With over 1,200 large language models (LLMs) available, the challenge in generative AI lies in selecting the right model. Amazon Bedrock simplifies this by offering a single, managed API that provides access to top foundation models (FMs) like Meta’s Llama 3.2 for language processing, Mistral 8B for text handling, and Anthropic’s Claude 3.5 Sonnet for robust content generation.
Integrating Amazon Bedrock with TinyMCE’s AI Assistant allows you to add intelligent content assistance directly into your editor, giving users access to features like customizable prompts and an intuitive, familiar UI. This guide covers setting up your environment with Vite, configuring TinyMCE, and enabling Amazon Bedrock’s AI capabilities in your rich text editor.
Prerequisites
Before starting the integration, ensure you have the following:
- AWS Account: An active AWS account with access to Amazon Bedrock services.
- API Credentials: AWS credentials with Bedrock permissions.
- Node.js and NPM: A working environment with Node.js and npm installed.
- TinyMCE API Key: An active TinyMCE instance with a TinyMCE AI Assistant subscription.
Set up your Vite project
Create a new Vite project with vanilla JavaScript as the template:
npm create vite@latest tinymce-aws-bedrock-demo -- --template vanilla
cd tinymce-aws-bedrock-demoSave your TinyMCE API key in a .env file so it can be injected into the project without exposing the key in your html file. Add the following to your .env file in the project’s root:
VITE_TINYMCE_API_KEY = your_real_tinymce_api_key;
Since import.meta.env can’t be directly accessed in HTML, add a placeholder script in index.html and use JavaScript to inject the TinyMCE script URL with the API key. Update index.html as follows:
<!DOCTYPE html>
<html lang="en">
<head>
  <meta charset="UTF-8" />
  <meta name="viewport" content="width=device-width, initial-scale=1.0" />
  <title>TinyMCE and Amazon Bedrock Integration</title>

  <!-- Placeholder for TinyMCE Script -->
  <script id="tinymce-script-placeholder"></script>
</head>
<body>
  <div class="container">
    <textarea></textarea>
  </div>
  <script type="module" src="main.js"></script>
</body>
</html>Next in main.js, replace the placeholder with the TinyMCE script URL using the API key from import.meta.env:
// Get the API key from the environment variable
const apiKey = import.meta.env.VITE_TINYMCE_API_KEY;

// Construct the TinyMCE script URL
const scriptURL = `<a href="https://cdn.tiny.cloud/1/$">https://cdn.tiny.cloud/1/$</a>{apiKey}/tinymce/7/tinymce.min.js`;

// Find the placeholder in the head and replace it with the actual script
const placeholder = document.getElementById("tinymce-script-placeholder");
const script = document.createElement("script");
script.src = scriptURL;
script.referrerPolicy = "origin";

// Replace the placeholder with the actual TinyMCE script
placeholder.replaceWith(script);

// Initialize TinyMCE after it loads
script.onload = () => {
  tinymce.init({
    selector: "textarea",
    width: "1000px",
    height: "500px",
    plugins:
      "anchor autolink charmap codesample emoticons image link lists media searchreplace table visualblocks wordcount",
    toolbar:
      "undo redo | blocks fontfamily fontsize | bold italic underline strikethrough | link image media table | align lineheight | numlist bullist indent outdent | emoticons charmap | removeformat",
  });
};
Finally, start the Vite development server to load your setup:
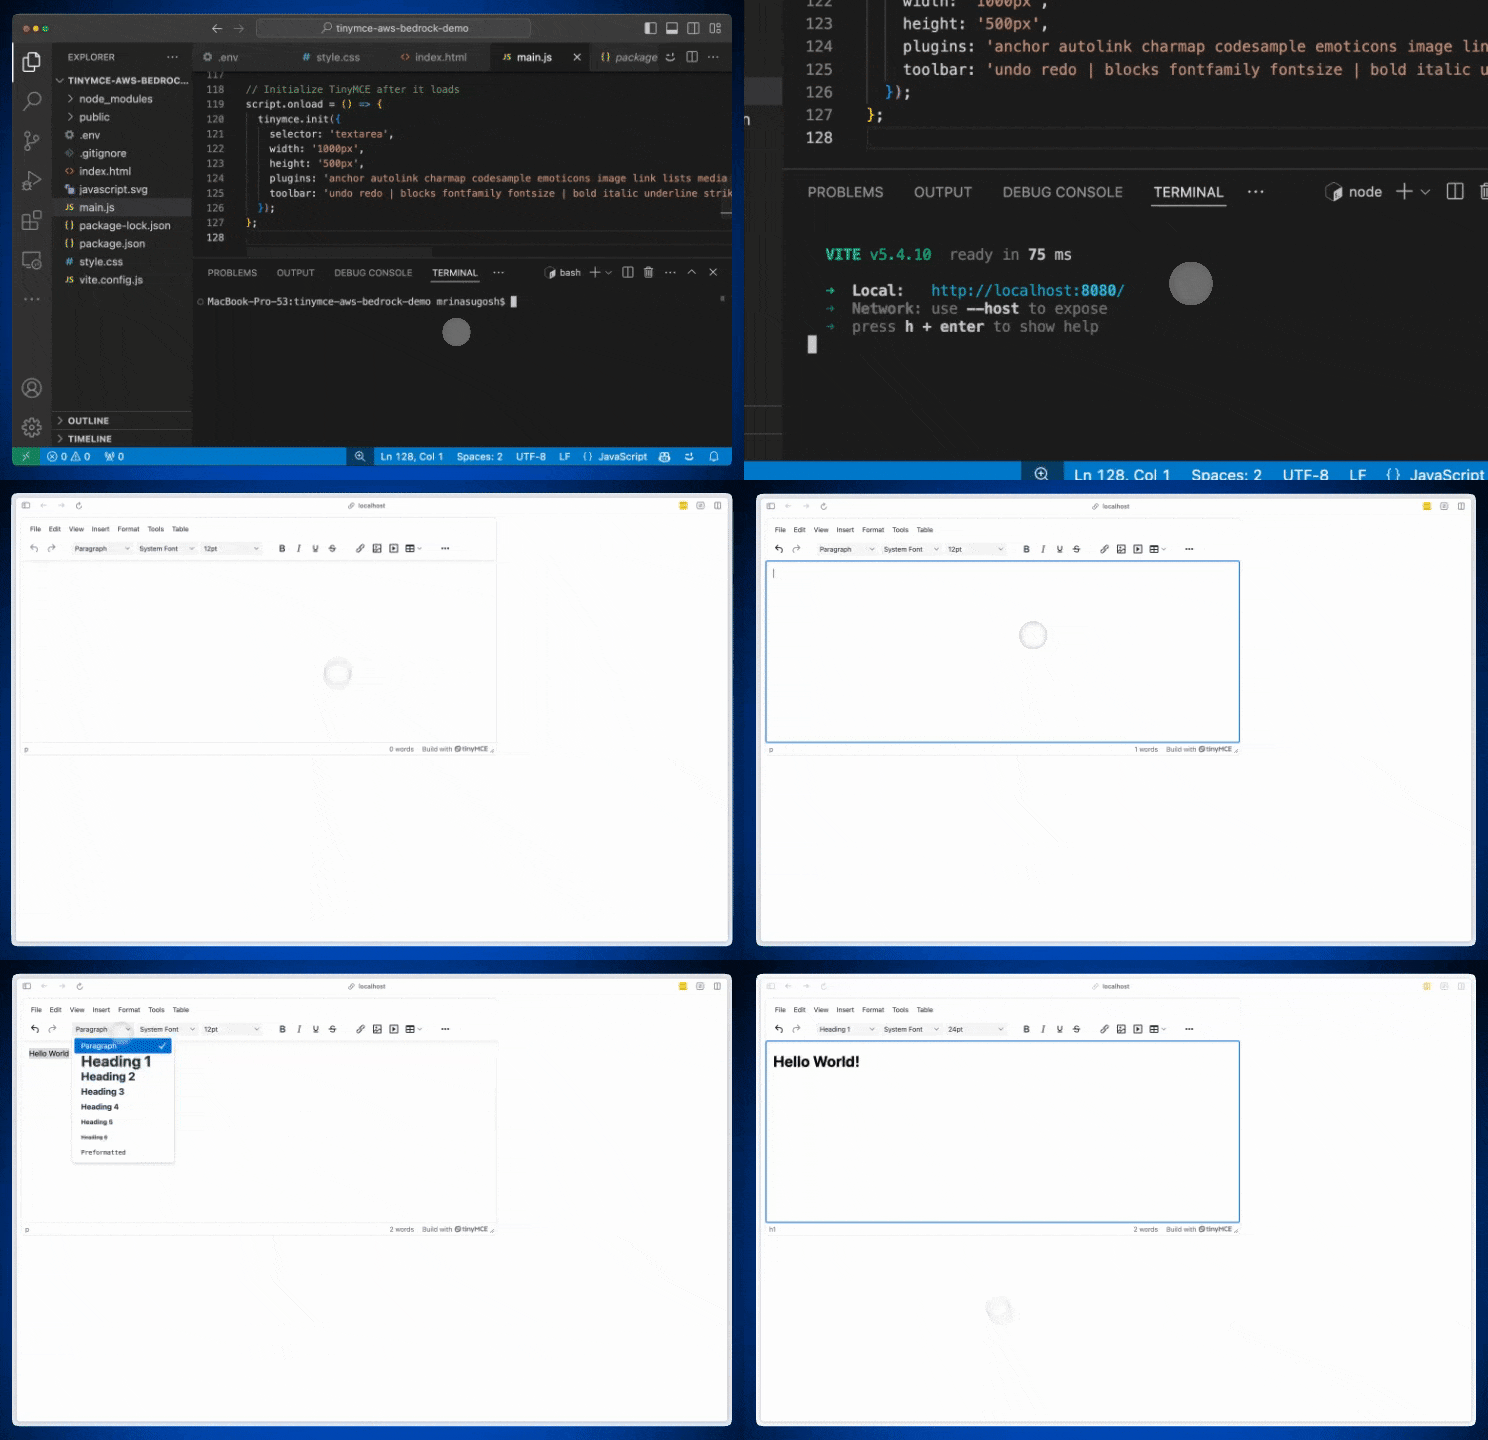
npm run devThis setup should initialize the TinyMCE editor with your configured toolbar and plugins, ready for use in your application similar to the screenshot below in localhost:8080

Install the AWS SDK for Bedrock
In this guide, we’ll use Node.js and the AWS SDK for JavaScript through the @aws-sdk/client-bedrock-runtime package to interact with the Amazon Bedrock API, but you can use any development environment that supports the AWS SDKs.
To connect TinyMCE’s AI Assistant with Amazon Bedrock, start by installing the AWS SDK for JavaScript in your project:
npm install @aws-sdk/client-bedrock-runtimeThis SDK allows TinyMCE to communicate with Bedrock’s models, enabling real-time responses directly within your editor.
Setup TinyMCE’s AI Assistant plugin
Configure this with the TinyMCE AI Amazon Bedrock integration guide by enabling the ai plugin and defining the ai_request function to handle streaming responses. Add aidialog and aishortcuts to the toolbar to allow user interaction with the AI features.
tinymce.init({
  selector: "textarea",
  width: "1000px",
  height: "500px",
  plugins:
    "ai anchor autolink charmap codesample emoticons image link lists media searchreplace table visualblocks wordcount",
  toolbar:
    "aidialog aishortcuts | undo redo | blocks fontfamily fontsize | bold italic underline strikethrough | link image media table | align lineheight | numlist bullist indent outdent | emoticons charmap | removeformat",
  ai_request,
});
This setup enables TinyMCE to connect with Amazon Bedrock’s AI capabilities, allowing users to interact with the AI Assistant directly within the editor.
Setting up AWS Bedrock API
Next we need to configure API calls to AWS Bedrock which means we will need API Keys. To use Amazon Bedrock with TinyMCE, you'll first need to set up your AWS environment:
- Create IAM User: In the AWS Management Console, create an IAM user with permissions to access Amazon Bedrock. Attach the necessary policies, such as AmazonBedrockFullAccess, to the user.
- Generate API Keys: Obtain the access key ID and secret access key for your IAM user. These credentials will be used to authenticate your application with Amazon Bedrock.
- Configuring Bedrock: Navigate to the Amazon Bedrock console and configure the models you intend to use. For instance, you might choose models optimized for text generation like Mistral’s LLMs or summarization like Anthropic’s Claude LLMs.
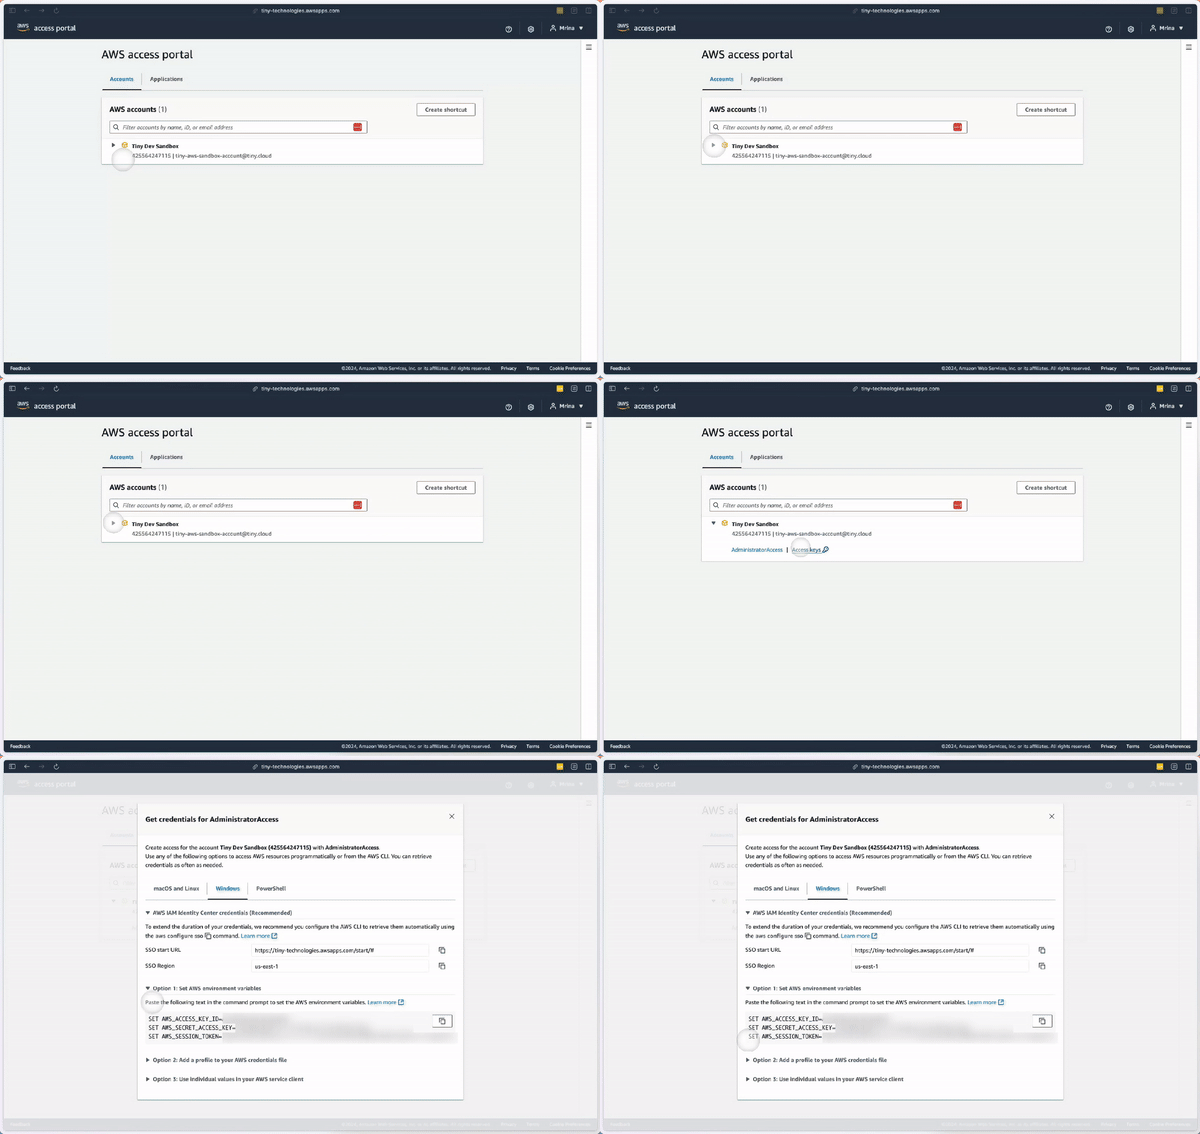
After setup, your configuration should look like this, with all the necessary information for setup, including region, AWS_ACCESS_KEY_ID, AWS_SECRET_ACCESS_KEY, AWS_SESSION_TOKEN :

Securely configure AWS credentials
To keep your integration secure, save your credentials in a .env file rather than embedding them directly in your code. Label each variable with a VITE_ prefix for compatibility with Vite.
In your .env file:
VITE_AWS_ACCESS_KEY_ID = <YOUR_ACCESS_KEY_ID>
VITE_AWS_SECRET_ACCESS_KEY = <YOUR_SECRET_ACCESS_KEY>
VITE_AWS_SESSION_TOKEN = <YOUR_SESSION_TOKEN>
VITE_TINYMCE_API_KEY = <YOUR_TINYMCE_API_KEY>With these environment variables, you can securely load your credentials without exposing them directly in your code.
Define the ai_request function
Now that we have our credentials, Amazon Bedrock offers two methods for interacting with its API: a single string response using the InvokeModel command, or a streaming response with InvokeModelWithResponseStream. For this integration, we’re using a streaming response, which makes it easy to enable real-time interaction within the TinyMCE editor.
The ai_request function in this TinyMCE configuration is designed to use Amazon Bedrock's AI capabilities for tasks such as text generation, summarization, and translation with a single model ID. While the model ID remains the same, the systemMessages parameter provides additional instructions that guide the AI’s response formatting and behavior. These system messages enhance the prompt by adding specific instructions tailored to the task at hand, helping to ensure the AI output is aligned with the intended application.
Import required AWS SDK components
Let’s begin with the main.js: Start by importing the required AWS SDK components for interacting with Amazon Bedrock.
import {
  BedrockRuntimeClient,
  InvokeModelWithResponseStreamCommand,
} from "@aws-sdk/client-bedrock-runtime";
Configure AWS credentials
For development purposes, you can use hard-coded AWS credentials, but it’s strongly recommended to use environment variables in production to keep credentials secure.
Define the AWS credentials in main.js:
const AWS_ACCESS_KEY_ID = import.meta.env.VITE_AWS_ACCESS_KEY_ID;
const AWS_SECRET_ACCESS_KEY = import.meta.env.VITE_AWS_SECRET_ACCESS_KEY;
const AWS_SESSION_TOKEN = import.meta.env.VITE_AWS_SESSION_TOKEN;
Then, set up the Bedrock client configuration:
const config = {
  region: "us-east-1",
  credentials: {
    accessKeyId: AWS_ACCESS_KEY_ID,
    secretAccessKey: AWS_SECRET_ACCESS_KEY,
    sessionToken: AWS_SESSION_TOKEN,
  },
};
const client = new BedrockRuntimeClient(config);
Build the AI request function
// AI request function
const ai_request = (request, respondWith) => {
  // Build conversation thread for context
  const conversation = request.thread.flatMap((event) => {
    if (event.response) {
      return [
        { role: "user", content: event.request.query },
        { role: "assistant", content: event.response.data },
      ];
    }
    return [];
  });

  // Define system messages
  const pluginSystemMessages = request.system.map((text) => ({ text }));
  const systemMessages = [
    ...pluginSystemMessages,
    { text: "Do not include html``` at the start or ``` at the end." },
    { text: "No explanation or boilerplate, just give the HTML response." },
  ];
  const system = systemMessages.map((message) => message.text).join("\n");

  // Structure prompt for AI model
  const text =
    request.context.length === 0 || conversation.length > 0
      ? request.query
      : `Question: ${request.query} Context: """${request.context}"""`;
  const messages = [...conversation, { role: "user", content: text }];

  // Configure payload and input
  const payload = {
    anthropic_version: "bedrock-2023-05-31",
    max_tokens: 1000,
    system,
    messages,
  };

  const input = {
    body: JSON.stringify(payload),
    contentType: "application/json",
    accept: "application/json",
    modelId: "anthropic.claude-3-haiku-20240307-v1:0",
  };

  // Stream response to TinyMCE
  respondWith.stream(async (_signal, streamMessage) => {
    const command = new InvokeModelWithResponseStreamCommand(input);
    const response = await client.send(command);
    for await (const item of response.body) {
      const chunk = JSON.parse(new TextDecoder().decode(item.chunk.bytes));
      if (chunk.type === "content_block_delta") {
        streamMessage(chunk.delta.text); // Send each text chunk to TinyMCE
      }
    }
  });
};
This setup enables real-time, AI-driven responses in TinyMCE using Amazon Bedrock’s streaming API. By structuring prompts with system messages and conversation threads, you can ensure that responses align closely with your application’s needs.
Test and debug your Amazon Bedrock integration
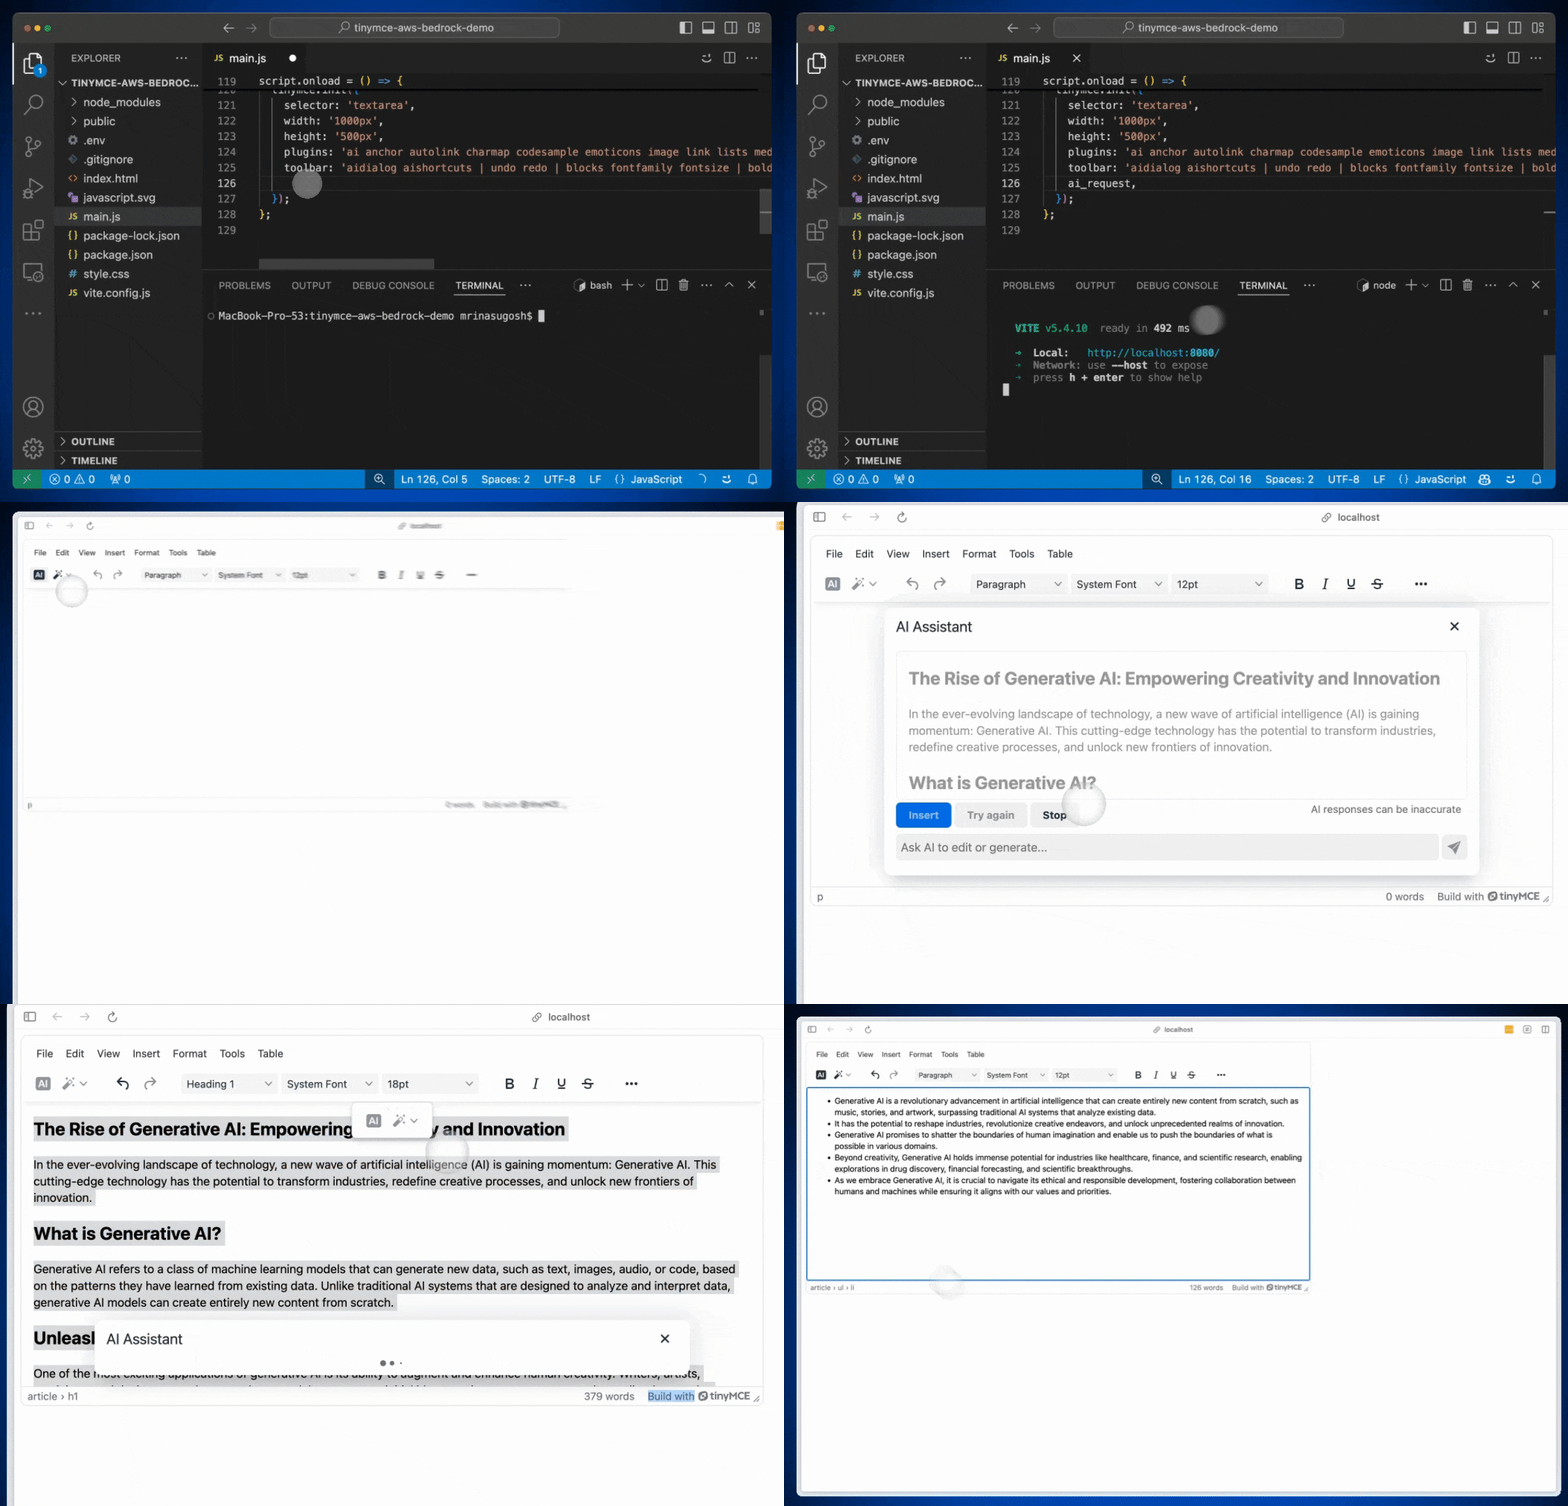
Save your changes and reload the app to test the AI Assistant plugin with Amazon Bedrock.
npm run devThat’s it! You’ve successfully added Amazon Bedrock to your rich text editor:

Amazon Bedrock integration into TinyMCE’s AI Assistant brings powerful, task-specific capabilities directly into a familiar rich text editing environment. With Bedrock’s flexible API and TinyMCE’s customizable prompts, users can enjoy an intuitive experience for tasks like language processing, summarization, and multilingual support—all enhancing content creation without the need for complex processes.
This setup provides a solid foundation for leveraging advanced AI from Amazon Bedrock while keeping your RTE secure, efficient, and aligned with user needs. To learn more about how your users can take advantage of an AI Assistant inside a rich text editor, check out How to Use AI Prompts for Content Creation in TinyMCE.
