This summer at Frontend Nation, we hosted an interactive workshop where we guided participants through building a fully-featured LMS editor with TinyMCE, React Integration, and OpenAI integration. During our workshop we covered everything from setting up TinyMCE in a React environment to integrating core plugins, formatting tools, and adding powerful AI capabilities with OpenAI.
Now this workshop is available via video and this guide, so you can follow along and enhance your own web applications with these advanced text editing and AI tools. Watch the whole workshop below or continue reading for a step-by-step walkthrough!
Before you get started, here are the prerequisites you'll need:
- Clone the TinyMCE Github Boilerplate Code: Make sure you clone the starter boilerplate from our repository to get up and running quickly.
- A free API key via a TinyMCE Cloud Account: You'll need a TinyMCE API key, which you can obtain by signing up for a free TinyMCE account.
- OpenAI API Account: Sign up for a free OpenAI account and get an API key to enable AI-powered features.
Step 1: Setting Up TinyMCE in Your React Project
We’ll start by integrating TinyMCE, the WYSIWYG rich text editor, into the React project using the boilerplate code you've cloned from the repository. This will set up the foundation for our editor, which will be enhanced with additional features later.
Add TinyMCE to Your React App
First, we’ll add TinyMCE to the app. Create a new component named TinyEditor.jsx in the src/components directory, which will contain the TinyMCE editor integration.
// src/components/TinyEditor.jsx
import { useRef } from "react";
import "./TinyEditor.css"; // For potential future styling
import { Editor } from "@tinymce/tinymce-react";

export default function TinyEditor() {
  const editorRef = useRef(null);

  return (
    <Editor
      apiKey="TINY_MCE_API_KEY" // Replace with your TinyMCE API key
      onInit={(_evt, editor) => (editorRef.current = editor)}
      init={{
        plugins:
          "anchor autolink charmap codesample emoticons image link lists media table visualblocks wordcount linkchecker",
        toolbar:
          "undo redo | blocks fontfamily fontsize | bold italic underline strikethrough | link image media table | align lineheight | numlist bullist indent outdent | emoticons charmap | removeformat",
      }}
      initialValue="Welcome to TinyMCE!"
    />
  );
}
Note: Make sure to replace 'TINY_MCE_API_KEY' with your TinyMCE API key, which you can get by signing up for a free key at TinyMCE.
Integrate the Editor into Your Application
Next, integrate the TinyEditor component into your main application by updating the App.jsx file to include the editor in the layout.
// src/App.jsx
import TinyEditor from "./components/TinyEditor";

export default function App() {
  return (
    <div className="app">
      <h1>LMS Rich Text Editor</h1>
      <TinyEditor />
    </div>
  );
}
Run the Application
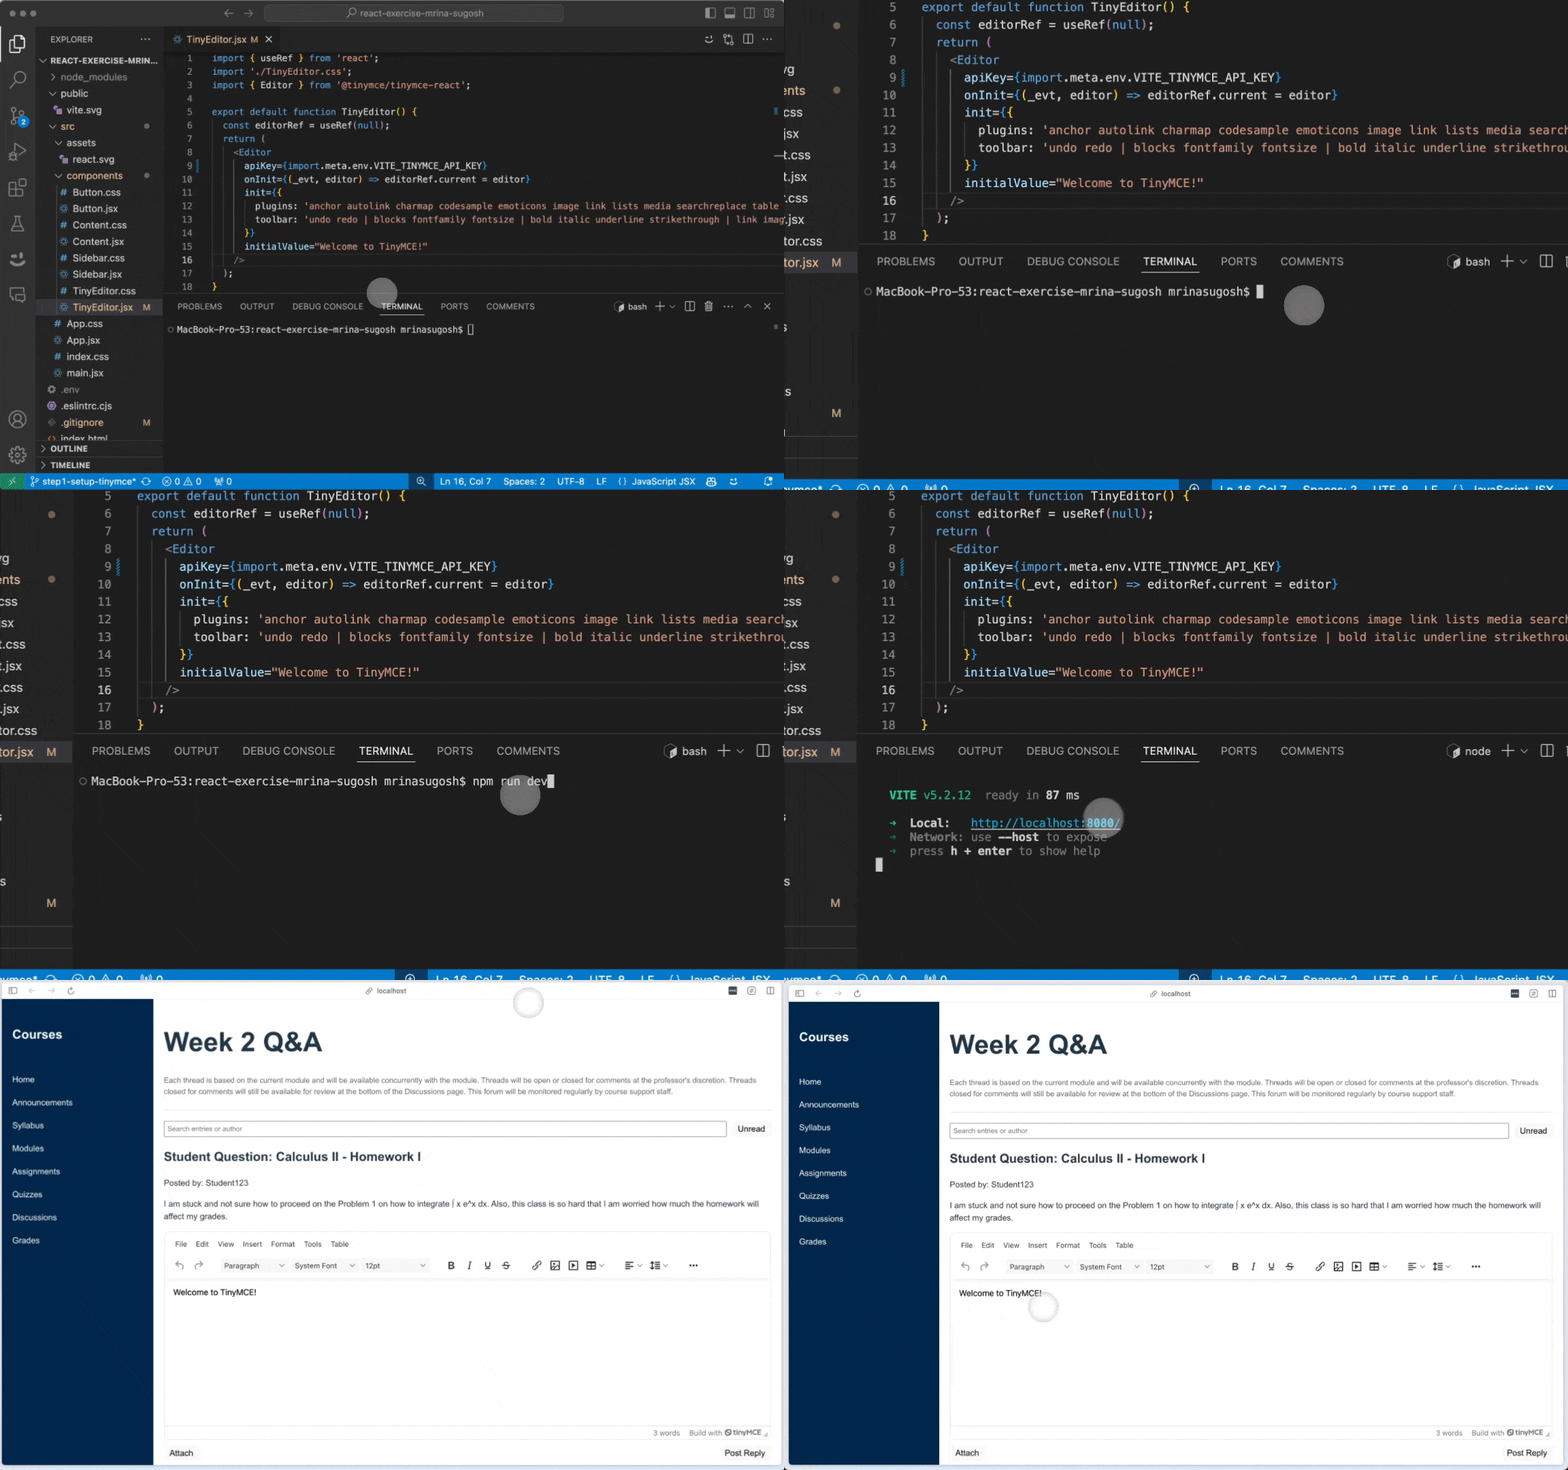
Now that TinyMCE is set up in your React app, start the development server to see the editor in action. Run the following command inside your project folder:
npm run dev
Once the server starts, you’ll see the TinyMCE editor integrated into your React app, ready for further enhancements.
Step 2: Core Editing - Adding Core Plugins
In this step, we’ll enhance the TinyMCE editor by adding core plugins that introduce advanced rich text editing capabilities. These plugins are crucial for creating a robust LMS editor that offers users a comprehensive set of tools to manage and format content efficiently.
Whether it’s for code snippets, image editing, or handling mathematical equations, these features are vital in an LMS environment where educators and students need to create high-quality, structured content.
Update the Editor Configuration
To unlock our advanced editing features, we’ll configure TinyMCE with a set of core plugins.
Here's the updated TinyEditor.jsx file reflecting these changes:
// src/components/TinyEditor.jsx
import { useRef } from "react";
import "./TinyEditor.css"; // For potential styling
import { Editor } from "@tinymce/tinymce-react";

export default function TinyEditor() {
  const editorRef = useRef(null);

  return (
    <Editor
      apiKey="TINY_MCE_API_KEY" // Replace with your TinyMCE API key
      onInit={(_evt, editor) => (editorRef.current = editor)}
      init={{
        plugins:
          "advcode code image editimage fullscreen preview wordcount math",
        toolbar:
          "undo redo blocks | bold italic underline | strikethrough forecolor backcolor align subscript superscript | charmap blockquote | code fullscreen preview | image math",
      }}
      initialValue="Welcome to TinyMCE!"
    />
  );
}
Core Plugins Breakdown
- advcode & code: These plugins enable code editing with syntax highlighting, perfect for LMS environments that involve coding exercises or technical content.
- image & editimage: Easily upload and edit images directly in the editor, ideal for enhancing lessons or assignments with multimedia.
- fullscreen: Full-screen mode allows users to focus on content creation, especially useful for long-form writing or detailed lessons.
- preview: Preview content before publishing to ensure proper formatting and presentation, essential for educators.
- wordcount: Displays word count, helping track content length for assignments with word limits.
- math: Quickly insert mathematical equations, a critical feature for STEM-related content in LMS applications.
Updated Toolbar
This toolbar includes formatting tools like bold, italic, underline, alignment, and blockquotes for basic composition. In this guide we’ve also added advanced options for code editing, full-screen mode, content preview, image insertion, and math equation support.
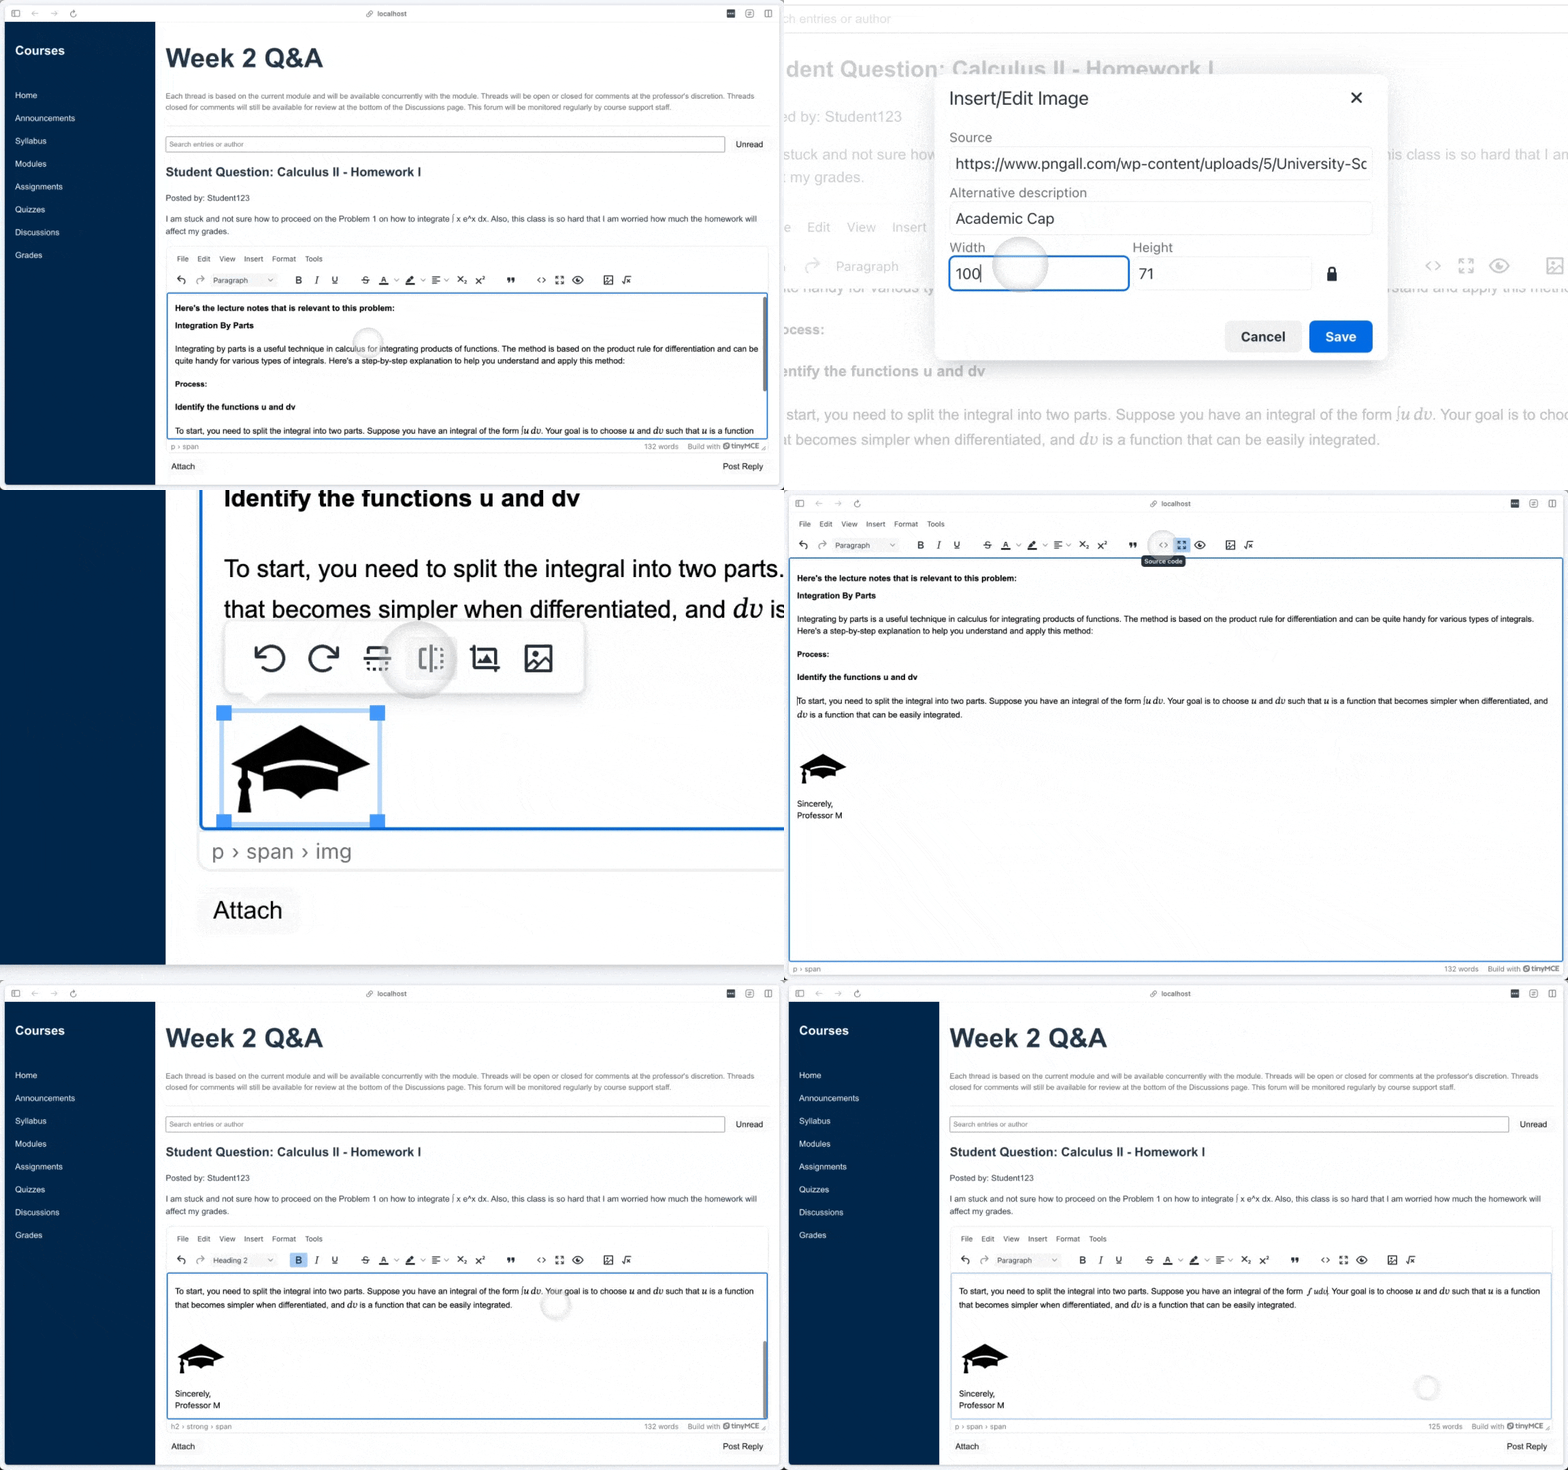
With these core plugins integrated, your TinyMCE editor is a fully-featured tool capable of supporting a wide range of educational content creation tasks. Whether it's writing assignments, coding exercises, or embedding images and equations, these core plugins ensure that both instructors and students can work efficiently within your LMS.
Step 3: Advanced Text Formatting
In the next step we’ll expand the capabilities of the TinyMCE editor by integrating plugins that enhance text formatting and content management. These plugins give users greater control over how they organize and format their content, which is especially important in an LMS where structured and polished content is essential.
Here’s the updated TinyEditor.jsx configuration with the new formatting plugins:
// src/components/TinyEditor.jsx
import { useRef } from "react";
import "./TinyEditor.css"; // For potential styling
import { Editor } from "@tinymce/tinymce-react";

export default function TinyEditor() {
  const editorRef = useRef(null);

  return (
    <Editor
      apiKey="TINY_MCE_API_KEY" // Replace with your TinyMCE API key
      onInit={(_evt, editor) => (editorRef.current = editor)}
      init={{
        plugins:
          "advcode code image editimage fullscreen preview wordcount math linkchecker lists markdown powerpaste typography",
        toolbar:
          "undo redo blocks | bold italic underline | strikethrough forecolor backcolor align subscript superscript | bullist numlist | typography charmap blockquote | code fullscreen preview | image math",
      }}
      initialValue="Welcome to TinyMCE!"
    />
  );
}
New Plugins Added:
- linkchecker: Ensures URLs are valid, maintaining content quality.
- lists: Adds support for numbered and bulleted lists, enhancing content structure.
- markdown: Converts Markdown syntax to formatted text for tech-savvy users.
- powerpaste: Preserves formatting when pasting from external sources like Word documents.
- typography: Automatically corrects common typography issues, ensuring polished content.
Now the toolbar includes essential formatting tools (bold, italic, underline, text color), alignment, lists, blockquotes, code editing, and options for previewing content or switching to full-screen mode for focused writing.
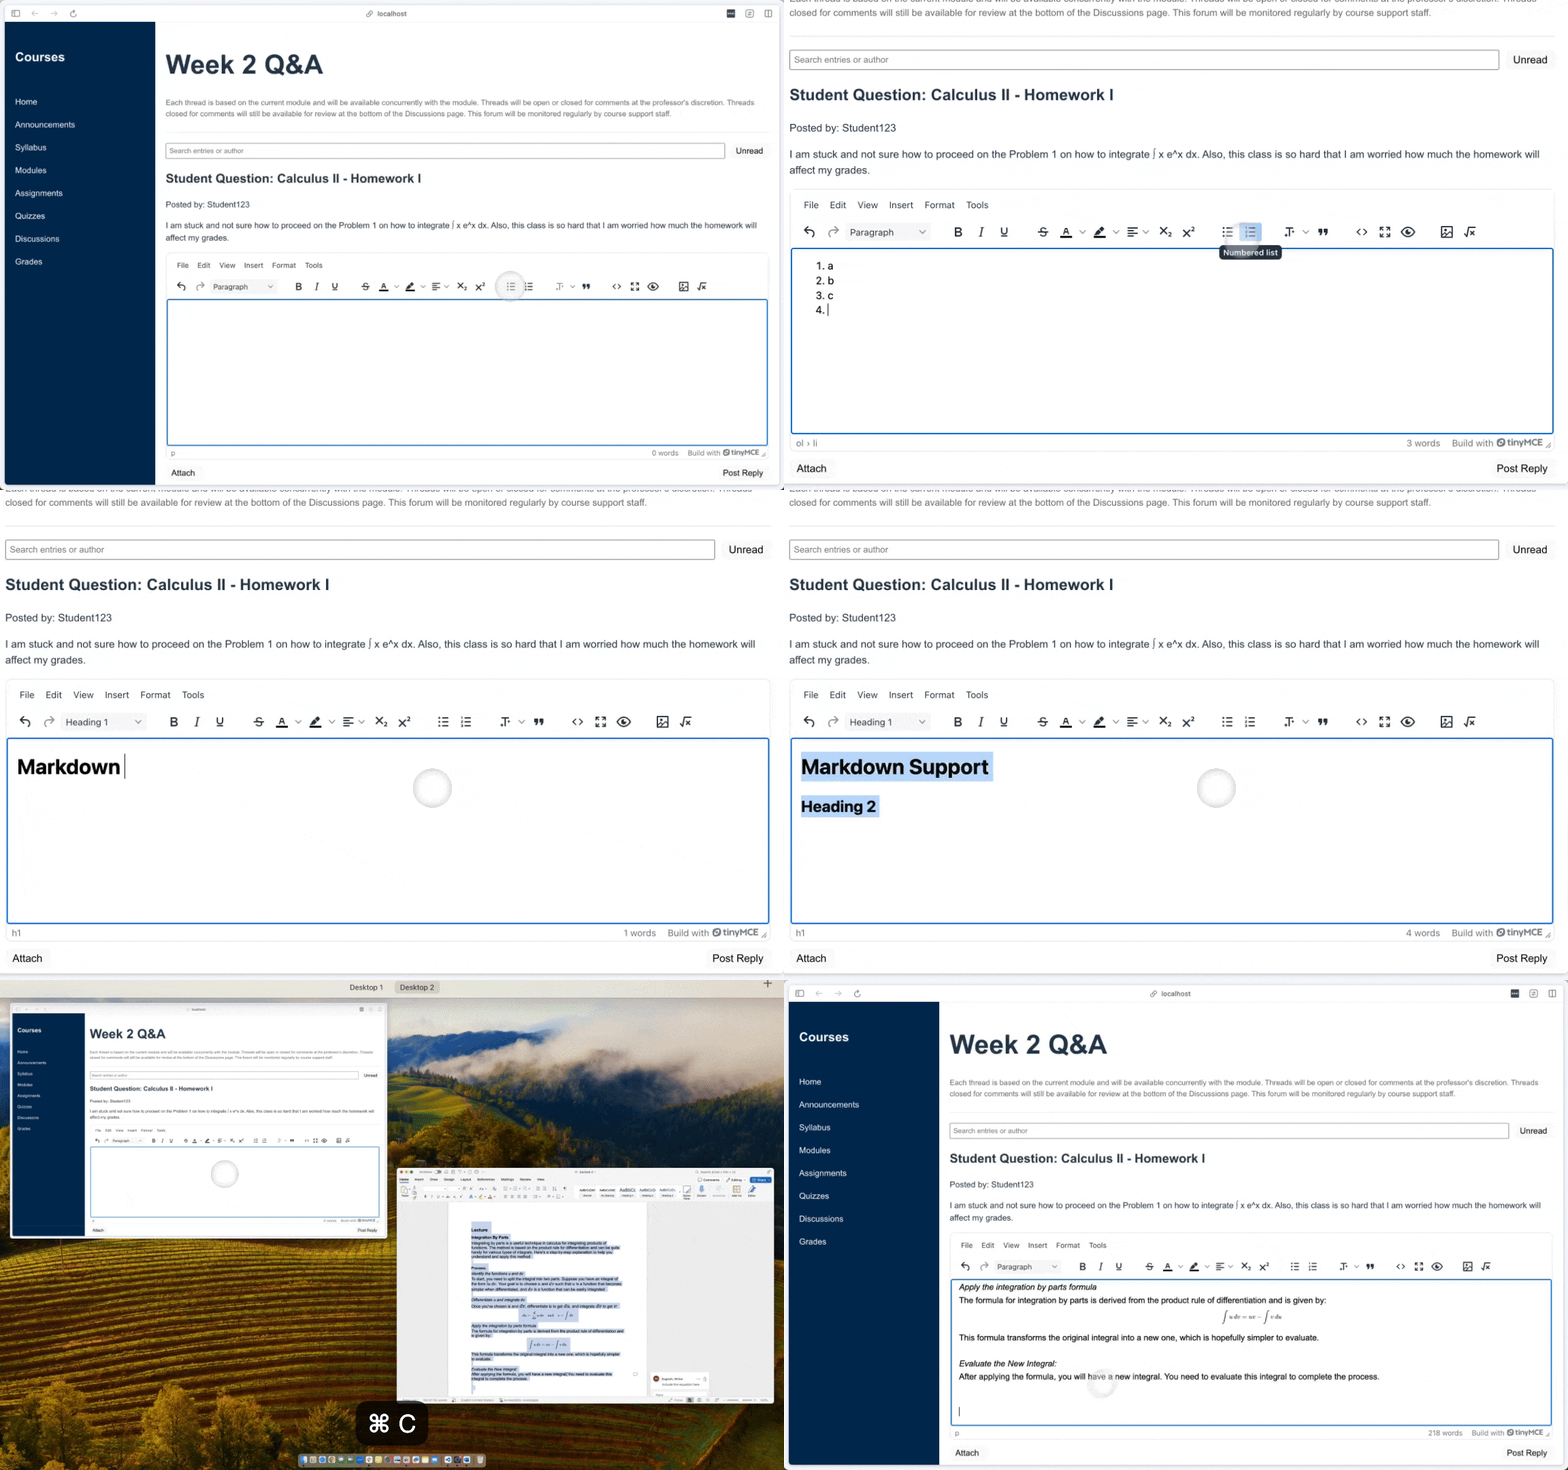
This makes it intuitive for users to create professional, structured content in an LMS environment. Educators can now efficiently format their work to ensure a polished and organized presentation of course materials, assignments, and exams.
Step 4: Content Insertion - Adding Plugins to Help with Content
Now let’s expand the content creation capabilities of the TinyMCE editor by integrating plugins that allow abilities like embedding media, tables, footnotes, and merge tags. These additions make the editor ideal for creating rich, dynamic content, especially useful in LMS applications where multimedia and structured content are essential.
Here’s the updated code for adding content-related plugins:
// src/components/TinyEditor.jsx
import { useRef } from "react";
import "./TinyEditor.css"; // For potential styling
import { Editor } from "@tinymce/tinymce-react";

export default function TinyEditor() {
  const editorRef = useRef(null);

  return (
    <Editor
      apiKey="TINYMCE_API_KEY" // Replace with your TinyMCE API key
      onInit={(_evt, editor) => (editorRef.current = editor)}
      init={{
        plugins:
          "advcode code editimage fullscreen preview wordcount math linkchecker lists markdown powerpaste typography charmap checklist emoticons footnotes image link media mediaembed mergetags table tableofcontents",
        toolbar:
          "undo redo blocks | bold italic underline | strikethrough forecolor backcolor align subscript superscript | bullist numlist checklist link | typography charmap blockquote | image media math | footnotes mergetags table charmap emoticons | code fullscreen preview",
      }}
      initialValue="Welcome to TinyMCE!"
    />
  );
}
New Plugins Added:
- checklist: Enables interactive checklists, ideal for tasks or assignment tracking.
- emoticons: Adds emoticons for better expression, enhancing engagement in content.
- footnotes: Allows users to insert academic-style footnotes, essential for educational content.
- image & media: Supports embedding of images, videos, and audio, making lessons more dynamic.
- mergetags: Facilitates personalized content generation through custom merge tags.
- table & tableofcontents: Provides table management and automated generation of a table of contents for structured content.
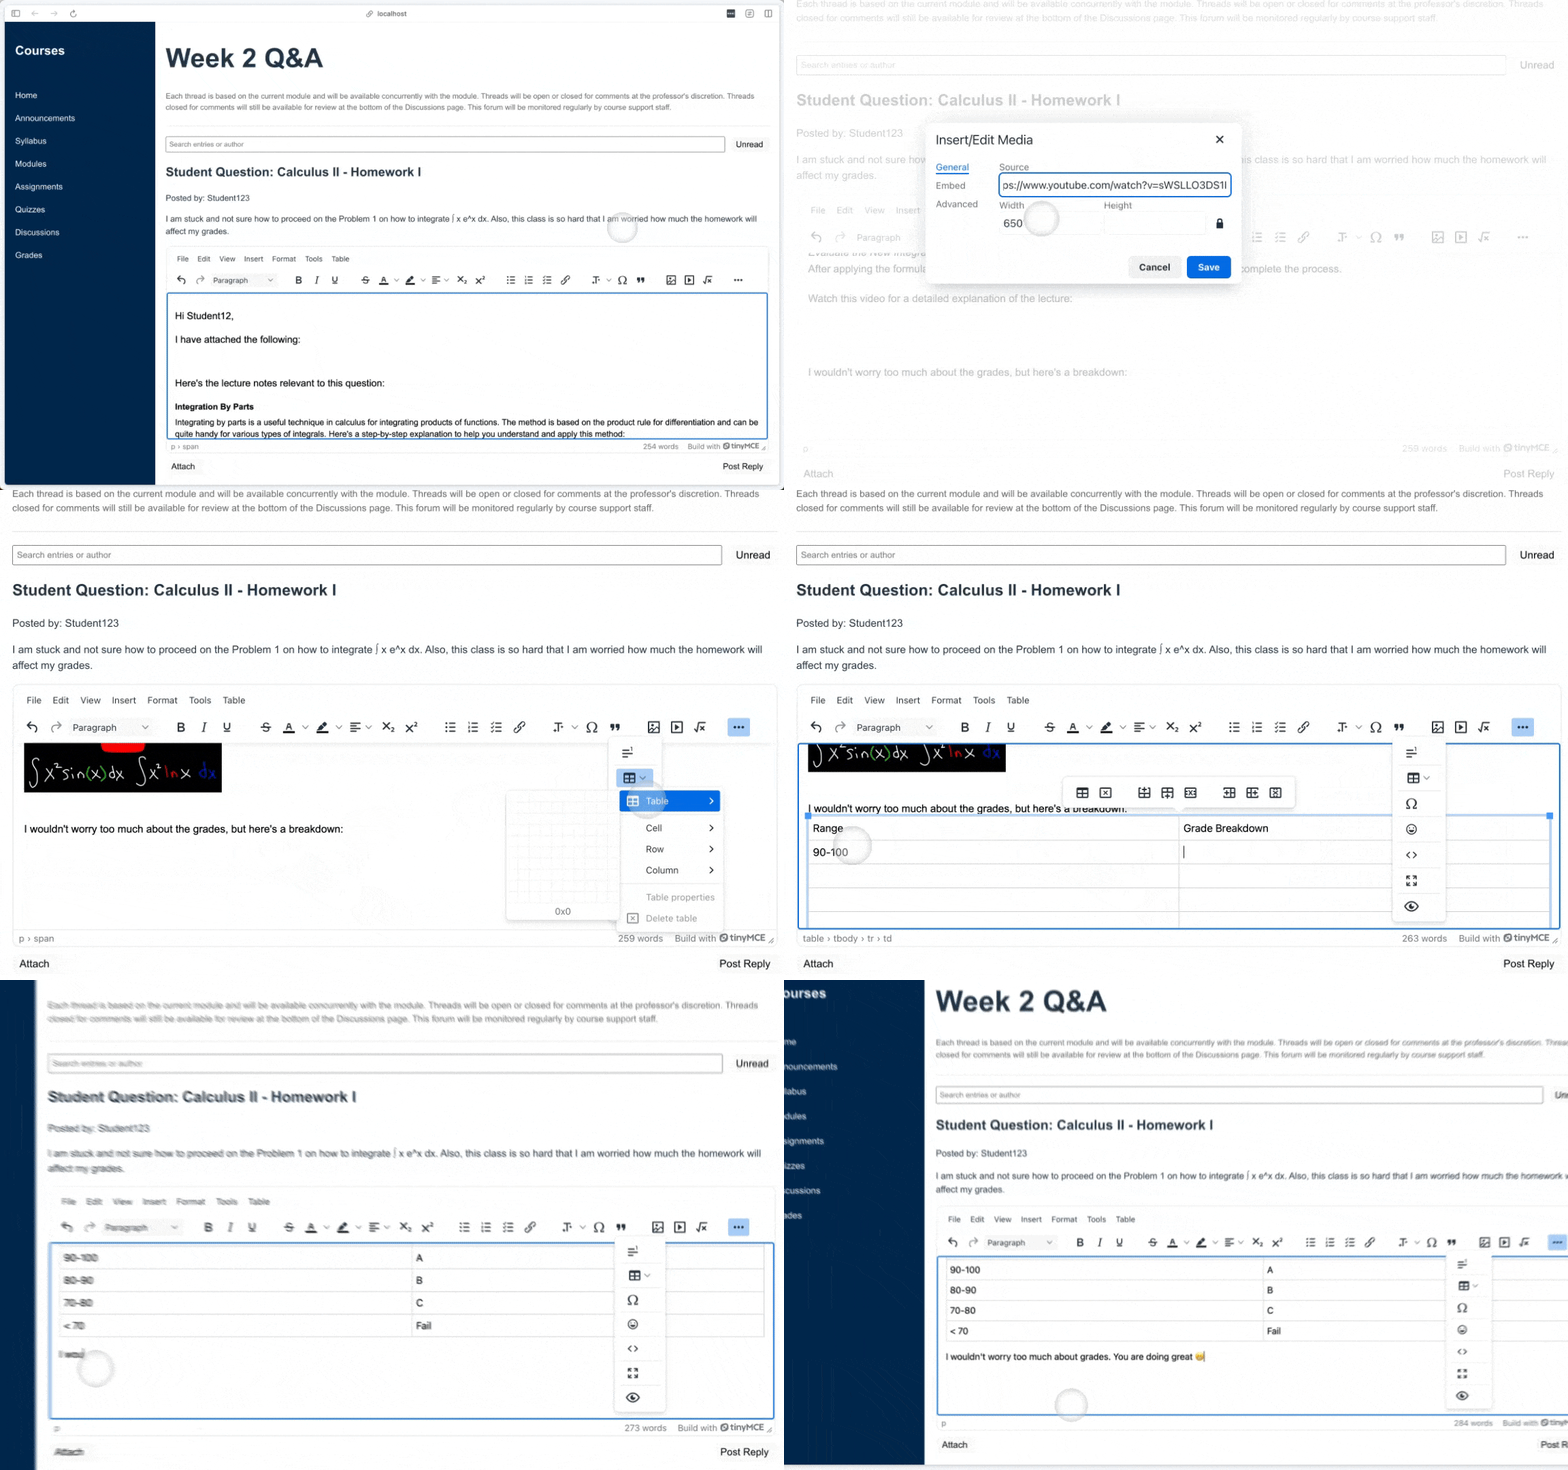
The toolbar now includes:
- Content embedding: Easily insert images, media, footnotes, and emoticons.
- Content management: Use checklists, merge tags, and table insertion.
- Formatting and layout: Control text alignment, list formatting, and blockquotes.
Step 5: Adding Pre-Configured Content Templates
In this step, we’ll enhance the TinyMCE editor by adding pre-configured content templates using the advtemplate plugin. These templates allow users to quickly insert structured content such as homework responses, exam preparation notes, or class assistance messages—perfect for an LMS environment where instructors need to reuse consistent messaging.
Define Custom Templates
We start by creating an array called advtemplate_templates to store predefined content templates. These templates use placeholders like {{Student.FirstName}} and {{Professor.FirstName}}, allowing dynamic content insertion later on.
The templates are divided into three categories:
- Homework Help: Templates for responding to students’ homework queries.
- Exam Help: Templates to assist students with exam preparation.
- Class Help: Templates for offering support with class materials.
const advtemplate_templates = [
  {
    title: "Homework Help",
    items: [
      {
        title: "Homework Help General",
        content:
          '<p dir="ltr">Hey {{Student.FirstName}}!</p>\n<p dir="ltr"> I received your question regarding the homework problem. This is what you need to solve this:</p>\n<p dir="ltr">If you need further clarification, please refer to the lecture notes from last week, or feel free to ask me questions on the steps you are getting stuck at.</p>\n<p dir="ltr">Regards,</p><p dir="ltr">{{Professor.FirstName}}</p>',
      },
      {
        title: "Homework Help for Exam",
        content:
          '<p dir="ltr">Hello {{Student.FirstName}},</p><p dir="ltr">I understand you are preparing for the upcoming exam and have some questions about the topics we have covered. Here is a detailed explanation to help you understand better:</p><p dir="ltr">For more examples and detailed explanations, please review our class notes or the recommended textbook chapters. If you have further questions, do not hesitate to reach out or schedule a one-on-one session.</p><p dir="ltr">Good luck with your studies!</p><p dir="ltr">{{Professor.FirstName}} {{Professor.LastName}}</p>',
      },
    ],
  },
  {
    title: "Exam Help",
    items: [
      {
        title: "Follow Up on Exam Preparation",
        content:
          '<p dir="ltr">Hi {{Student.FirstName}},</p><p dir="ltr">I hope your exam preparation is going well. I wanted to follow up and see if you have any more questions or need further explanations on any of the topics we have discussed.</p><p dir="ltr">Remember, practicing past exam questions can be particularly helpful. Let me know if you need a list of practice questions or additional resources.</p><p dir="ltr">Do not hesitate to reach out. My goal is to ensure you feel confident and prepared for your exam.</p><p dir="ltr">Best regards,</p><p dir="ltr">{{Professor.FirstName}} {{Professor.LastName}}</p>',
      },
    ],
  },
  {
    title: "Class Help",
    items: [
      {
        title: "Assistance with Class Materials",
        content:
          '<p dir="ltr">Hello {{Student.FirstName}},</p><p dir="ltr">I have noticed you might need some extra help with the topics we have recently covered in class. Here is a brief overview to aid your understanding:</p><!-- Brief explanation of recent topics --><p dir="ltr">I strongly encourage you to attend our group study sessions every Thursday after class, where we can go over these topics in detail. Additionally, please consult the supplementary materials uploaded on the course website.</p><p dir="ltr">If you have any specific areas where you are struggling, please let me know, and we can arrange a one-on-one meeting to address them directly.</p><p dir="ltr">Looking forward to seeing you in class!</p><p dir="ltr">Best wishes,</p><p dir="ltr">{{Professor.FirstName}} {{Professor.LastName}}</p>',
      },
    ],
  },
];
Add the advtemplate Plugin and Configure Toolbar
Next, we’ll:
- Integrate the advtemplate plugin, which enables template functionality.
- Configure the toolbar to include an inserttemplate button, making it easy to insert templates
- Add the template option to the context menu for quick access via right-click
<Editor
  apiKey="TINYMCE_API_KEY" // Replace with your TinyMCE API key
  onInit={(_evt, editor) => (editorRef.current = editor)}
  init={{
    plugins:
      "advcode code editimage fullscreen preview wordcount math linkchecker lists markdown powerpaste typography charmap checklist emoticons footnotes image link media mediaembed mergetags table tableofcontents advtemplate",
    toolbar:
      "undo redo blocks | inserttemplate | bold italic underline | strikethrough forecolor backcolor align subscript superscript | bullist numlist checklist link | typography charmap blockquote | image media math | footnotes mergetags table charmap emoticons | code fullscreen preview",
    contextmenu: "advtemplate", // Add template option to context menu
    advtemplate_templates, // Attach the custom templates
  }}
  initialValue="Welcome to TinyMCE!"
/>;
Test the Editor
After setting up the editor, run your application and load the TinyMCE editor. You will see the "Insert Template" button in the toolbar. You can also right-click and insert templates via the context menu. When a template is selected it automatically inserts the predefined content into the editor, ready to be customized.
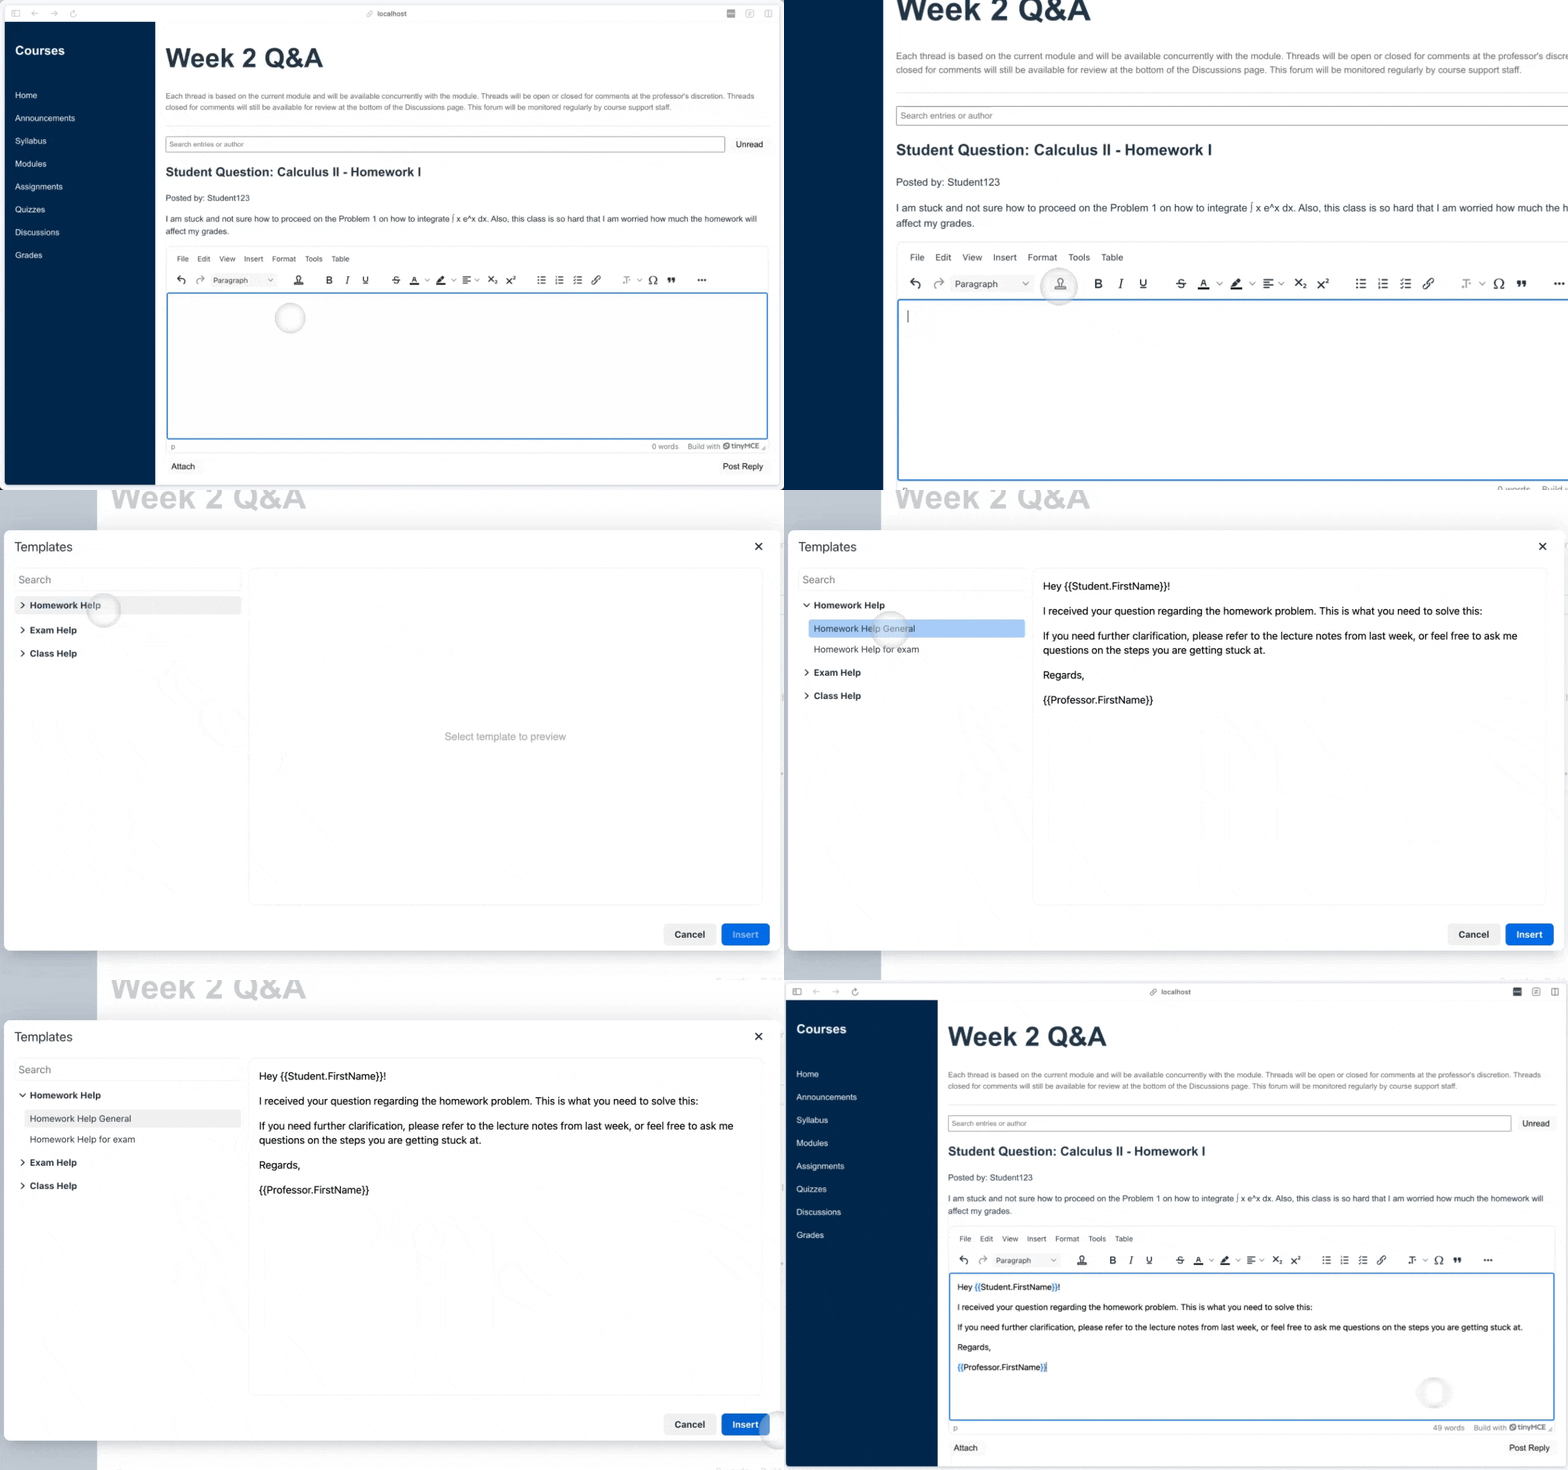
Now that you’ve added the advtemplate plugin and custom templates, your TinyMCE editor now offers quick content insertion through predefined layouts, making it particularly useful in LMS applications where instructors frequently reuse structured content to streamline communication and feedback.
Step 6: Document Converters – Import Word, Export Word, and Export PDF
In this step, we’ll add the capability to import and export documents in popular formats like Word and PDF so users can manage content in different formats for sharing, printing, or further editing. Document conversion is critical for educators and students who frequently handle assignments, reports, and resources in multiple formats.
Add Document Converter Plugins
Here’s the updated TinyMCE configuration to include these document converters:
<Editor
  apiKey="TINYMCE_API_KEY" // Replace with your TinyMCE API key
  onInit={(_evt, editor) => (editorRef.current = editor)}
  init={{
    plugins:
      "advcode code editimage fullscreen preview wordcount math linkchecker lists markdown powerpaste typography charmap checklist emoticons footnotes image link media mediaembed mergetags table tableofcontents advtemplate exportpdf exportword importword",
    toolbar:
      "exportpdf exportword importword | undo redo blocks | inserttemplate | bold italic underline | strikethrough forecolor backcolor align subscript superscript | bullist numlist checklist link  | typography charmap blockquote | image media math | footnotes mergetags table charmap emoticons | code fullscreen preview",
    contextmenu: "advtemplate",
    advtemplate_templates,
    exportpdf_service_url: EXPORT_PDF_SERVICE_URL, // Add your export PDF service URL
    exportword_service_url: EXPORT_WORD_SERVICE_URL, // Add your export Word service URL
    importword_service_url: IMPORT_WORD_SERVICE_URL, // Add your import Word service URL
  }}
  initialValue="Welcome to TinyMCE!"
/>;
Configure the Service URLs
To ensure the document conversion functions correctly, you need to configure the service URLs for the conversion features. These URLs point to the services that handle the actual conversion process.
- exportpdf_service_url: Points to the service responsible for converting TinyMCE content into PDF format.
- exportword_service_url: Used for exporting content as a Word document.
- importword_service_url: Handles importing Word documents into the TinyMCE editor.
You can contact TinyMCE support to obtain these service URLs.
Update the Toolbar
To make document import and export options easily accessible, we’ll update the toolbar to include the right buttons.
toolbar: 'exportpdf exportword importword | undo redo blocks | inserttemplate | bold italic underline | strikethrough forecolor backcolor align subscript superscript | bullist numlist checklist link | typography charmap blockquote | image media math | footnotes mergetags table charmap emoticons | code fullscreen preview',Test the Features
Once the configuration is complete, test the document import and export functionalities:
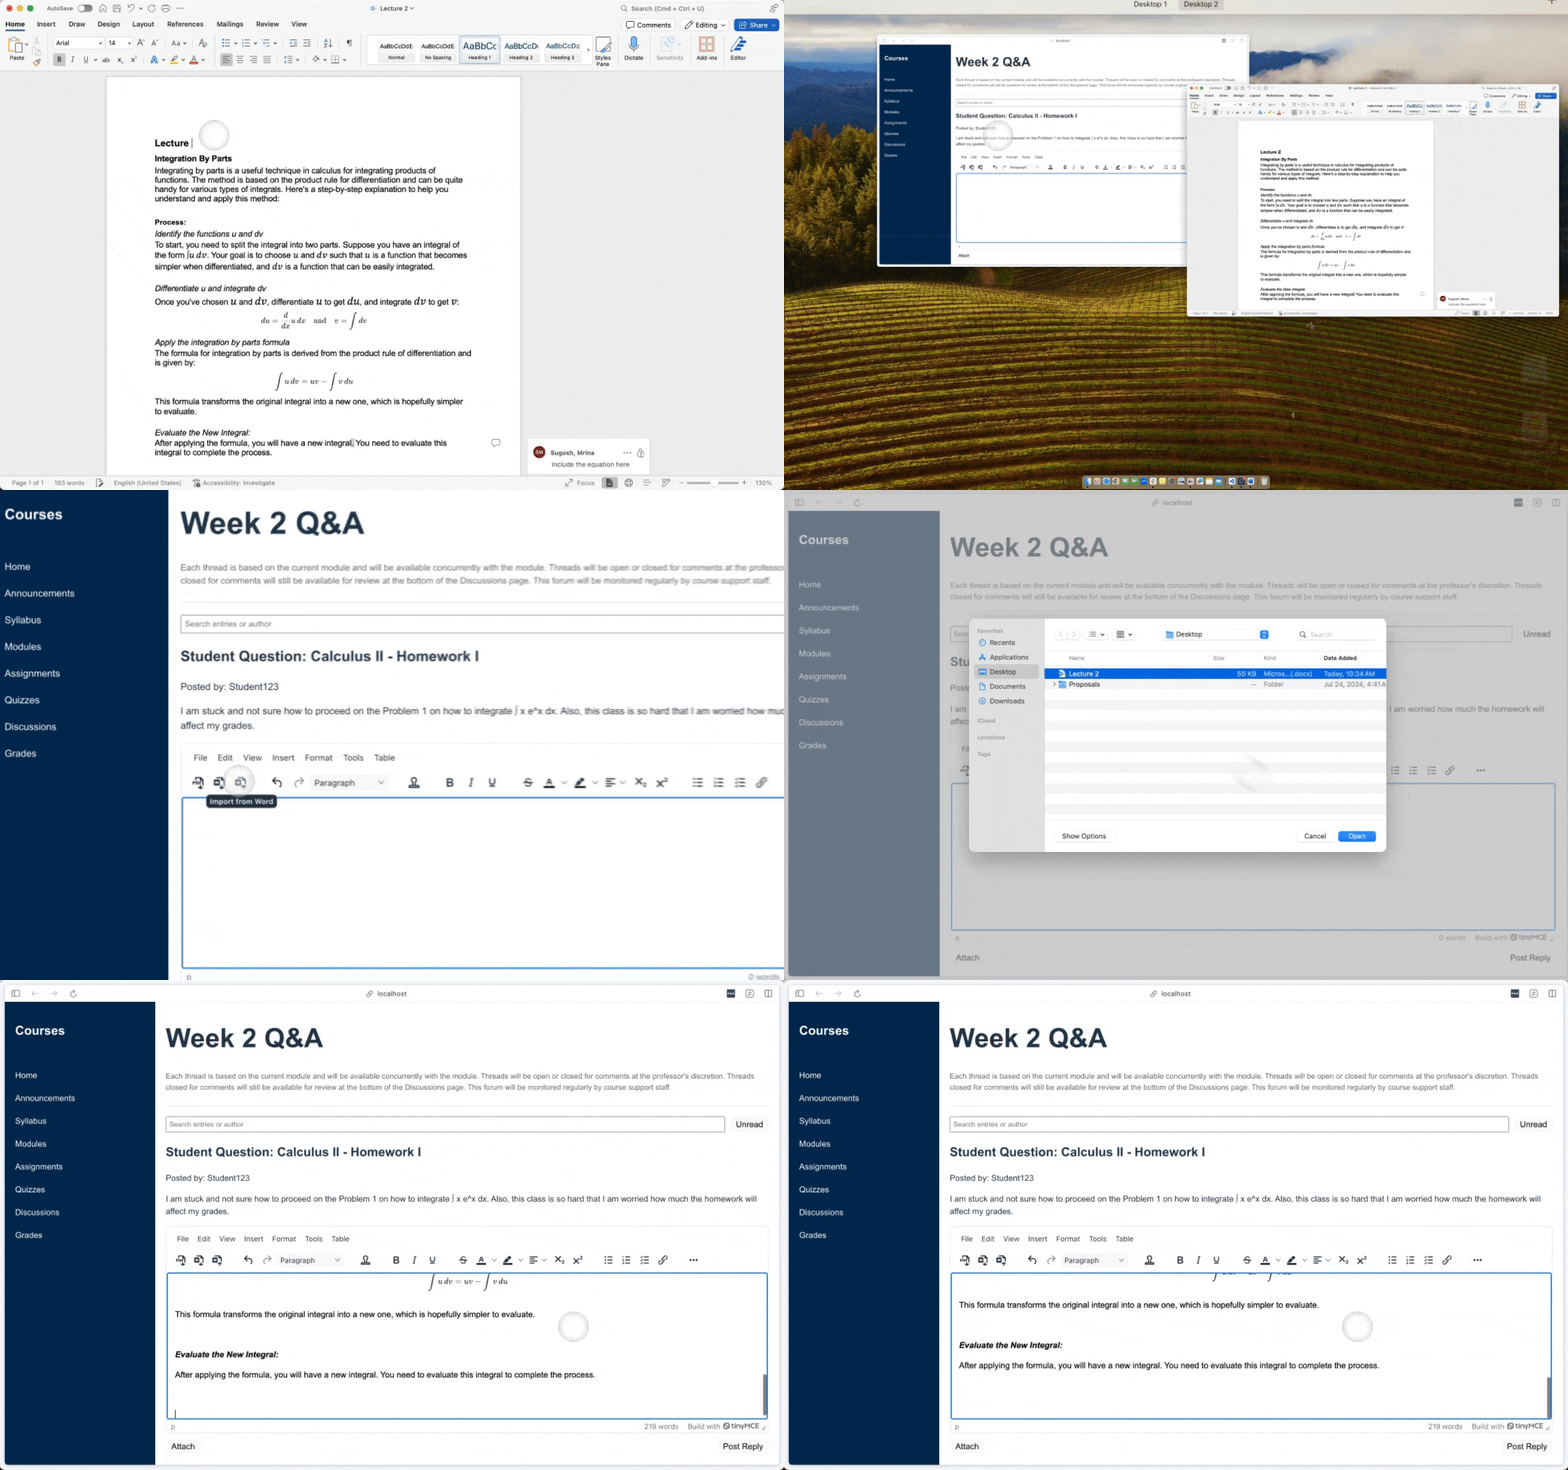
-
Import Word: Use the "Import Word" button to upload a Word document. See how the content is rendered in TinyMCE.
-
Export to Word and PDF: Create content in the editor and use the export options to download your content in Word or PDF formats.
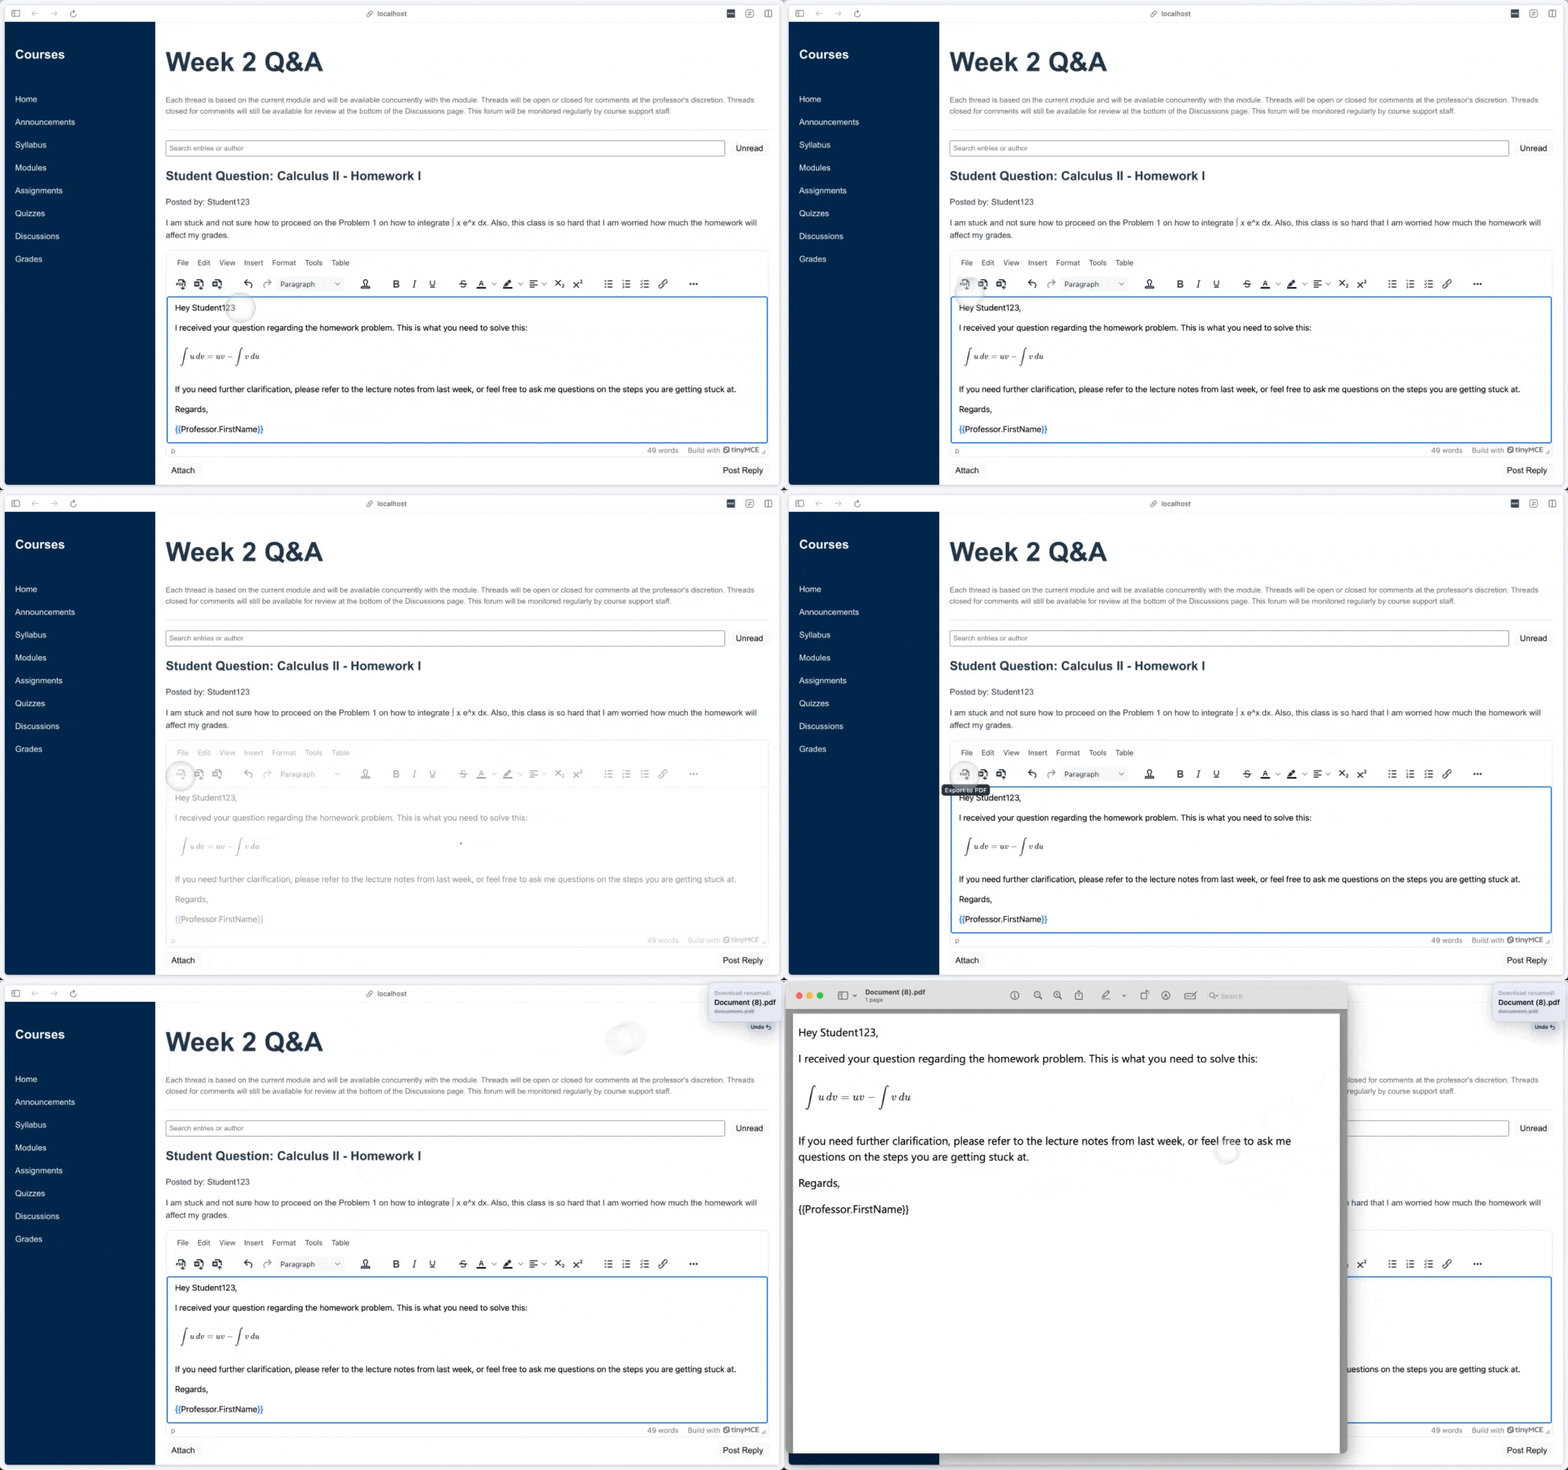
By integrating the importword, exportword, and exportpdf plugins, your TinyMCE editor now supports the ability to import and export content in multiple formats.
Step 7: Special Content Checks - Accessibility and Spell Checking
It’s time to integrate two critical content validation features into TinyMCE:
- Accessibility checks using the a11ychecker plugin
- Spelling validation using the tinymcespellchecker plugin.
These tools ensure that content is accessible and error-free, which is important for all kinds of students who use your LMS.
Adding a11ychecker for Accessibility Checks
The a11ychecker plugin helps developers ensure that the content meets accessibility standards, specifically WCAG (Web Content Accessibility Guidelines). Educational material needs to be accessible to all students, including those with disabilities. Ensuring accessibility is crucial for compliance with legal requirements like the Americans with Disabilities Act (ADA).
Capabilities of the a11ychecker Plugin:
- Alt Text for Images: Ensures images include descriptions for screen readers.
- Color Contrast Checks: Verifies that the color contrast between text and background is sufficient for readability.
- Table Structure: Ensures that tables are accessible, including proper header usage for screen readers.
- Heading Structure: Validates the use of appropriate heading tags, aiding navigation for visually impaired users.
- ARIA Attribute Validation: Ensures that ARIA (Accessible Rich Internet Applications) attributes are used correctly to enhance accessibility.
Add the a11ychecker Plugin to TinyMCE
To add accessibility checks, integrate the a11ychecker plugin into the TinyMCE configuration:
<Editor
  apiKey='TINYMCE_API_KEY'
  onInit={(_evt, editor) => editorRef.current = editor}
  init={{
plugins: 'a11ychecker advcode code editimage fullscreen preview wordcount math linkchecker lists markdown powerpaste typography charmap checklist emoticons footnotes image link media mediaembed mergetags table tableofcontents advtemplate exportpdf exportword importword',Add the a11ycheck Button to the Toolbar
Add the a11ycheck button to the toolbar.
toolbar: 'exportpdf exportword importword | undo redo blocks | inserttemplate | a11ycheck | bold italic underline | strikethrough forecolor backcolor align subscript superscript | bullist numlist checklist link | typography charmap blockquote | image media math | footnotes mergetags table charmap emoticons | code fullscreen preview',Test the Accessibility Checker
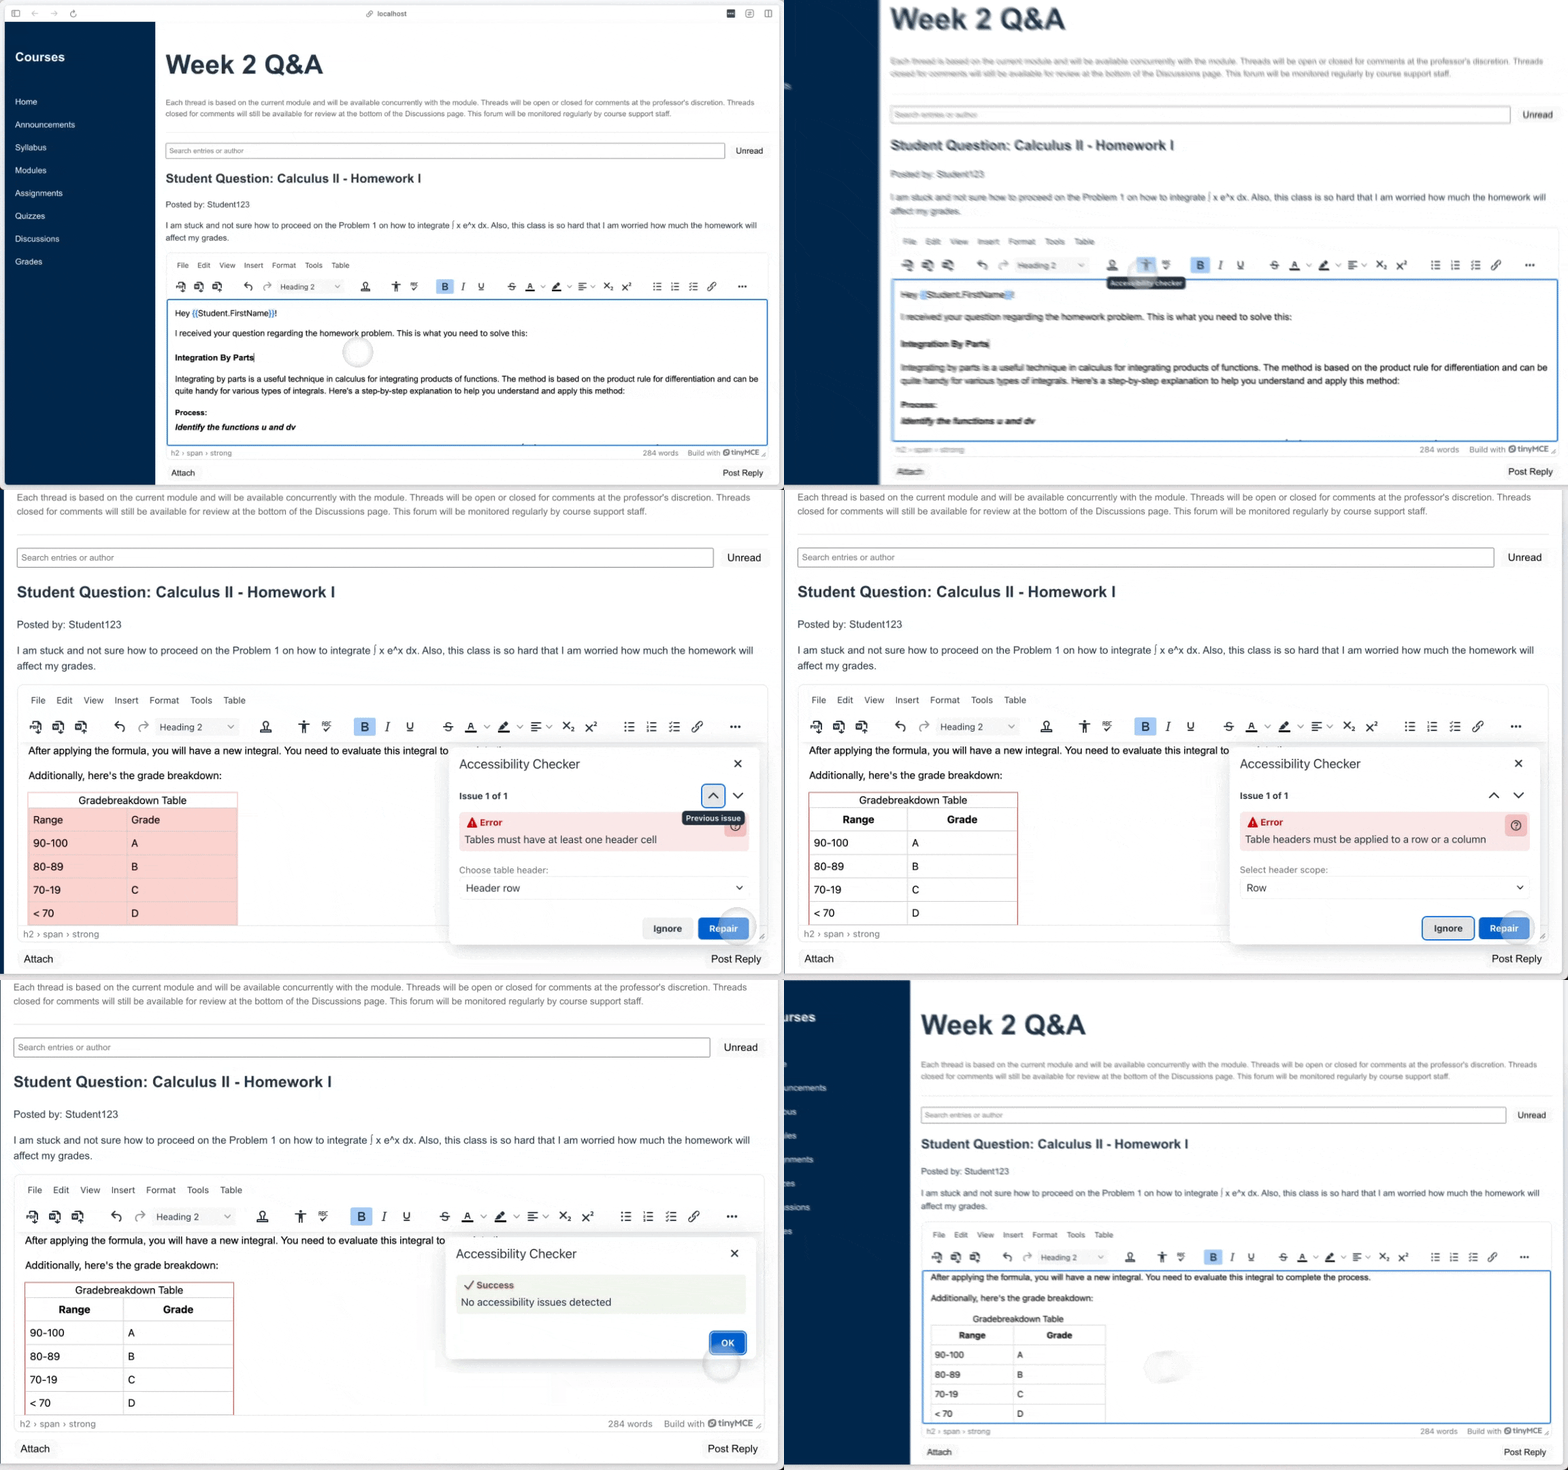
After updating the configuration, run the editor and use the a11ycheck button to scan the content for accessibility issues. The plugin will highlight problems such as missing alt text, improper heading structures, or insufficient contrast, and provide suggestions to improve accessibility.
Adding tinymcespellchecker for Spell Checking
The tinymcespellchecker plugin provides spelling validation within the TinyMCE editor. Spell checking is a critical feature in any content creation platform, but especially in LMS systems. Correct spelling improves the readability, professionalism, and credibility of the material being published.
Capabilities of the tinymcespellchecker Plugin:
- Spell Check in Real Time or On-Demand: Users can either check spelling as they type or run a manual spell check using the spellcheckdialog button.
- Customizable Dictionaries: Developers can configure custom dictionaries, which is useful for specific fields like medical or scientific writing.
- Multi-language Support: The plugin can support multiple languages, making it suitable for international LMS platforms.
- Context-Aware Suggestions: Provides suggestions based on the context of the sentence, helping users correct their mistakes more accurately.
- Ignore or Learn Words: Users can choose to ignore specific words or add them to a custom dictionary, making the spell checker more flexible and user-friendly.
For developers, the tinymcespellchecker plugin is not just a basic spell checker. It allows customization through dictionaries, can be tailored for specific use cases, and provides powerful tools to ensure high-quality content.
Step 2.1: Add the tinymcespellchecker Plugin
Add the tinymcespellchecker plugin to the TinyMCE configuration.
<Editor
  apiKey='TINYMCE_API_KEY'
  onInit={(_evt, editor) => editorRef.current = editor}
  init={{
    plugins: 'a11ychecker tinymcespellchecker advcode code editimage fullscreen preview wordcount math linkchecker lists markdown powerpaste typography charmap checklist emoticons footnotes image link media mediaembed mergetags table tableofcontents advtemplate exportpdf exportword importword',
..
}}
/>Add the spellcheckdialog Button to the Toolbar
Add the spellcheckdialog button to the toolbar to allow users to open a spell-check dialog. This provides a clean interface for reviewing and correcting spelling errors in the content.
toolbar: 'exportpdf exportword importword | undo redo blocks | inserttemplate | a11ycheck spellcheckdialog | bold italic underline | strikethrough forecolor backcolor align subscript superscript | bullist numlist checklist link | typography charmap blockquote | image media math | footnotes mergetags table charmap emoticons | code fullscreen preview',Configure the Spellchecker Language
Set the spell checker’s language to English (or another language if needed). This ensures the spell checker works in the correct language context.
spellchecker_language: 'en',Test the Spell Checker
After updating the configuration, run the editor and use the spellcheckdialog button to scan the content for spelling mistakes. The spell checker will highlight errors and provide suggestions for corrections. Users can review these suggestions and make edits as needed, ensuring that their content is error-free and polished.
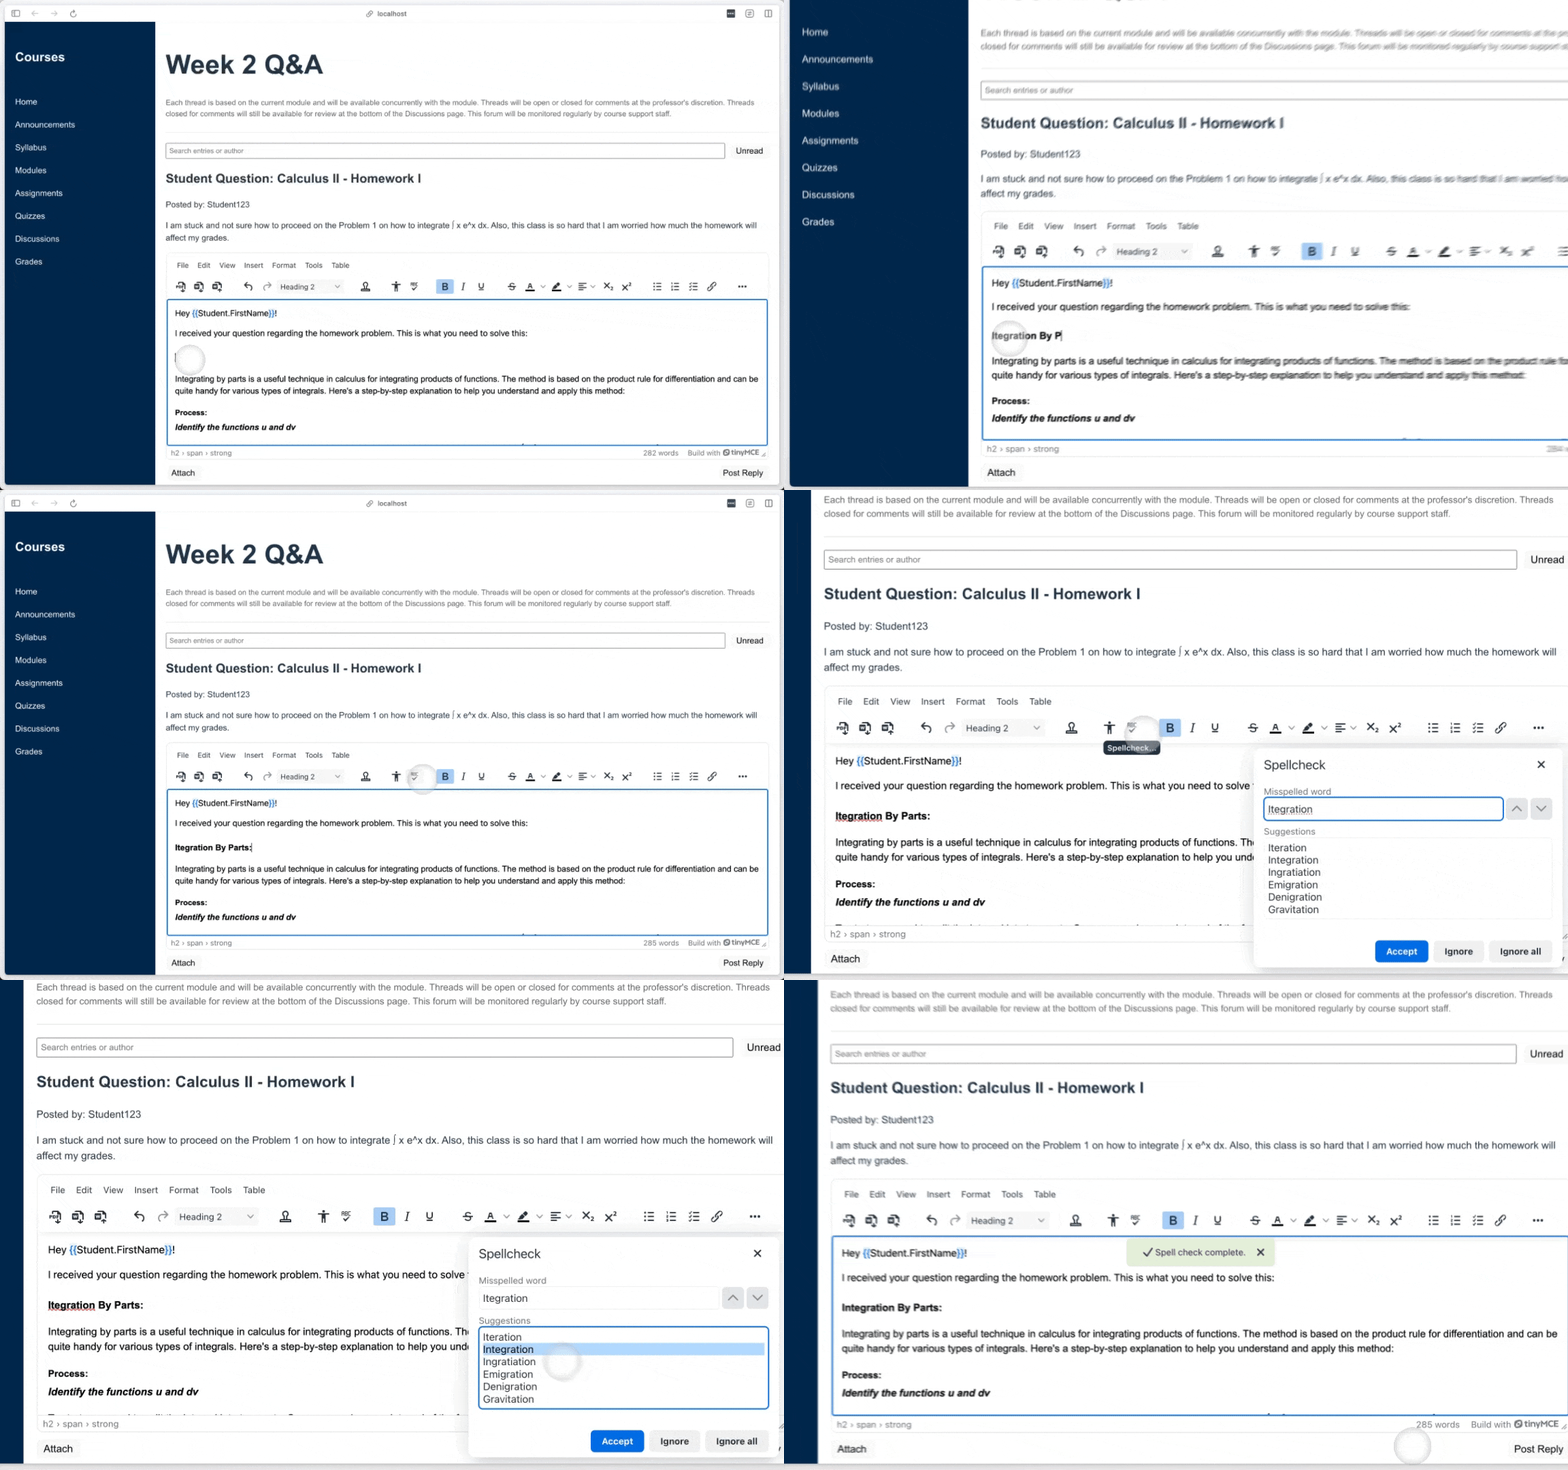
In an LMS, educators benefit from delivering high-quality, error-free lessons, while students can use the spell checker to improve the quality of their submissions, leading to better academic performance. Additionally, support for multiple languages is valuable for international or multilingual educational platforms.
Step 8: AI Assistant
In this step, we integrate AI capabilities into the TinyMCE editor using OpenAI’s API to create an AI-powered assistant. The assistant can help users generate content, provide writing suggestions, answer questions, and assist with formatting directly within the editor.
In an LMS, an AI-powered assistant is extremely useful for:
- Generating Content: Teachers can quickly generate quizzes, assignments, or lesson summaries.
- Answering Questions: Students can ask the assistant to explain difficult concepts or summarize content for better understanding.
- Writing Assistance: The assistant can help with grammar, formatting, and even provide writing suggestions for essays or reports.
Add AI Assistant to TinyMCE Editor Configuration
To enable AI features, we must add ai to the plugins option.
plugins: 'ai a11ychecker tinymcespellchecker advcode code editimage fullscreen preview wordcount math linkchecker lists markdown powerpaste typography charmap checklist emoticons footnotes image link media mediaembed mergetags table tableofcontents advtemplate exportpdf exportword importword',Then, we update the TinyMCE toolbar to include the AI assistant functionality. This will allow users to interact with the AI through the toolbar buttons. For this we include:
- aidialog: Opens a dialog for users to interact with the AI assistant.
- aishortcuts: Provides predefined AI tasks, such as generating summaries or questions.
<Editor
  apiKey="TINYMCE_API_KEY"
  onInit={(_evt, editor) => (editorRef.current = editor)}
  init={{
    plugins:
      "ai a11ychecker tinymcespellchecker advcode code editimage fullscreen preview wordcount math linkchecker lists markdown powerpaste typography charmap checklist emoticons footnotes image link media mediaembed mergetags table tableofcontents advtemplate exportpdf exportword importword",
    toolbar:
      "exportpdf exportword importword | undo redo blocks | inserttemplate | aidialog aishortcuts | a11ycheck spellcheckdialog | bold italic underline | strikethrough forecolor backcolor align subscript superscript | bullist numlist checklist link | typography charmap blockquote | image media math | footnotes mergetags table charmap emoticons | code fullscreen preview",
    ai_request,
    spellchecker_language: "en",
  }}
  initialValue="Welcome to TinyMCE!"
/>;
Set Up the AI Request Handler
Now that the AI options are available in the toolbar, we need to configure the request handler to interact with OpenAI’s API. This handler processes user queries, communicates with the API, and streams AI-generated responses back into the editor.
const api_key = 'OPENAI_API_KEY';
const fetchApi = import("<a href="https://unpkg.com/@microsoft/fetch-event-source@2.0.1/lib/esm/index.js">https://unpkg.com/@microsoft/fetch-event-source@2.0.1/lib/esm/index.js</a>").then(module => module.fetchEventSource);

const ai_request = (request, respondWith) => {
  respondWith.stream((signal, streamMessage) => {
    const conversation = request.thread.flatMap((event) => {
      if (event.response) {
        return [
          { role: 'user', content: event.request.query },
          { role: 'assistant', content: event.response.data }
        ];
      } else {
        return [];
      }
    });

    const systemMessages = [
      { role: 'system', content: 'Ensure the response is suitable for HTML formatting.' }
    ];

    const messages = [
      ...conversation,
      ...systemMessages,
      { role: 'user', content: request.query }
    ];

    const requestBody = {
      model: 'gpt-4',
      temperature: 0.7,
      max_tokens: 800,
      messages,
      stream: true
    };

    const openAiOptions = {
      signal,
      method: 'POST',
      headers: {
        'Content-Type': 'application/json',
        'Authorization': `Bearer ${api_key}`
      },
      body: JSON.stringify(requestBody)
    };

    return fetchApi
    .then(fetchEventSource =>
      fetchEventSource('<a href="https://api.openai.com/v1/chat/completions">https://api.openai.com/v1/chat/completions</a>', {
        ...openAiOptions,
        onmessage: (ev) => {
          const data = ev.data;
          if (data !== '[DONE]') {
            const parsedData = JSON.parse(data);
            const message = parsedData?.choices[0]?.delta?.content;
            if (message) {
              streamMessage(message);
            }
          }
        },
        onerror: (error) => { throw error; }
      })
    );
  });
};Client-Side vs. Server-Side Implementation
Client-Side Demo (as in this guide):
This demo implements the AI assistant on the client side, meaning AI requests are made directly from the user's browser to OpenAI’s API.
- Advantages: Simple to set up and works well for small-scale demos.
- Disadvantages: Exposes API keys and sensitive data to the client, making it less secure.
Recommended Production Setup:
In a production environment, you should use a proxy server to securely handle API requests. A proxy server acts as a middleman between the client and the AI service (OpenAI, AWS, etc.), protecting sensitive data like API keys.
Advantages:
- API keys and sensitive data are hidden from the end user.
- Additional security measures such as rate limiting, request validation, and data compliance can be implemented.
- A proxy ensures that your application remains secure and compliant with data protection regulations.
To test the AI assistant, open the AI dialog via the toolbar, input queries such as "Summarize this text" or "Generate quiz questions based on this topic," and view real-time AI responses directly within the editor.
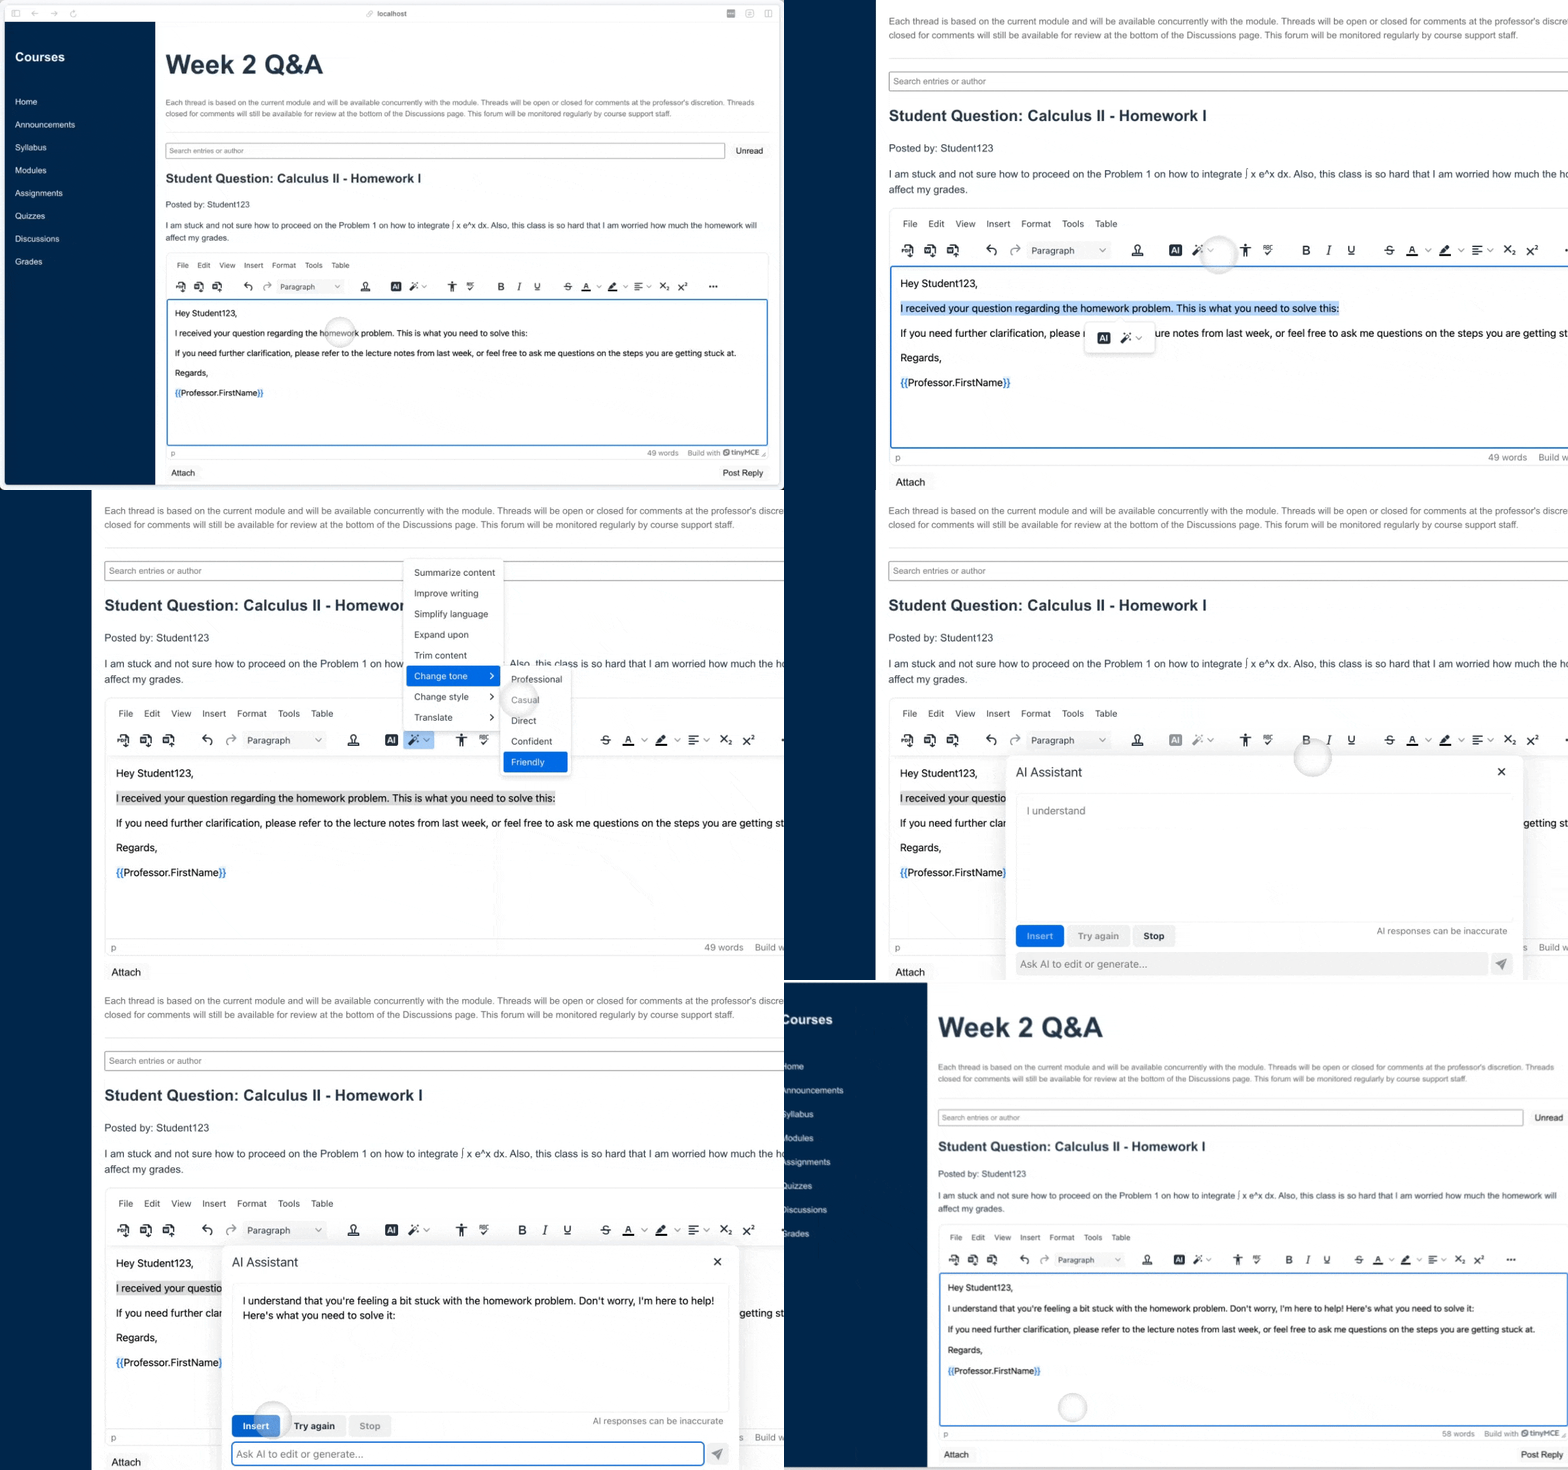
TinyMCE’s AI capabilities can be extended to work with other AI providers like Google Gemini, AWS, and Azure, offering flexibility for various environments.
What’s next?
By following along with this blog, you've learned how to build a powerful LMS editor using TinyMCE, React Integration, and OpenAI integration. From setting up the editor in a React project to enabling advanced features like document converters, formatting tools, and AI-powered content creation, you now have a fully functional and highly customizable text editor for your web applications.
Whether you're looking to enhance educational platforms or create rich content for other use cases, the tools and techniques we've covered will give you the flexibility and power to meet your needs. If you haven’t already, be sure to check out the full workshop video for more insights, and feel free to experiment with the additional plugins and configurations to make the editor uniquely yours!
Find out more about future TinyMCE plugins on our Public Product Roadmap, or let us know what you need on the TinyMCE GitHub Discussions.
