Static websites are fine, but when site design changes are needed, and a disagreeable component won’t allow dynamic CSS change, it’s frustrating. It’s also disappointing for your customers and users, who expect parts of the app appearance to dynamically change when they’re interacting with it.
In these situations, it’s generally best to look into an alternative component – one that responds to events, and can change its appearance. If your application needs a reliable rich text editor that can change CSS dynamically, one of your first (and often best) options is TinyMCE. It’s a widely trusted editing component that can change CSS and design properties using JavaScript.
Dynamic CSS change is useful for a variety of solutions. And TinyMCE has the ability to flexibly integrate into projects such as:
- Content Management Systems that need to change design based on different audiences.
- Document Management Systems which have different security roles, and need a different design for each role
- Learning Management Systems, where there are clearly defined student created or instructor and educator created content, which need their own designs
This post is a guide on how to change CSS dynamically with TinyMCE – producing a design that responds to events and easily shifts appearance.
How to change CSS with JavaScript dynamically
You can manipulate your application’s CSS at runtime using JavaScript, by getting the stylesheets of the application using the document.styleSheets method, and then parsing the list of CSS style rules returned. You can then insert a new CSS rule into the stylesheet. For example, you might have the following CSS stylesheet linked in your application:
a {
  background-color: powderblue;
}To change it dynamically with JavaScript, you could run the following code to retrieve the stylesheet, and then add a transition to the HTML element:
const stylesheet = document.styleSheets[0];
stylesheet.cssRules[1].style.transition = "background-color 0.5s";
The element will now transition from one color to another on hover. Check on the complete list of style options you can configure to see the scope of the dynamic CSS changes you can make.
Change CSS dynamically in TinyMCE
The following demo sets up TinyMCE with a stylesheet in an HTML page so that you can try out dynamic CSS changes within the rich text editor.
Setting up the TinyMCE demo
First, you need an API key. This key gives you free access to TinyMCE Premium plugins for 14 days. Navigate to the Get-tiny sign up page to get your FREE rich text editor API key.
-
Create an index.html file, and add the following HTML:
<!DOCTYPE html>
<html lang="en">
<head>
    <meta charset="UTF-8">
    <meta http-equiv="X-UA-Compatible" content="IE=edge">
    <meta name="viewport" content="width=device-width, initial-scale=1.0">
    <title>TinyMCE Demo</title>
</head>
    <body>
    </body>
</html>-
With your file open, in the head section, add script tags, and reference TinyMCE Cloud through a CDN link within the script tags. This is what the link looks like:
<script
  src="https://cdn.tiny.cloud/1/your-api-key/tinymce/6/tinymce.min.js"
  referrerpolicy="origin"
></script>;
-
Add another pair of script tags, add the following JavaScript. It’s the tinymce.init method, and it’s how you control TinyMCE:
<script>
   tinymce.init({
   selector: '#editor',
   plugins: 'powerpaste casechange searchreplace autolink directionality advcode visualblocks visualchars image link media mediaembed codesample table charmap pagebreak nonbreaking anchor tableofcontents insertdatetime advlist lists checklist wordcount tinymcespellchecker editimage help formatpainter permanentpen charmap linkchecker emoticons advtable export autosave',
   toolbar: 'undo redo print spellcheckdialog formatpainter | blocks fontfamily fontsize | bold italic underline forecolor backcolor | link image | alignleft aligncenter alignright alignjustify lineheight | checklist bullist numlist indent outdent | removeformat',
   height: '700px'
       });
</script>-
Add initial HTML content, and the CSS selector class to some textarea tags. The selector is set as an id with the value “editor”. This links to the selector option in the TinyMCE init script.
This content also includes an id and a class that’ll link to a stylesheet created in the next steps:
<body>
<h1>Changing CSS Dynamically</h1>
          <p>This demo page is styled with CSS.</p>
          <p>Dynamic content changes are possible, and you
            can <a href="https://developer.mozilla.org/en-US/docs/Web/API/CSS_Object_Model/">check the MDN documentation for examples</a>, and definitions.
          </p>
        <div id="container">
          <form id="post">
            <textarea id="editor">Hello, World!</textarea>
          </form>
        </div>
        <div class="gradient">
          <p style="color: antiquewhite;">This content has a style attribute. It is a style tag that changes the text color, which is taking preference over
           the stylesheet.</p>
        </div>
        <footer>
          <p>This is the lower edge of the demo.</p>
        </footer>
    </body>
</body>-
Create a stylesheet, and place it inside the head section of the demo HTML:
touch stylesheet.css<title>TinyMCE Demo</title>
<link rel="stylesheet" href="stylesheet.css">-
Add the following CSS content:
body {
  background-color: #F0F2F5;
}

h1 {
  color: #99AEFF;
  font-size: 2em;
  margin-top: 0;
  text-align: center;
}

p {
  color: #2E449E;
  font-size: 1em;
  padding: 10px;
  margin: 0 0 10px 0;
  text-align: center;
}

a {
  color: #99AEFF;
  text-decoration: none;
  text-align: center;
}

a:hover {
  color: #4D71FF;
  text-decoration: underline;
  text-align: center;
}

.gradient {
  background-image: linear-gradient(to bottom, #4D71FF 0%, #335DFF 100%);
  text-align: center;
  padding: 5px;
  margin: 2px;
}

#container {
    text-align: center;
    margin: auto;
    padding: 5px;
    width: 700px;
    border: 2px dotted #99AEFF;
    background-color: #F0F2F5;
}-
In the TinyMCE init script, add the content_style option:
content_style: ``,-
Add the following CSS to the content_style option. Content in the editor will essentially be invisible with the opacity value set to 0:
      content_style: `
                 body {
                  opacity: 0;
                 }
`,-
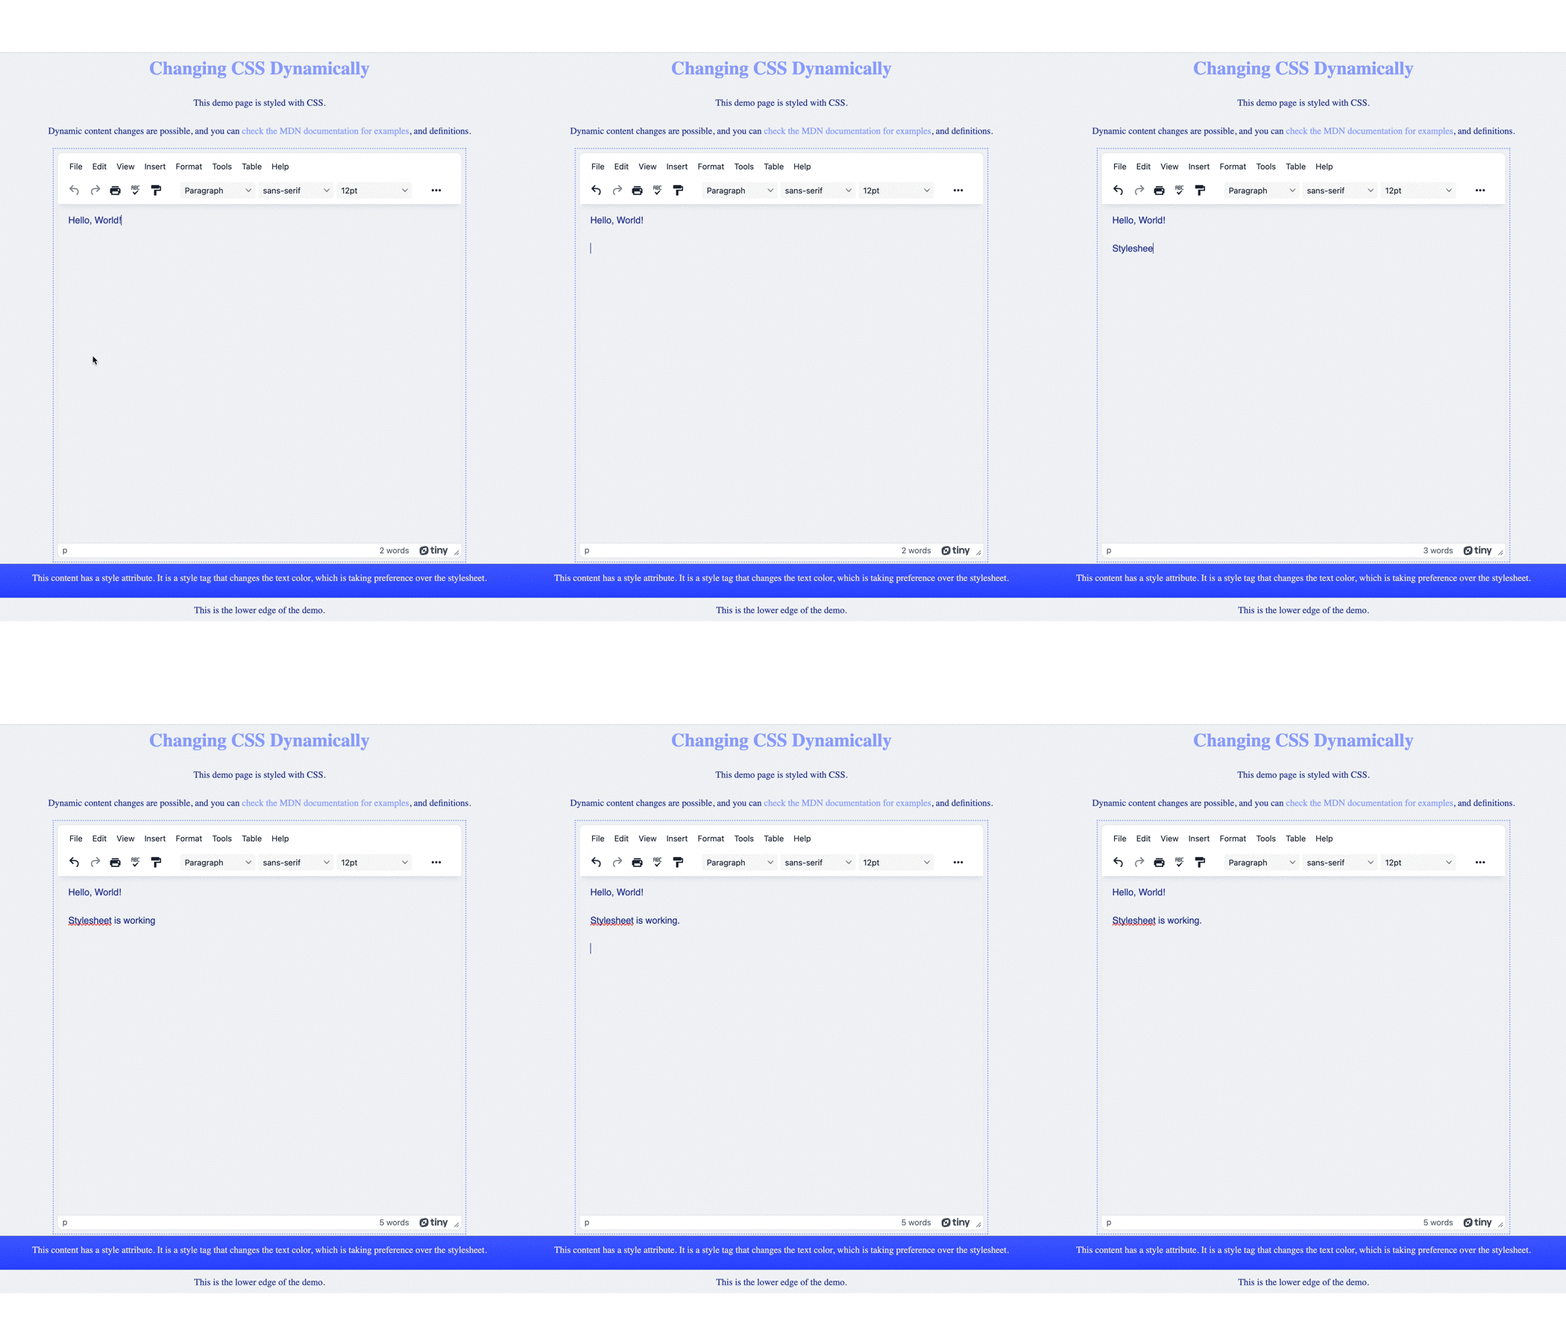
Save the changes, and then test run the index.html file by opening it in your browser, or use a local server command with Python or with the PHP command.
This example has the opacity set above 0 to 0.5 for demonstration purposes:
Setting up dynamic CSS changes
TinyMCE is designed for ease of implementation, and customization. This means there’s a wide array of solutions where TinyMCE could dynamically change CSS.
However this demo is restricted to a limited scope, and the following procedure shows how TinyMCE can dynamically change CSS when the focus and blur events happen. This could fit into a variety of situations where the editor needs to remain less noticeable in the user interface, until it is needed.
-
Add the setup option along with a function to the TinyMCE init script:
tinymce.init({
   selector: '#editor',
   plugins: 'powerpaste casechange searchreplace autolink directionality advcode visualblocks visualchars image link media mediaembed codesample table charmap pagebreak nonbreaking anchor tableofcontents insertdatetime advlist lists checklist wordcount tinymcespellchecker editimage help formatpainter permanentpen charmap linkchecker emoticons advtable export autosave',
   toolbar: 'undo redo print spellcheckdialog formatpainter | blocks fontfamily fontsize | bold italic underline forecolor backcolor | link image | alignleft aligncenter alignright alignjustify lineheight | checklist bullist numlist indent outdent | removeformat',
   height: '700px',
   width: '700px',
   content_style: `
     body {
       opacity: 0.0;
     }
     `,
setup: (editor) => { },-
Inside the new braces, set a function activated by the focus event:
setup: (editor) => {
  editor.on("focus", function () {});
};
-
Add the following API call, which makes use of the addClass TinyMCE DOM utility command. They’re methods designed for interacting with the TinyMCE DOM, and making changes, which includes dynamically changing CSS.
The JavaScript also contains a console message that prints to the developer tools console to confirm that the script is working:
editor.on("focus", function (e) {
  editor.dom.addClass(tinymce.activeEditor.dom.select("body"), "online");
  console.log("focus, online class added");
});
-
The previous step introduced a class, following the syntax of the addClass() API method. Setup this class in the TinyMCE content_style option by adding the following CSS:
content_style: `
            body {
                opacity: 0.5;
               }
            .online {
                opacity: 1;
                color: #2E449E;
                font-size: 1em;
                padding: 10px;
                margin: 0 0 10px 0;
               }
`,-
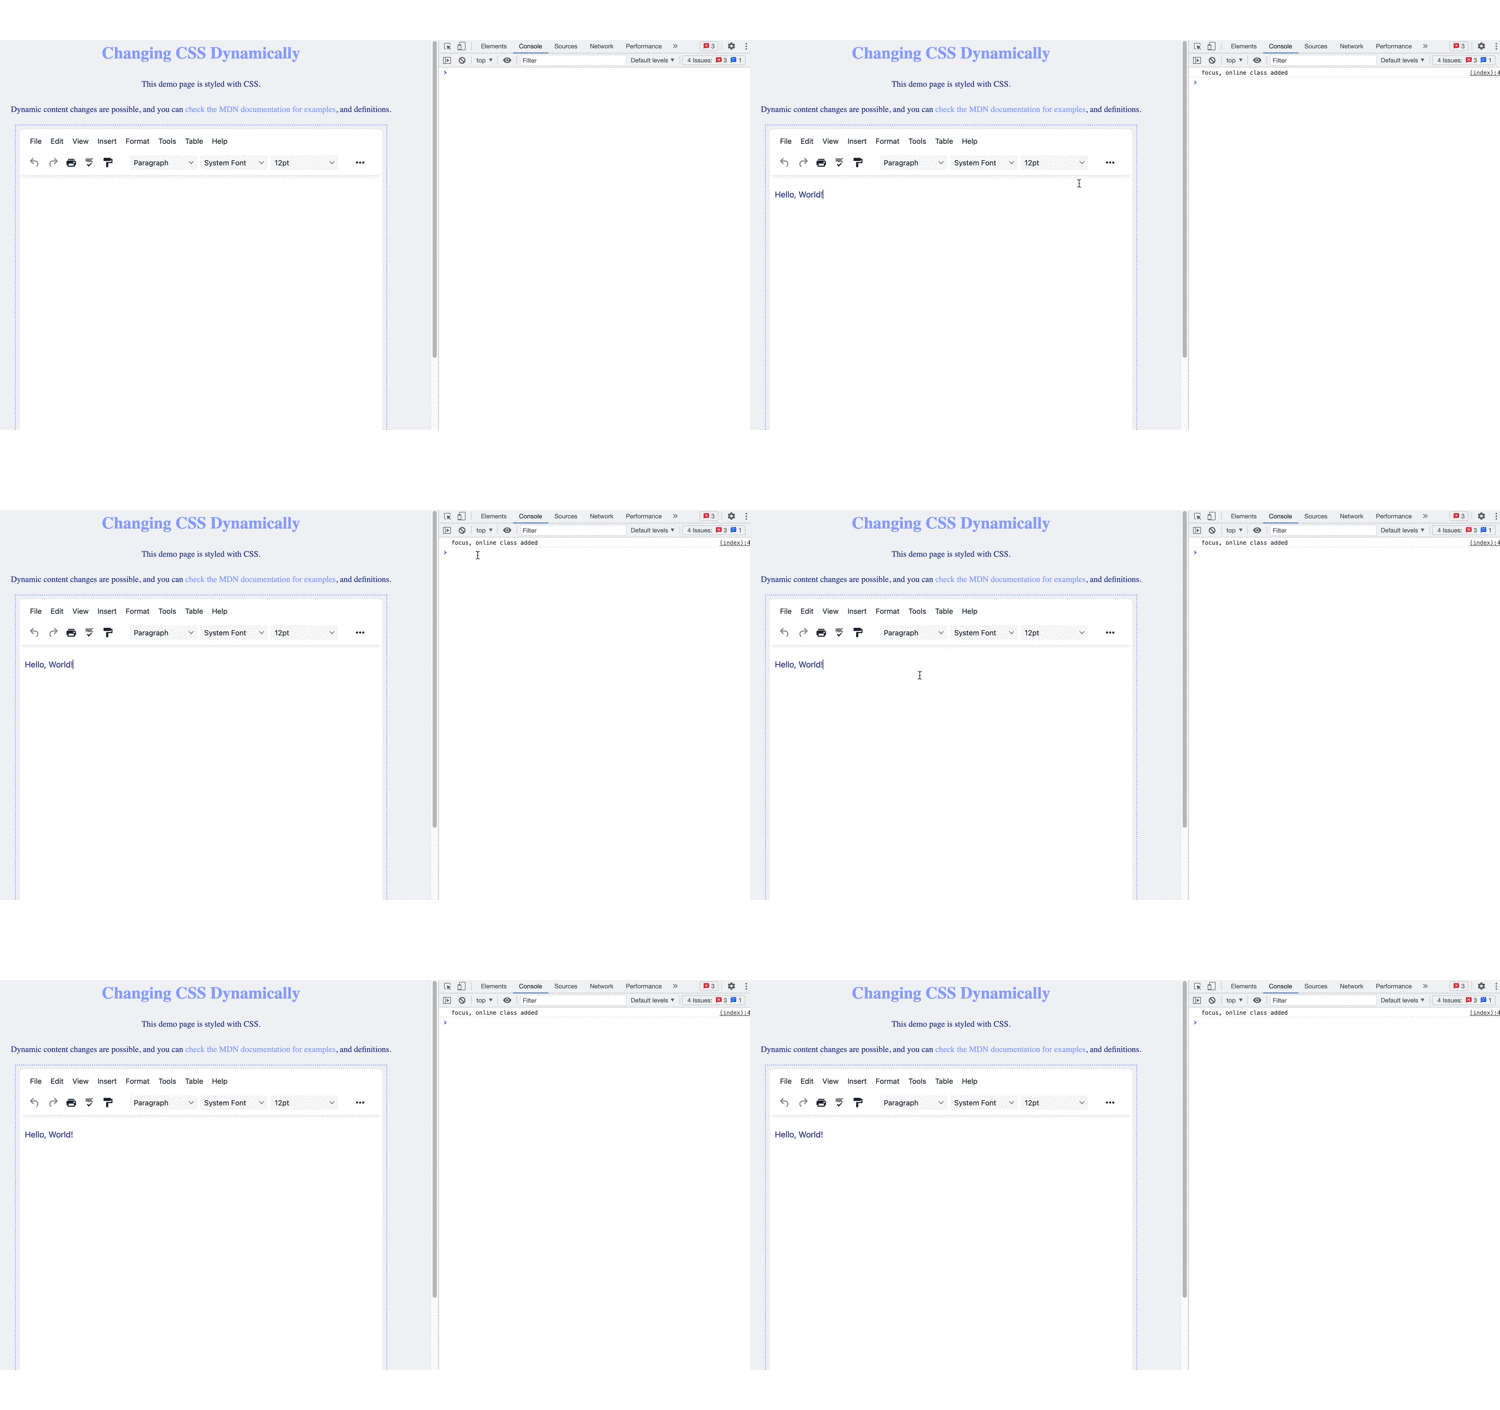
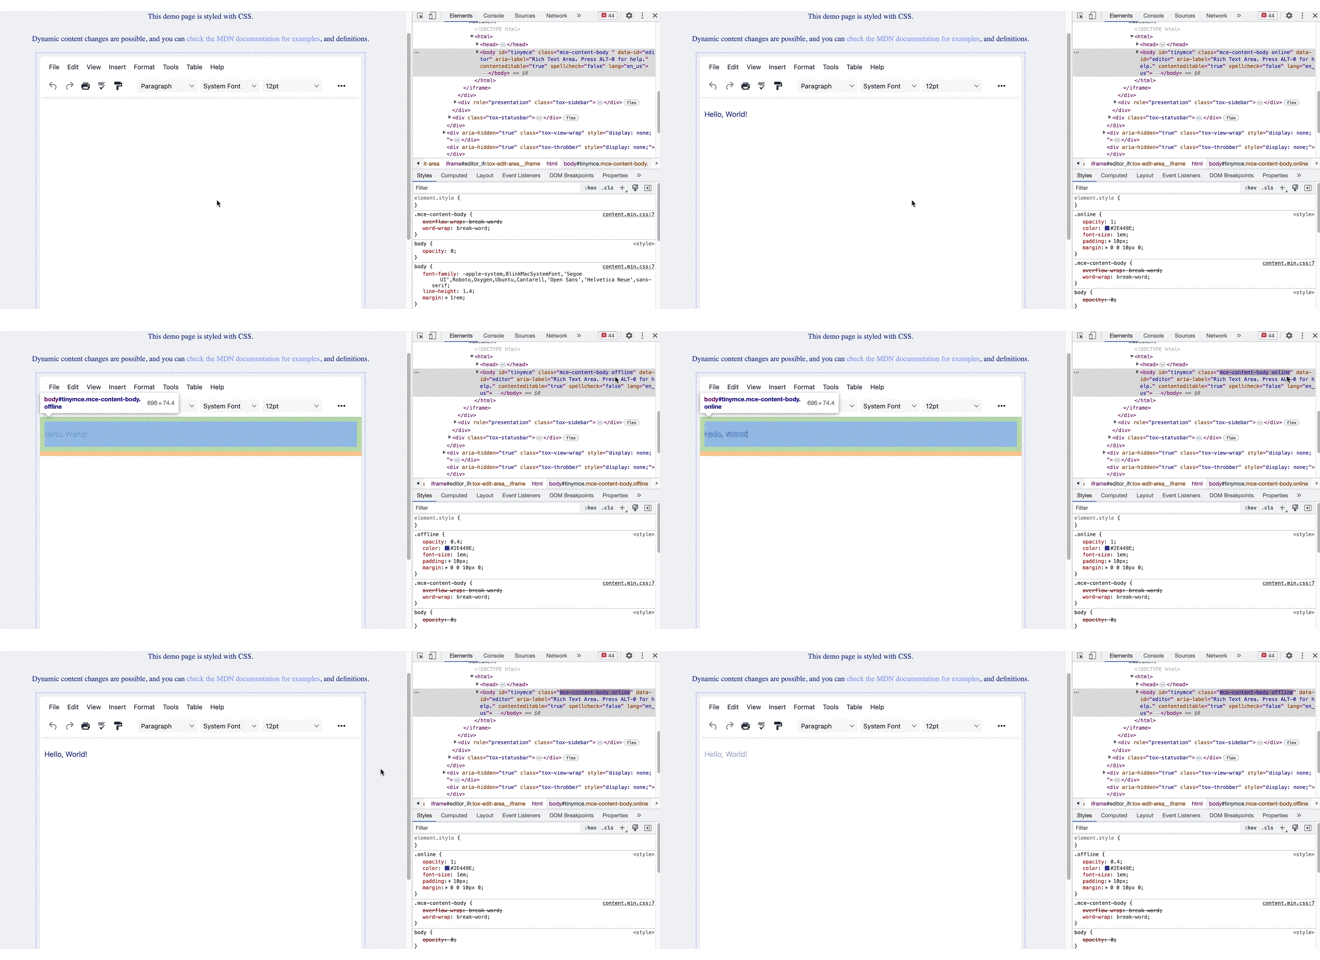
Save the changes, and then test out the dynamic CSS change. When TinyMCE is in focus, the body tags receive the online class, and change their appearance:
Refining dynamic CSS changes
The CSS and design changes dynamically when the focus event happens, but what about changing the editor back when focus changes? To do this, add to the demo’s setup option with a event handler that responds to the blur event”
-
Add a second event handler function for the blur event:
setup: (editor) => {
  editor.on("focus", function (e) {
    editor.dom.addClass(editor.dom.select("body"), "online");
    console.log("focus, online class added");
  });
};
editor.on("blur", function () {});
-
Include the API method for removing a class. This is important because without a method to remove the online class created in the previous section, the result will be a body element with multiple, conflicting classes added on. This means the style won’t change.
editor.on('blur', function () {
editor.dom.removeClass(editor.dom.select('body'), 'online' );-
Include the API method to introduce a low opacity design choice with the offline class:
editor.on('blur', function () {
editor.dom.removeClass(editor.dom.select('body'), 'online' );
editor.dom.addClass(editor.dom.select('body'), "offline");-
Confirm the script is running with a console message:
editor.on("blur", function () {
  editor.dom.removeClass(editor.dom.select("body"), "online");
  editor.dom.addClass(editor.dom.select("body"), "offline");
  console.log("blur, offline class added");
});
-
Modify the content_style content to include an offline class with the low opacity and design choice:
                content_style: `
                 body {
                   opacity: 0;
                 }
                 .online {
                    opacity: 1;
                    color: #2E449E;
                    font-size: 1em;
                    padding: 10px;
                    margin: 0 0 10px 0;
                 }
                 .offline {
                    opacity: 0.4;
                    color: #2E449E;
                    font-size: 1em;
                    padding: 10px;
                    margin: 0 0 10px 0;
                 }
`,-
Save the changes, and then give the dynamic CSS change a try. You should see the following:
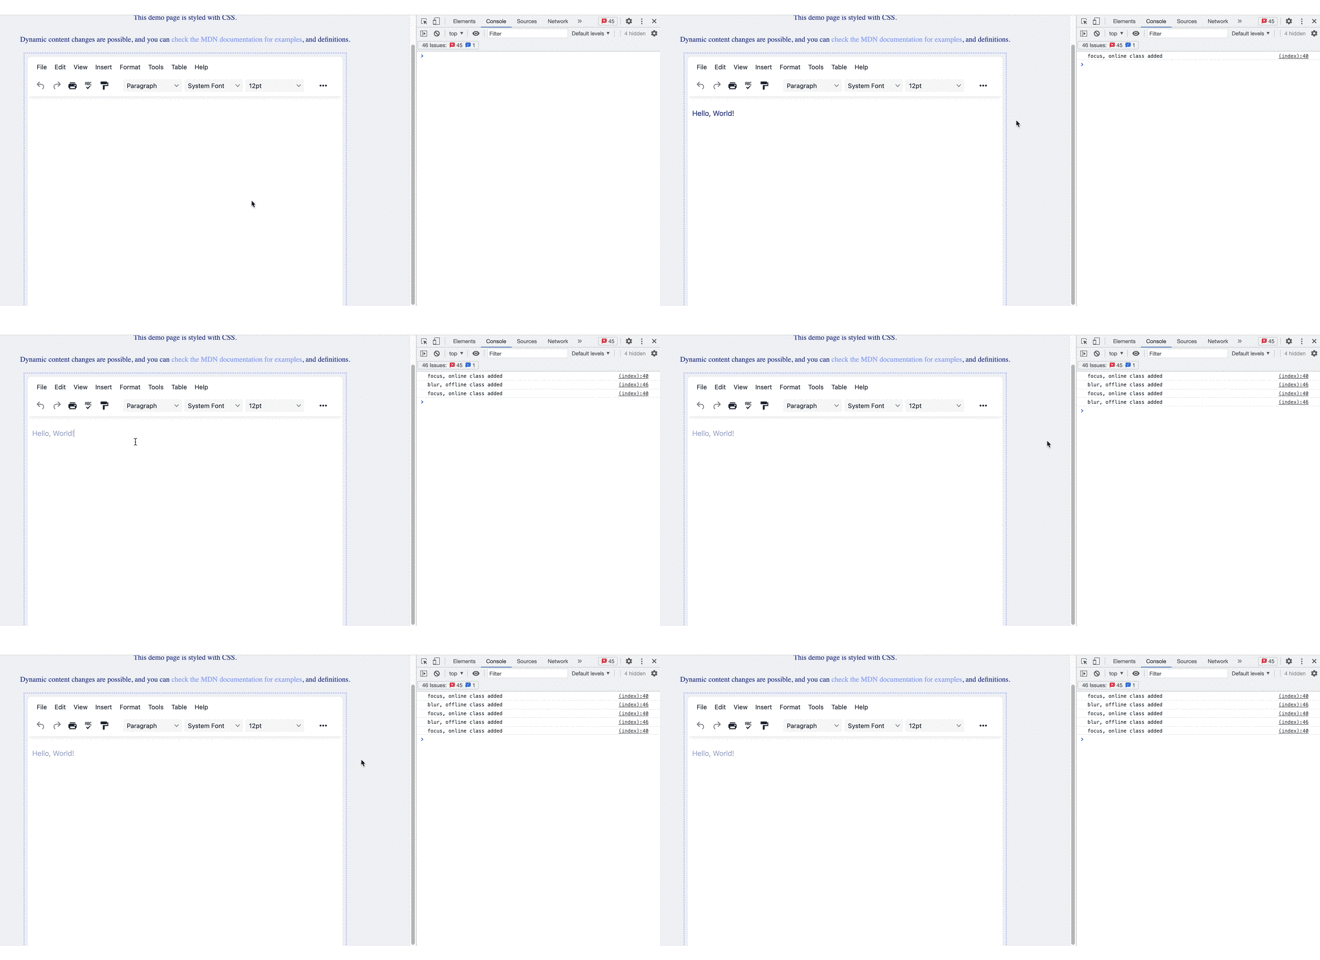
The JavaScript is dynamically changing the CSS in response to the focus and blur events, but something is wrong. The opacity design choice for the blur event is persisting despite the editor having focus.
To fix this, make use of the TinyMCE DOM utility API methods already used earlier in the demo.
-
Modify the focus event handler to remove the offline class from the body element:
setup: (editor) => {
editor.on('focus', function () {
  tinymce.activeEditor.dom.removeClass(tinymce.activeEditor.dom.select('body'), 'offline' ); //remove the offline class tinymce.activeEditor.dom.addClass(tinymce.activeEditor.dom.select("body"), "online");
  console.log("focus, online class added")
});-
Save the change, and run the demo again. This time, the dynamic CSS change works:
Why change CSS dynamically with TinyMCE APIs?
Make use of TinyMCE’s APIs for dynamic CSS change because the alternative is writing more JavaScript, and making sense of more information from the application to get the dynamic CSS change working.
In the demo, the TinyMCE addClass and the removeClass methods save effort and time in delving through the HTML DOM and parsing document objects to style different sections. It demonstrates how TinyMCE provides full features out-of-the-box like the API utility that makes integration easier.
For example, to access the TinyMCE DOM without the support of the utility APIs, you might need something like the following:
setup: (editor) => {
      editor.on('focus', function () {
      var selectClass = tinymce.activeEditor.dom.select("body")
      var checkClass = selectClass.classList.contains("offline"); //Note: the classList property does not work here, this is only an example.
      if (checkClass = true) {
      editor.dom.removeClass(editor.dom.select('body'), 'online' );
      editor.dom.addClass(editor.dom.select("body"), "online");
      console.log("focus, offline class removed, online class added")
      } else {
     editor.dom.addClass(editor.dom.select("body"), "online");
     console.log("focus, online class added")
  }
});Using the classList property, you could check whether the offline class appears in the body element, or not. The advantage of TinyMCE’s APIs here is that instead of checking for the class and removing it, the API essentially checks and removes in one step. There is no need to think about variables and if else statements.
How to change CSS dynamically in React
The same methods used in the preceding sections (for changing CSS dynamically with JavaScript) also work within frameworks. TinyMCE integrates into all the main, popular frameworks available for development. As an example, here is how to change CSS dynamically when TinyMCE integrates into the React framework:
-
Create a new React project in your development environment:
npx create-react-app tinymce-react-demo-
In the new React project, install the TinyMCE React integration through npm or yarn, depending on your package manager:
NPM:
npm install --save @tinymce/tinymce-reactYarn:
yarn add @tinymce/tinymce-react-
Open the App.js file, and include the following content, which is adapted from the demo in the previous sections:
import React, { useRef } from 'react';
import { Editor } from '@tinymce/tinymce-react';

export default function App() {
  const editorRef = useRef(null);
  const log = () => {
    if (editorRef.current) {
      console.log(editorRef.current.getContent());
    }
  };

  return (
    <>
      <h1>Changing CSS Dynamically</h1>
        <p>This demo page is styled with CSS.</p>
        <p>Dynamic content changes are possible, and you can <a href="<a href="https://developer.mozilla.org/en-US/docs/Web/API/CSS_Object_Model/">https://developer.mozilla.org/en-US/docs/Web/API/CSS_Object_Model/</a>">check the MDN documentation for examples</a>, and definitions.
        </p>
        <div id="container">
      <Editor
        apiKey='your-api-key'
        onInit={(evt, editor) => editorRef.current = editor}
        initialValue="<p>This is the initial content of the editor.</p>"
        init={{
          height: 500,
          menubar: false,
          plugins: [
            'advlist', 'autolink', 'lists', 'link', 'image', 'charmap', 'preview',
            'anchor', 'searchreplace', 'visualblocks', 'code', 'fullscreen',
            'insertdatetime', 'media', 'table', 'code', 'help', 'wordcount'
          ],
          toolbar: 'undo redo | blocks | ' +
            'bold italic forecolor | alignleft aligncenter ' +
            'alignright alignjustify | bullist numlist outdent indent | ' +
            'removeformat | help',
          content_style: `
            body {
              opacity: 0;
            }
            .online {
               opacity: 1;
               color: #2E449E;
               font-size: 1em;
               padding: 10px;
               margin: 0 0 10px 0;
            }
            .offline {
               opacity: 0.4;
               color: #2E449E;
               font-size: 1em;
               padding: 10px;
               margin: 0 0 10px 0;
            }
            `,
            setup: (editor) => {
              editor.on('focus', function(e) {
              editor.dom.removeClass(editor.dom.select('body'), 'offline' );
              editor.dom.addClass(editor.dom.select('body'), "online");
              console.log("focus, online class added")
              });

              editor.on('blur', function () {
              editor.dom.removeClass(editor.dom.select('body'), 'online' );
              editor.dom.addClass(editor.dom.select('body'), "offline");
              console.log("blur, offline class added")
              })
           }
        }}
      />
      <button onClick={log}>Log editor content</button>
      </div>
      <div class="gradient">
        <p>Content on Style Attributes.</p>
        </div>
        <footer>
            <p>This is the lower edge of the demo.</p>
        </footer>
    </>
  );
}-
Save the changes, and then start the React demo:
npm run start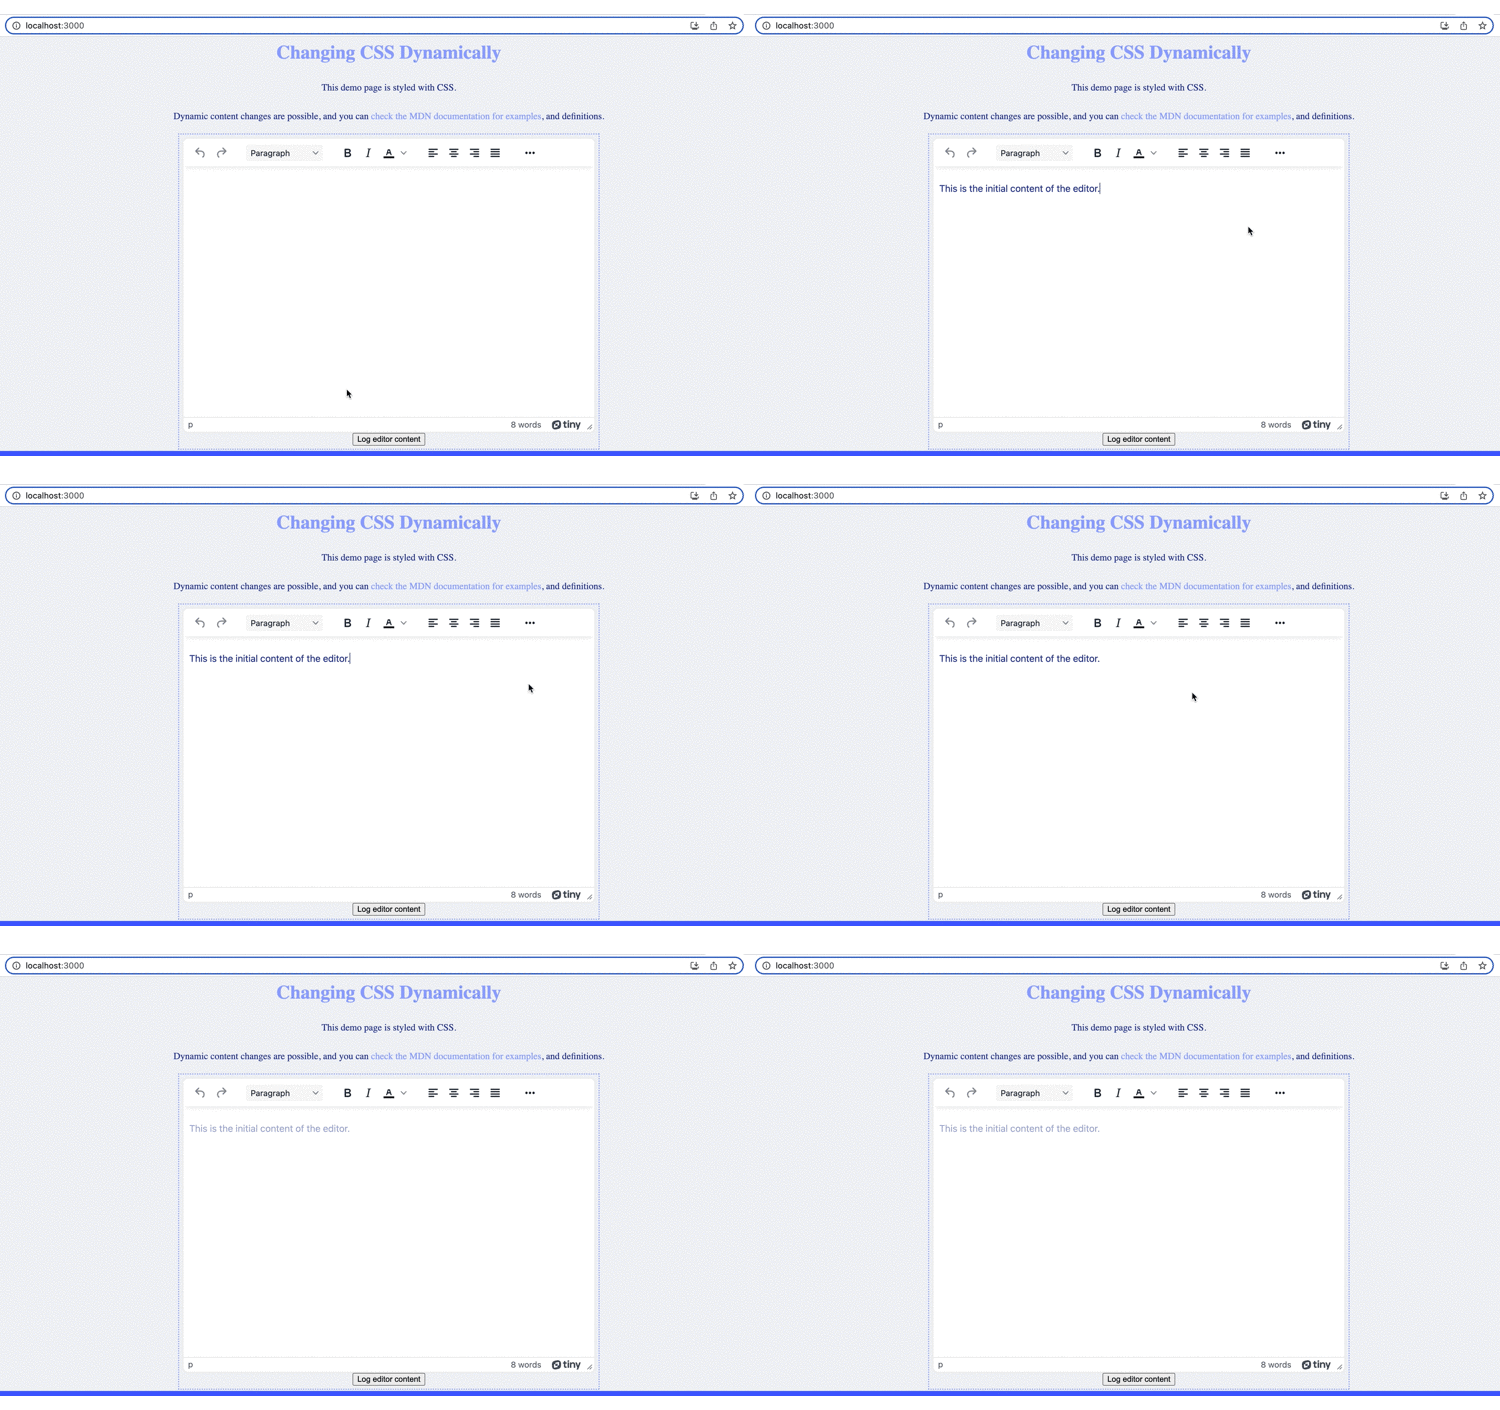
Next steps for dynamically changing CSS
Accessibility is a major area where this ability could become useful. In this case, you could change TinyMCE to a high contrast mode, or a mode with alternative colors – both of which are helpful to viewers living with colorblindness.
For instance, you could create a new class in the TinyMCE content_style option that loads high contrasting design content:
.contrast {
  color: #ffffff; /* White text */
  background-color: #000000; /* Black background */
}And a design optimized for colorblind vision:
.colorchange {
  color: #333333; /* Dark gray text */
  background-color: #f4f4f4; /* Light gray background */
}You could even create a new stylesheet for the editor, and introduce it with the loadCSS() API method. TinyMCE’s effortless customization options unlock a diverse range of design options for your dynamic application.
If you have any questions or thoughts on DOM utility options within TinyMCE, check on the blog article that introduces the DOM utility API methods, or contact us for more information.
