Keyboard shortcuts and text editors are nigh-inseparable in the world of content editing productivity. You’ll be hard-pressed to find any WYSIWYG text editor without a solid set of keyboard shortcuts to improve your workflow while editing content.
TinyMCE is no exception. There are over 30 useful shortcuts in TinyMCE that improve the editing power you have over your content. All of them are perfectly compatible with Microsoft Word or LibreOffice.
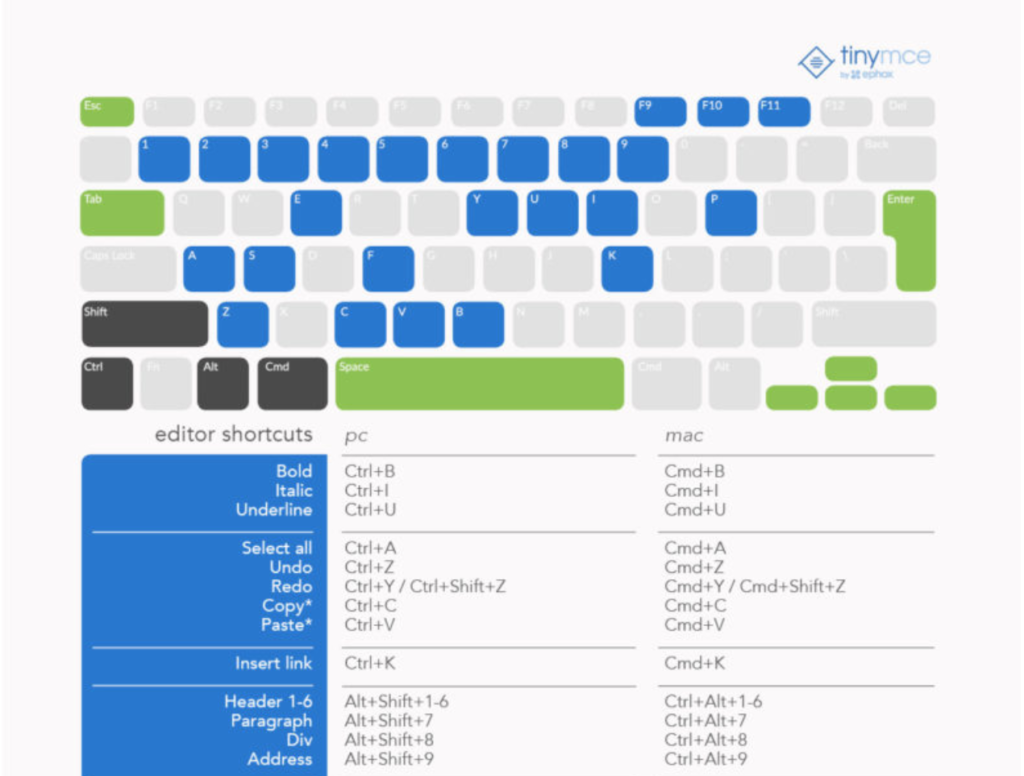
If you’ve ever wondered exactly which shortcuts TinyMCE allows you to use, the documentation linked above will tell you what already exists in our shortcut feature set. We also have this infographic you can use as a quick visual reference on TinyMCE’s core editor shortcuts.
One of TinyMCE’s major strengths is its customizability. In addition to these pre-existing shortcuts, TinyMCE also gives you the ability to add your own shortcuts.

Using the tinymce.Shortcuts API, you can add two kinds of keyboard shortcuts. Both shortcuts for pre-existing functionality (features that are already part of core TinyMCE), or shortcuts for new functionality, limited only by the scope of your JavaScript knowledge.
For either of these, all it takes is a simple addition to your TinyMCE init statement. Here’s how to do it.
How to add shortcuts
First, you’ll need an initialization callback. It looks something like this:
init_instance_callback: function (editor) {
  // Shortcuts and useful things go here.
}
Nothing too major. This statement will get called as soon as TinyMCE is initialized in your browser, giving you access to the editor object before anything else happens.
You’ll need to add that right inside your tinymce.init, just like you would any other property:
tinymce.init({
  selector: ".myTinySelector",
  init_instance_callback: function (editor) {
    // Shortcuts and useful things go here.
  },
});
Adding shortcuts with pre-existing functionality
Adding shortcuts for features that are already part of TinyMCE is straightforward. Inside your init_instance_callback (that we’ve already written above), place the following line:
editor.shortcuts.add("alt+b", "A New Way To Bold", "Bold");
Here, we’ve called editor.shortcuts.add with three parameters:
- A list of keys that activate the shortcut, separated by the
+symbol - A description of the shortcut itself
- A command string
More examples
You can add as many editor.shortcuts.add as you like, as long as they’re comma-separated.
init_instance_callback: function (editor) {
  editor.shortcuts.add("alt+i", "A New Way To Italicize", "Italic"),
  editor.shortcuts.add("alt+ctrl+u", "A New Way To Underline", "Underline"),
  editor.shortcuts.add("alt+shift+c", "A New Way To Copy", "Copy")
}
Adding shortcuts with new functionality
Adding shortcuts for custom functionality follows a similar process. Instead of supplying a TinyMCE command string, a function must be provided. This function can be almost anything you want, as long as it can be expressed in JavaScript. Anything you write will have access to the editor object.
Examples
init_instance_callback: function (editor) {
  editor.shortcuts.add("alt+t", "Show Me My Content", function() {
    alert(editor.getContent())
  }),
  editor.shortcuts.add("alt+ctrl+t", "Take Me To a Webpage", function() {
    window.open("https://www.ephox.com")
  }),
  editor.shortcuts.add("alt+shift+t", "Insert Some Content", function() {
    editor.execCommand("mceInsertContent", false, "Some Content")
  }),
}
Conclusion
There are a lot of benefits to adding shortcuts for either existing functionality, or new functionality expressed through custom JavaScript. TinyMCE’s many convenient shortcuts facilitate greater editing ability.
Adding your own shortcuts also significantly helps the user become more familiar in editing with TinyMCE, making your application more useful in the context of content creation when you use the editor.shortcuts API.
