Markdown is a popular lightweight markup language that is easy to read and write. Commonly used for documentation, README files, and other content requiring simple formatting, it offers simplicity and efficiency. However, when working within rich text editors like TinyMCE, users often face challenges importing and exporting Markdown content without losing formatting.
Adding Import and Export buttons to the TinyMCE editor can streamline workflows for those who switch between Markdown and HTML formats, benefiting developers, technical writers, and content creators collaborating on platforms utilizing both Markdown and WYSIWYG editors.
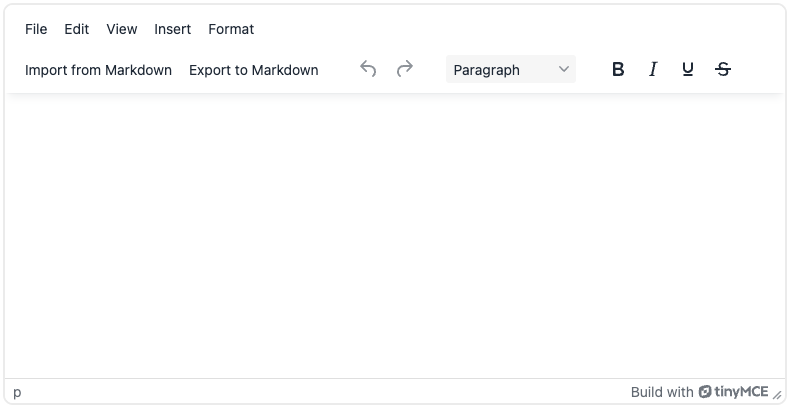
In this blog, we will create two toolbar Markdown buttons to import and export Markdown content in the TinyMCE editor. The Markdown plugin already allows automatic conversion of Markdown to HTML on paste and lets you extract HTML content as Markdown through its API. Our import feature will enhance this capability by enabling you to upload .md files from your computer and insert them as HTML content in the editor. The export feature will build on the plugin functionality to allow you to download the HTML content as a Markdown file.
Step one: Set up your project
We start by creating a basic HTML and JavaScript page including a TinyMCE setup with the Markdown plugin enabled.
👉 Note: You will need to replace your-api-key with a valid TinyMCE API key. If you don’t already have one, you can get one with a free TinyMCE 14-day trial in less than one minute.
We’ll call the first file index.html.
<!DOCTYPE html>
<html lang="en">
  <head>
    <meta charset="UTF-8" />
    <meta name="viewport" content="width=device-width, initial-scale=1.0" />
    <script
      src="https://cdn.tiny.cloud/1/your-api-key/tinymce/7/tinymce.min.js"
      referrerpolicy="origin"
    ></script>
    <title>TinyMCE Import/Export Markdown</title>
  </head>
  <body>
    <textarea id="editor"></textarea>
    <script src="index.js"></script>
  </body>
</html>Our second file will be index.js.
tinymce.init({
  selector: "#editor",
  plugins: "markdown",
});
Step two: Add the "Import from Markdown" toolbar button
Next, we’ll add a new “Import from Markdown” button to the TinyMCE toolbar. This button will open a file picker dialog when clicked, allowing the user to select a Markdown file from their computer. The file content will then be read and inserted into the editor as HTML content using the MarkdownInsert command.
Update the tinymce.init function in the index.js file to include the new toolbar button:
tinymce.init({
  selector: "#editor",
  plugins: "markdown",
  toolbar: "importmd",
  setup: (editor) => {
    // Import from Markdown
    editor.ui.registry.addButton("importmd", {
      text: "Import from Markdown",
      onAction: async () => {
        const input = document.createElement("input");
        input.type = "file";
        input.accept = ".md";
        input.onchange = (event) => {
          const file = event.target.files[0];
          if (file) {
            const reader = new FileReader();
            reader.onload = (e) => {
              const content = e.target.result;
              editor.execCommand("MarkdownInsert", false, content);
            };
            reader.readAsText(file);
          }
        };
        input.click();
      },
    });
  },
});
Step three: Add the "Export to Markdown" toolbar button
Like “Import to Markdown”, we’ll need to add an “Export to Markdown” toolbar button. This button will extract the HTML content from the editor and convert it to markdown using the markdown.getContent() method. The markdown content will then be downloaded as a file using the Blob and URL.createObjectURL browser APIs.
Update the existing tinymce.init function in the index.js file to include the new toolbar button:
tinymce.init({
  selector: "#editor",
  plugins: "markdown",
  toolbar: "importmd exportmd",
  setup: (editor) => {
    // Import from Markdown
    editor.ui.registry.addButton("importmd", {
      text: "Import from Markdown",
      onAction: async () => {
        const input = document.createElement("input");
        input.type = "file";
        input.accept = ".md";
        input.onchange = (event) => {
          const file = event.target.files[0];
          if (file) {
            const reader = new FileReader();
            reader.onload = (e) => {
              const content = e.target.result;
              editor.execCommand("MarkdownInsert", false, content);
            };
            reader.readAsText(file);
          }
        };
        input.click();
      },
    });

    // Export to Markdown
    editor.ui.registry.addButton("exportmd", {
      text: "Export to Markdown",
      onAction: async () => {
        const markdownContent = await editor.plugins.markdown.getContent();
        const blob = new Blob([markdownContent], {
          type: "text/markdown;charset=utf-8",
        });
        const url = URL.createObjectURL(blob);
        const a = document.createElement("a");
        a.href = url;
        a.download = "markdown.md";
        a.click();
        URL.revokeObjectURL(url);
      },
    });
  },
});
Step four: Test your setup
You will need a sample markdown file to import. Copy the following markdown content into a new file named test.md:
# Heading1
## Heading2
### Heading3
---
This is a paragraph with **bold** and *italic* text.

This is a list:
* Item 1
* Item 2
* Item 3
> Here is some text that is quoted.Run a local server using a tool like http-server to open your index.html file in a browser. This will allow you to see TinyMCE in action and test the new "Import from Markdown" and "Export to Markdown" buttons.
Run the following command in your terminal to run a local server:
npx http-serverOpen your browser and navigate to http://localhost:8080 to view the TinyMCE editor.
To test "Import from Markdown", click the toolbar button and select the test.md file you created. The markdown content will be inserted into the editor as HTML content.
To test "Export to Markdown", type some formatted content into the editor, then click the toolbar button. A file named markdown.md will be downloaded, containing the HTML content as markdown.

What’s next?
In this guide, we've shown you how to extend TinyMCE's Markdown plugin by adding Import and Export Markdown buttons to the toolbar. This demonstrates the flexibility of TinyMCE and how you can customize it to suit your needs.
Find out more about the Markdown plugin and how to use it in your projects today. Follow these easy Markdown guides from TinyMCE to continue your learning journey:
