Hotkeys and keyboard shortcuts – without them, you'd be losing time and energy digging through endless menus. Nobody has time for that. But a good text editor component can give you and your customers a variety of keyboard shortcuts available by default: shortcuts which are familiar for anybody who relies on Microsoft Word or Google Docs.
TinyMCE brings with it useful and family keyboard shortcuts, and since TinyMCE is effortlessly customizable, you can create new keyboard shortcuts as needed.
This post explains how keyboard shortcut customization works in TinyMCE. In the following sections, you'll find explanations and a demo on how to go about creating, changing, and customizing keyboard shortcuts with TinyMCE’s shortcut APIs.
What are keyboard shortcuts
Keyboard shortcuts are a way to activate a function in software or a program with only the keyboard. Keyboard shortcuts are designed to be a faster way to work by instantly accessing and running functions held within menus.
It’s a quicker and responsive user experience compared to using the mouse to navigate and activate software functions. No other device has the flexibility or the universal adoption as the keyboard for human-computer interaction, which makes keyboard shortcuts important to help customers improve their productivity.
How to create keyboard shortcuts in TinyMCE
Keyboard shortcuts and text editors are nigh-inseparable in the world of content editing productivity. TinyMCE is no exception. There are over 30 pre-programmed useful keyboard shortcuts in TinyMCE which improve the editing power you have over your content. All of them are compatible with Microsoft Word, LibreOffice, and Google Docs.
Using the tinymce.Shortcuts API, you can add two kinds of keyboard shortcuts:
- Change the keyboard shortcut keys for pre-existing functionality (features that are already part of core TinyMCE)
- Create new keyboard shortcuts
There are two shortcut APIs required to add your keyboard shortcuts:
- The tinymce.editor.addShortcut API
- The tinymce.shortcuts.add API
The addShortcut API shortcut works with the following syntax:
The key combination
Start with the specific keys to press:
editor.addShortcut("meta+alt+y");
The description
Write a description of what the new shortcut does:
editor.addShortcut("meta+alt+y", "Add yellow highlight to selected text");
The command function
This last part specifies what happens when the customer successfully presses the key combination:
editor.addShortcut(
  "meta+alt+y",
  "Add yellow highlight to selected text",
  function () {
    editor.execCommand("hilitecolor", false, "#FFFF00");
  }
);
The shortcuts API has a similar syntax, but can also receive the remove() method, which is useful for deactivating a custom keyboard shortcut.
Keyboard Mappings
It's important to know how to represent specific keys to TinyMCE, and the following keyboard mappings show what words to include in the key combination part of the API syntax, depending on operating system:
PC
- meta – ctrl
- shift - shift
- ctrl - ctrl
- alt - alt
- access - shift+alt
macOS
- meta – command
- shift - shift
- ctrl - ctrl
- alt - option
- access - control+option
How to customize keyboard shortcuts
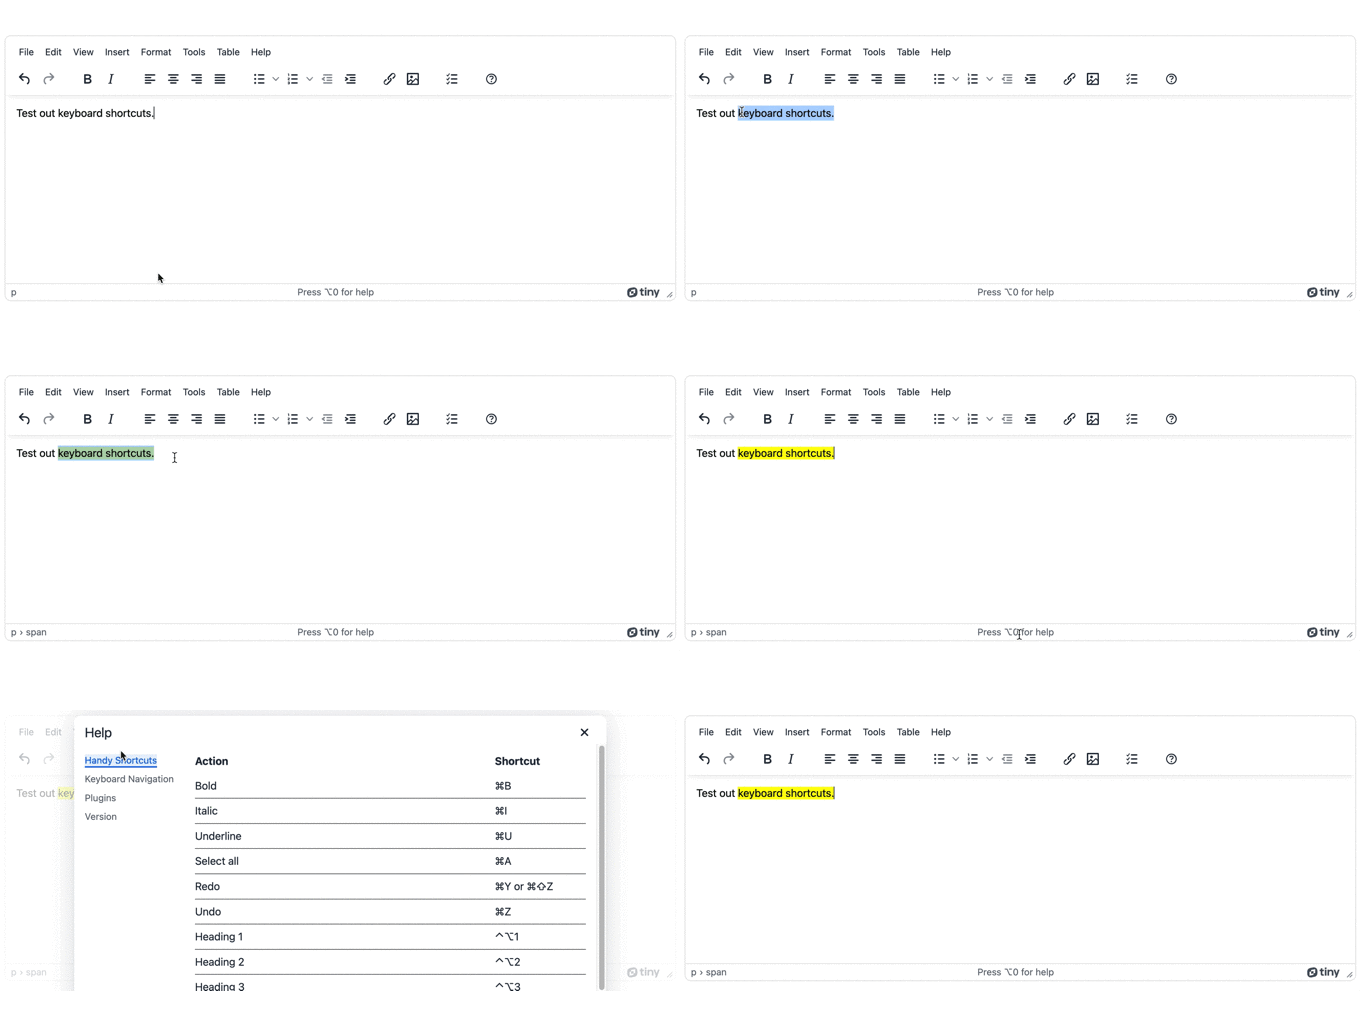
The following demo shows the steps involved in creating a keyboard shortcut in TinyMCE:
-
Create an index.html file in your development environment
-
Copy the following HTML, and paste it into the file:
<!DOCTYPE html>
<html lang="en">
<head>
    <meta charset="UTF-8">
    <meta name="viewport" content="width=device-width, initial-scale=1.0">
    <title>TinyMCE Keyboard Shortcuts</title>
</head>
<body>
</body>
</html>-
Add the the following script tags into your document head section, which connect to TinyMCE, and also specify the TinyMCE initialisation script:
<script src="https://cdn.tiny.cloud/1/your-api-key/tinymce/6/tinymce.min.js" referrerpolicy="origin"></script>
<script type="text/javascript">
tinymce.init({
    selector: "textarea",
    plugins: [
        "advlist autolink lists checklist link image charmap print preview anchor",
        "searchreplace visualblocks code fullscreen",
        "insertdatetime media table contextmenu paste" ],
    menubar: "view",
    toolbar: "preview | insertfile undo redo | styleselect | bold italic underline | alignleft aligncenter alignright alignjustify | bullist numlist outdent indent | link image | checklist",
    help_accessibility: true,
});
</script>NOTE: replace the “your-api-key” string with your TinyMCE API key, which you can get when you sign up for a TinyMCE account (you can use Google or GitHub credentials to log in). Using your API key prevents any domain name errors in the TinyMCE text area, and also comes with a 14-day FREE trial of TinyMCE’s Premium plugins.
-
Add the setup option to the TinyMCE init script:
tinymce.init({
  selector: "textarea",
  plugins: [
    "advlist autolink lists checklist link image charmap print preview anchor",
    "searchreplace visualblocks code fullscreen",
    "insertdatetime media table contextmenu paste",
  ],
  menubar: "view",
  toolbar:
    "preview | insertfile undo redo | styleselect | bold italic underline | alignleft aligncenter alignright alignjustify | bullist numlist outdent indent | link image | checklist",
  help_accessibility: true,
  setup: function (editor) {},
});
-
Copy and paste the following keyboard customization methods into the setup option:
   setup: function (editor) {
      editor.addShortcut("meta+alt+y", "Add yellow highlight to selected text", function () { editor.execCommand("hilitecolor", false, "#FFFF00"); });
      editor.shortcuts.add( "meta+alt+s", "Change the text to superscript", function () { editor.execCommand("mceToggleFormat", false, "superscript"); });
  },
});
NOTE: The examples in step 5 of this procedure demonstrate can act as a template to build more custom shortcuts, and you can check on the examples in the TinyMCE documentation for more ideas.
-
Save the changes
-
Test out the demo in your browser by making use of local host testing commands, for example, the Python command line tool, or PHP command line tool.

Changing keyboard shortcuts
TinyMCE comes out-of-the-box with a set of Core keyboard shortcuts, Accessibility focused keyboard shortcuts, and Advanced editor shortcuts for find and replace functions.
You can customize the key for these shortcuts:
-
Copy the following keyboard shortcut, and paste it into the setup option from the previous procedure:
   setup: function (editor) {
      editor.addShortcut("meta+alt+y", "Add yellow highlight to selected text", function () { editor.execCommand("hilitecolor", false, "#FFFF00"); });
      editor.shortcuts.add( "meta+alt+s", "Change the text to superscript", function () { editor.execCommand("mceToggleFormat", false, "superscript"); });
      editor.shortcuts.add("shift+alt+i", "A New Way To Italicize", function () { editor.execCommand('Italic'); });
  },

});-
Save the change, and test out the newly added alternative to creating italicized text
Debugging keyboard shortcuts
Using the right syntax for the custom keyboard shortcut is the first debugging step, confirming that you’ve added the right keyboard mapping (meta for the command key, for instance).
The function component of the shortcut API is a key area for testing and debugging, and one method is to use the Developer Tools Console in your browser to test the TinyMCE exec.commands or other APIs to make sure they work before committing the keyboard shortcut to your project.
How to disable keyboard shortcuts in TinyMCE
You can disable any custom shortcuts you have created dynamically using the remove() method. The browser default shortcuts may still cause these core shortcuts to work
regardless of the use of remove() depending on which shortcut you are trying to deactivate.
The remove() method syntax only requires a key combination. To disable one of the custom shortcuts created in the previous procedure:
-
Copy and paste the following line of JavaScript into the setup option after the previous configured keyboard shortcuts:
editor.shortcuts.remove("meta+alt+y");
  },
});-
Save the change
-
Test out the highlight shortcut. With the remove() syntax added, the shortcut no longer works
If you need the ability to turn a custom keyboard shortcut on and off dynamically, the remove() method is suited to this use case. You can make changes to the TinyMCE init script dynamically with TinyMCE’s other APIs, and the documentation has more information on how this is achieved.
The benefits of keyboard shortcuts
There are a lot of benefits to adding shortcuts for either existing functionality, or new functionality expressed through custom JavaScript. TinyMCE’s many convenient shortcuts facilitate greater editing ability.
Adding your own shortcuts also significantly helps the user become more familiar in editing with TinyMCE, making your application more useful in the context of content creation.
Contact the TinyMCE sales team anytime to find out more, and if you have any questions on modifying TinyMCE to fit your application.
