HTML tables used to sit at the center of web design, but they’ve since evolved to now be considered a good structure for holding and conveying complex information. Why? Because HTML tables allow content creators to construct useful displays, and convey complex information quickly, and web design structures are now more flexible. However, this involves changing style attributes, like the HTML table background color, and images. So, what's an easy way to do this?
Replicating the ability to change table background color – which some software, like Excel, does really easily – can be tricky in both CMSs or document management systems. That’s because there’s more to building an HTML table background option than it seems at first glance.
TinyMCE is a reliable and flexible rich text editor that allows for simple table construction. With a few CSS lines and the TinyMCE API methods, it’s possible to create a setting for HTML table background color. This post explains how to do this, and includes a demo.
HTML tables background: impact on web design
During the early days of web development in the 1990s, HTML tables defined a nested grid structure as a great structure for web design. It’s not, however, a design process that has carried through as web design continued to evolve.
Over time, HTML tables also changed their role within a website, and they’re now a method mainly used to display large amounts of data. To do this effectively, the table must have some way to guide the reader’s eye. Changing the HTML table background color can help achieve this goal of increased comprehension.
Customizing HTML table background color
The following procedure shows how you can create a table with different HTML table background color options to help guide the reader’s eye.
How to set up and customize the color of an HTML table background in TinyMCE
Before you start, getting a TinyMCE API key can help prevent domain name errors in the TinyMCE text area. Your API key also gives you free access to TinyMCE Premium plugins for 14 days. Head to the Get-tiny sign up page to get your FREE API key.
Setting up TinyMCE and the table plugin
- Create an index.html file in your development environment, and paste in the following HTML:
<!DOCTYPE html>
<html lang="en">
<head>
    <meta charset="UTF-8">
    <meta http-equiv="X-UA-Compatible" content="IE=edge">
    <meta name="viewport" content="width=device-width, initial-scale=1.0">
    <title>TinyMCE HTML Table background</title>
</head>
    <body>
        <textarea id="editor"></textarea>
    </body>
</html>- Copy and paste the following link to TinyMCE – the CDN link – to access TinyMCE through Tiny Cloud, and replace the “your-api-key” string with your TinyMCE API key:
<script
  src="https://cdn.tiny.cloud/1/your-api-key/tinymce/6/tinymce.min.js"
  referrerpolicy="origin"
></script>;
- Add another pair of script tags, and then paste the following JavaScript. It’s the tinymce.init method, and it’s where several important settings for the HTML table background color process are configured, such as the Advanced Table plugin:
    <script>
        tinymce.init({
        selector: '#editor',
        plugins: 'advtable powerpaste autolink advcode visualblocks visualchars image link media mediaembed table charmap pagebreak nonbreaking anchor insertdatetime advlist lists checklist wordcount tinymcespellchecker editimage help formatpainter charmap linkchecker',
        toolbar: 'undo redo spellcheckdialog formatpainter | fontfamily fontsize | bold italic underline forecolor backcolor | link image | alignleft aligncenter alignright alignjustify lineheight | checklist bullist numlist indent outdent | removeformat',
        height: '700px'
            });
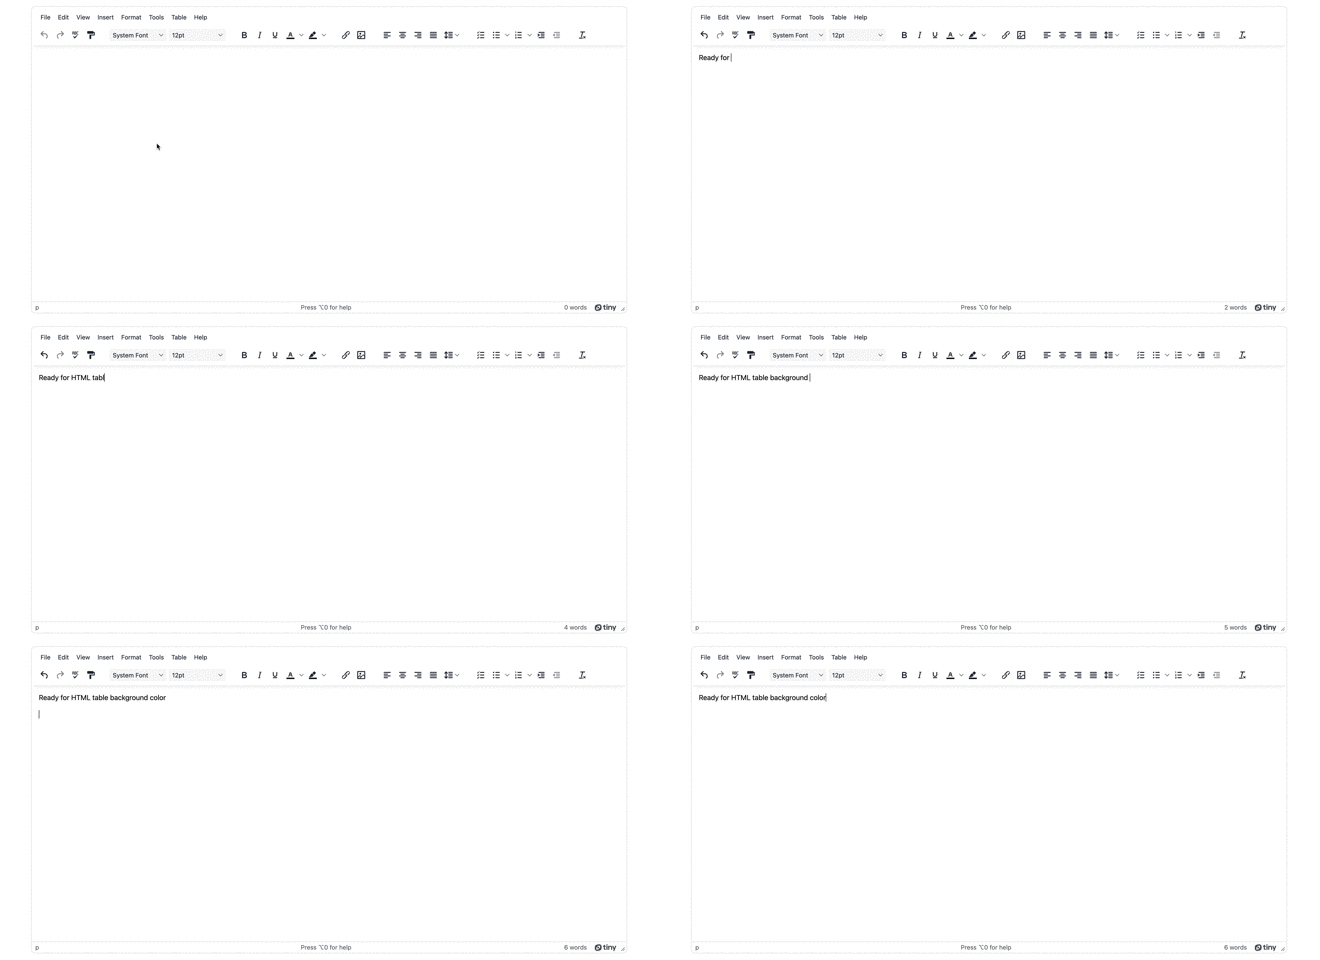
</script>- Save the changes, and then test run the index.html file by opening it in your browser, or use a local server command with Python or with the PHP command:
- Include the Table plugin toolbar button in the TinyMCE toolbar option in the TinyMCE init script:
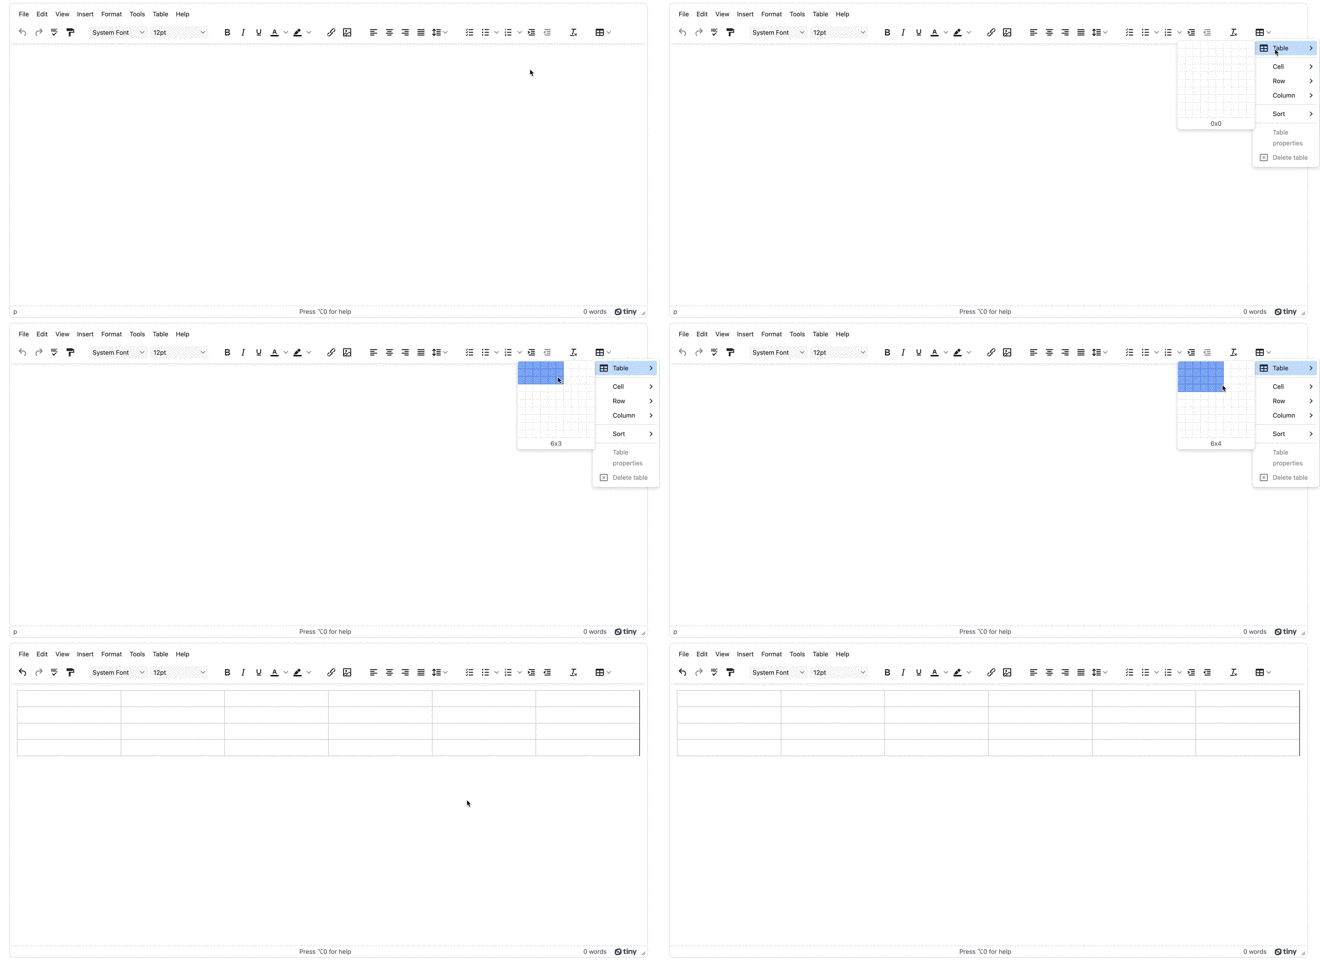
toolbar: 'undo redo spellcheckdialog formatpainter | fontfamily fontsize | bold italic underline forecolor backcolor | link image | alignleft aligncenter alignright alignjustify lineheight | checklist bullist numlist indent outdent | removeformat | table',- Save the change and then test out the TinyMCE table building abilities:
Creating and changing HTML background color
There are a few methods you can use to do this:
- Adjust the attributes of the table directly
- Set up a CSS class and assign it to the table, tr, td, and th elements as needed
- Use TinyMCE DOMUtils API methods to change the style rules for the editor, including the table style
The following procedures step through two of these methods: first, adjusting attributes directly, and then using API methods to add a table style rule.
- Include the Code plugin into the TinyMCE toolbar, and save the change:
toolbar: 'undo redo spellcheckdialog formatpainter | fontfamily fontsize | bold italic underline forecolor backcolor | link image | alignleft aligncenter alignright alignjustify lineheight | checklist bullist numlist indent outdent | removeformat | table | code',- Refresh the editor, and create a new table
- Open the Code plugin dialog to inspect the HTML. Add the following style attribute to the table element:
<table style="border-collapse: collapse; width: 100%; background-color: rgb(214, 238, 238);" border="1">- Save the change and close the inspector window
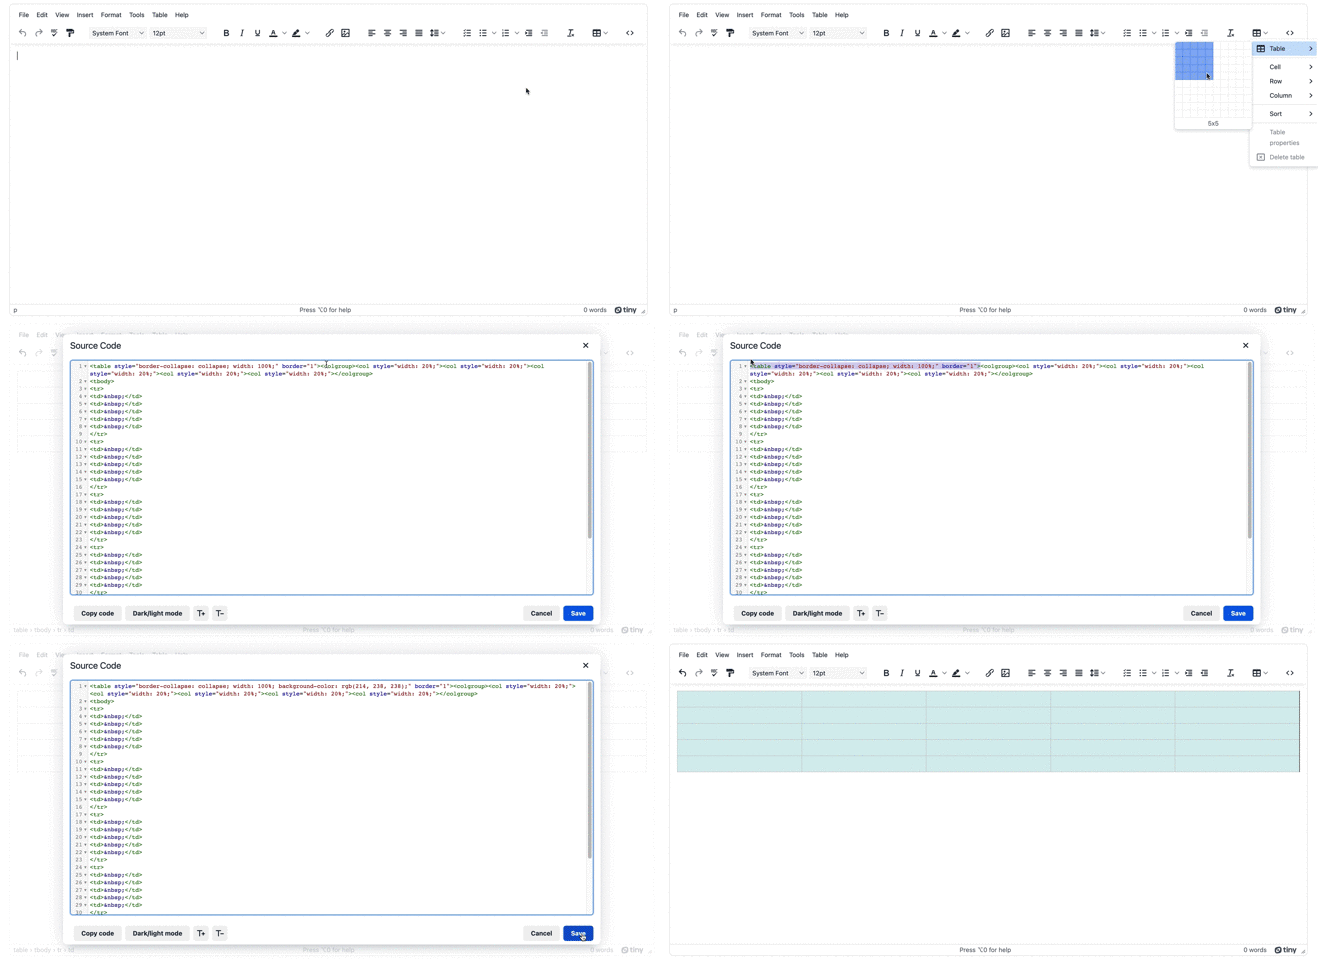
By manually adding attributes to the table, you can easily change the table background color. Rather than add attributes to the elements directly (not best practice for HTML table backgrounds), it’s better to set up a CSS class with the background color and add the class to the different table elements.
✏️NOTE: While you can set the HTML table background color with a color name or a hex value, TinyMCE converts the color to RGBA format once you save the attributes. The advantage of this change is that it adds the ability to include opacity, which is an ideal design point for content and document table design.
Changing HTML table background color dynamically
Using TinyMCE’s API methods, you can dynamically change the HTML table background color, and change it to help guide the viewer's eyes over complex table information. The addStyle method is one of the TinyMCE DOM.util API methods. Running the API method through a function can create a style rule for TinyMCE that can adjust the HTML table background color.
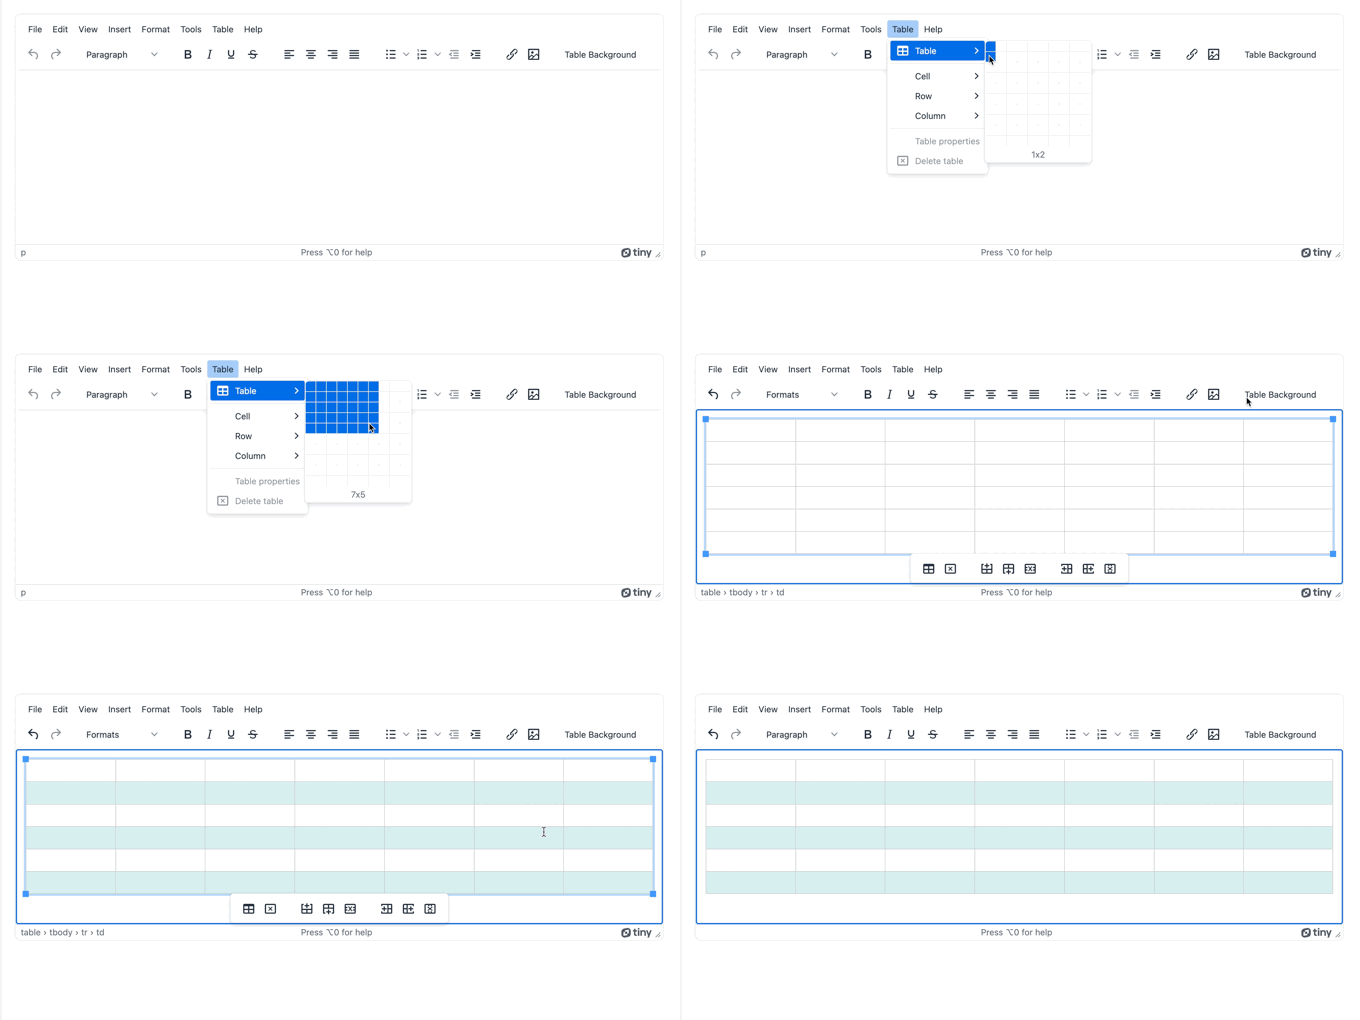
The following demo sets up a dedicated toolbar button. When pressed, the button provides alternating background color for the table:
- Within the TinyMCE init script from the previous procedure, add the following setup option:
setup: (editor) => { }
});

</script>- Add the editor UI registry JavaScript with the addButton method to the setup option, which also includes a name for the HTML table background color button, “tablebackground”:
setup: (editor) => {
editor.ui.registry.addButton('tablebackground', { });
    }
});

</script>- Configure the HTML table background color button using this style element that creates alternating table background colors to help guide the the reader’s eye:
setup: (editor) => {
editor.ui.registry.addButton('tablebackground', {
        text: 'Table Background',
        OnAction: (_) => tinymce.activeEditor.dom.addStyle('tr:nth-child(even) { background-color: #D6EEEE; }');
      });
    }
 });

</script>- Save the changes, and then test the button to add an alternating background color to the table:
Implementing HTML table background images
To implement HTML table background images, make use of the CSS background property along with the url option to specify the location of a specific image, for example:
table {
   background: no-repeat url("template-document-cover-landscape@2x");
}Here’s how to test it out in TinyMCE, setting up a dedicated toolbar button to configure the alternating background color with an image added to the first column:
- Modify the custom button to include a background image as well as the background color, which involves adjusting the style content, and a change to the custom toolbar button name:
setup: (editor) => {
    editor.ui.registry.addButton('tablebackground', {
        text: 'BackgroundImage',
        onAction: () => tinymce.activeEditor.dom.addStyle('tr:nth-child(even) { background-image: url(https://www.tiny.cloud/docs/_/img/tiny-white-sm.png); background-size: contain; background-repeat: no-repeat; background-color: #D6EEEE; }')
       });
     }
});- Save the change, and then test out the HTML table background image capability:
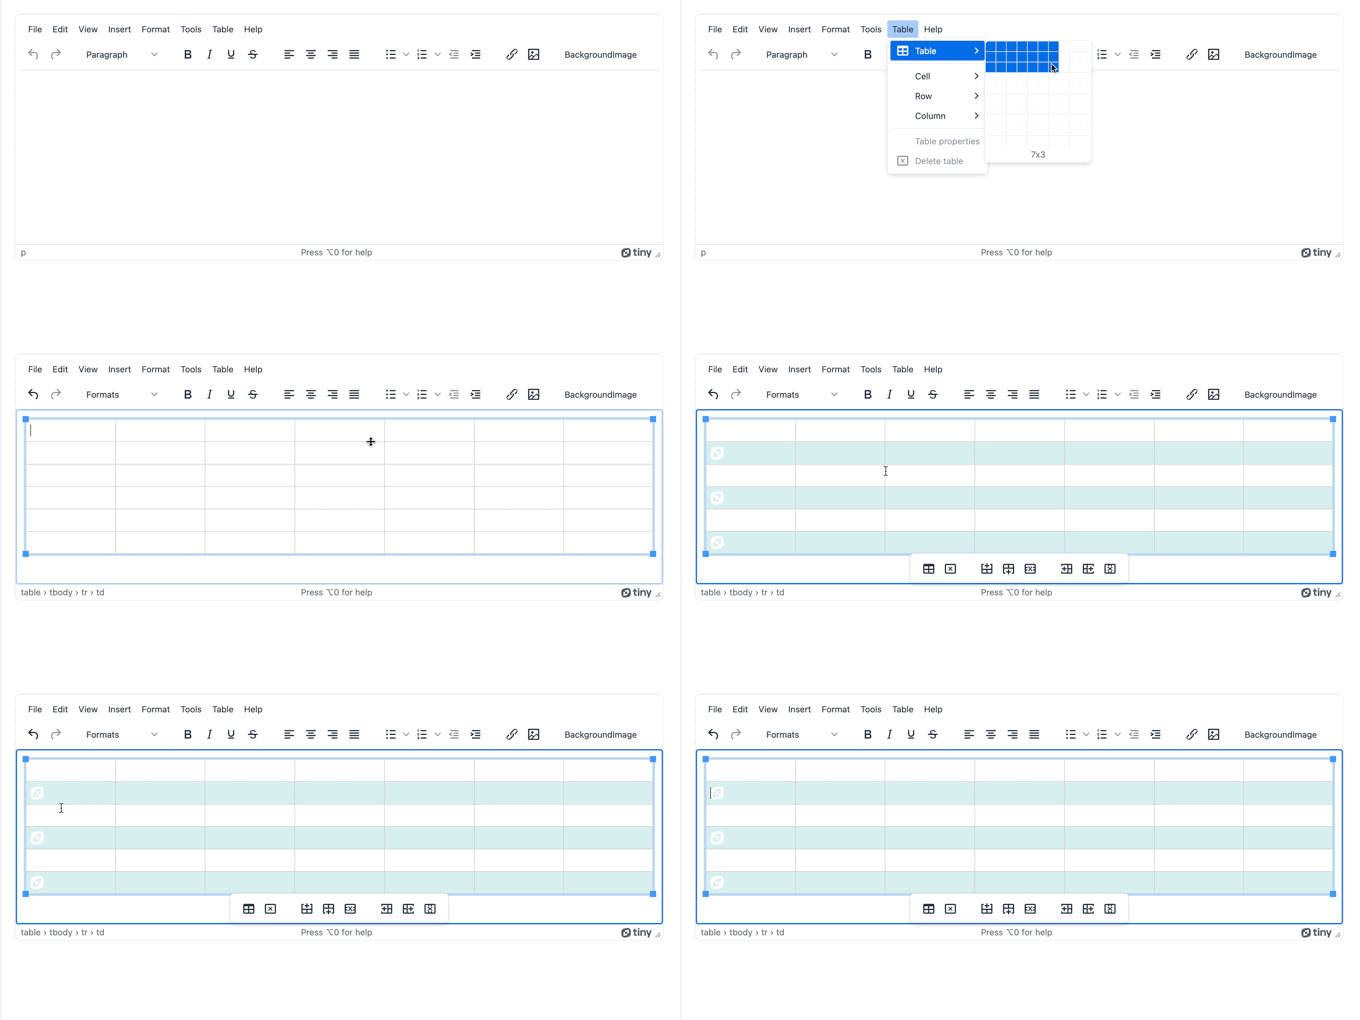
One point of HTML table background image best practice is to make sure that the width of the table and the image width line up with each other. Either line up the image and table width, or by designing the image such that it can tile or repeat seamlessly as the background image.
HTML table background next steps
Remember that within TinyMCE, you can set the HTML background color by adjusting the table HTML. In production, another solution could be to create a specific background color, and configure a TinyMCE’s addStyle or addClass API methods with a custom toolbar button to style the table background image more quickly.
Contact our support team for more information about HTML table background color or how TinyMCE can best support your web design plans.
