Writing and publishing content is as ubiquitous as the internet itself. When most people think about creating a blog or similar self-published content, they usually use a content management system like WordPress. It is no surprise to learn that WordPress claims to power 30% of websites.
But there is a new trend in content management systems (CMS) that is very different to how WordPress works. They are called headless CMSes.
A headless CMS decouples the authoring experience from the publishing experience. It provides tools for authoring and managing content, and makes the content available to a developer via an API. The developer can then read content from the API into their website publishing infrastructure. Headless CMSes are often used with static site generators, such as Gatsby or Hugo.
One of the more popular headless CMS platforms is Contentful. Contentful’s content management infrastructure, lets you author your content in a web app and consume it via an API for publishing. Developers often use a system like this as the authoring platform for a static website. This architecture is becoming more popular, as it supports a rich authoring environment while providing flexibility for publishing and deploying.
Announcing TinyMCE for Contentful
Contentful provides a UI Extensions mechanism, which allows someone to develop a custom component for editing content within the Contentful web app.
We created a Contentful UI Extension that loads TinyMCE 5, giving you access to TinyMCE's polished user experience and Tiny Cloud’s premium features (free trial available).
How to integrate TinyMCE with Contentful
To install TinyMCE for Contentful:
- Sign up for an API Key at https://www.tiny.cloud/auth/signup/, or use your existing API Key.
- In your My Account dashboard, go to the Approved Domains page, and add the domain
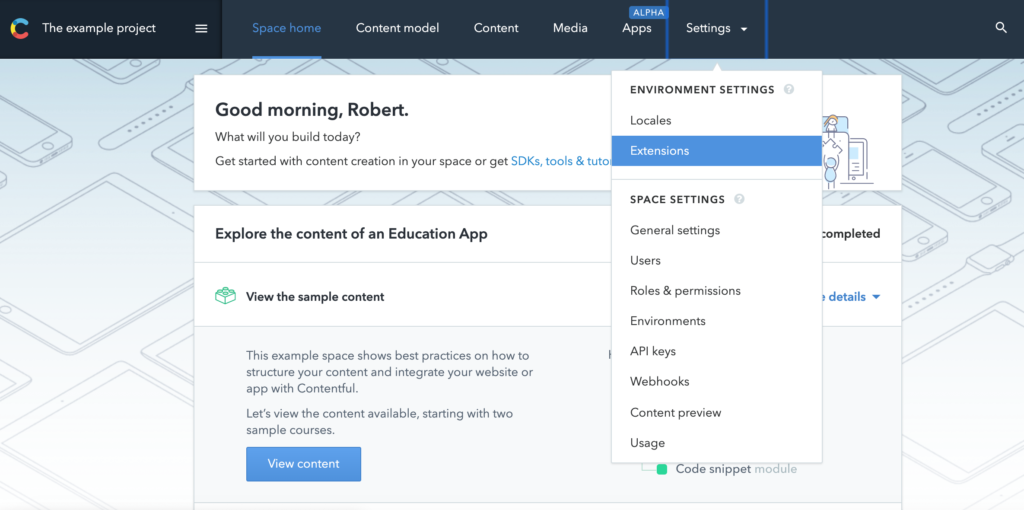
contentful.tiny.cloud - In your Contentful dashboard, go to Settings, Extensions
- Click Add Extension, then Install from Github.
- Enter the URL: https://github.com/tinymce/tinymce-contentful/blob/master/extension.json
- Enter your Tiny Account API Key (generated when you signed up)
- Click Save

You then need to configure TinyMCE as the editor for a Text field.
- Under Content Model, add or edit a Content Type.
- Add a field of type Text. The Long Text option is recommended.
- Click Create and Configure, Appearance and select TinyMCE
- In this screen, you can customize some of TinyMCE's settings to best meet your needs.
You can then use TinyMCE to edit this text field in your content items.
We've also filmed a screencast showing this in action.
Why we write to Contentful’s text field and not the rich text field
Contentful's rich text fields use a custom JSON structure as their input and output format. When consuming this format via the Contentful APIs, you may need to convert this format to HTML. This certainly provides a lot of publishing flexibility, but is extra work when integrating content into your website.
TinyMCE is built primarily to read and write HTML. To support this custom JSON structure, we would have to write converters to and from HTML. We would also have to be careful not to lose information in this process, and we may have to restrict what markup we support, in order to fit within the definition of the JSON format.
For these reasons, we believe it's simplest for TinyMCE to just store HTML in a standard Contentful Text field. When you consume the content from the Contentful API, you get the rich, clean HTML straight from the editor.
Development challenges
Contentful's API for custom editors is fantastic to work with, and made many parts of the integration quite simple. However, all development work has its challenges and I'd like to discuss some of these that we encountered during the creation of this integration.
Contentful places custom editors within an <iframe> tag that can be specified as a URL via the src attribute, or as inline text using the srcdoc attribute. They also use iframe sandboxing techniques to improve security. We found that only the src option worked, due to how TinyMCE uses iframes within the editor.
TinyMCE is incredibly customizable, so we wanted to make that easily available to users of this integration. Contentful provides custom properties for a UI extension, but only 8 of them and the text fields are limited to 255 characters. It's definitely challenging to fit a significant portion of TinyMCE's configuration into so little space! For now, we just allow configuration of plugins, toolbar buttons and menus (but not menu items). If there is anything you would like us to add, please let us know.
All-in-all, these challenges were quite minor and the integration was a very interesting project.
Conclusion
We hope that this integration is useful to you. We would definitely like to hear your feedback.
Please try out the tech preview and let us know any feedback you may have.
