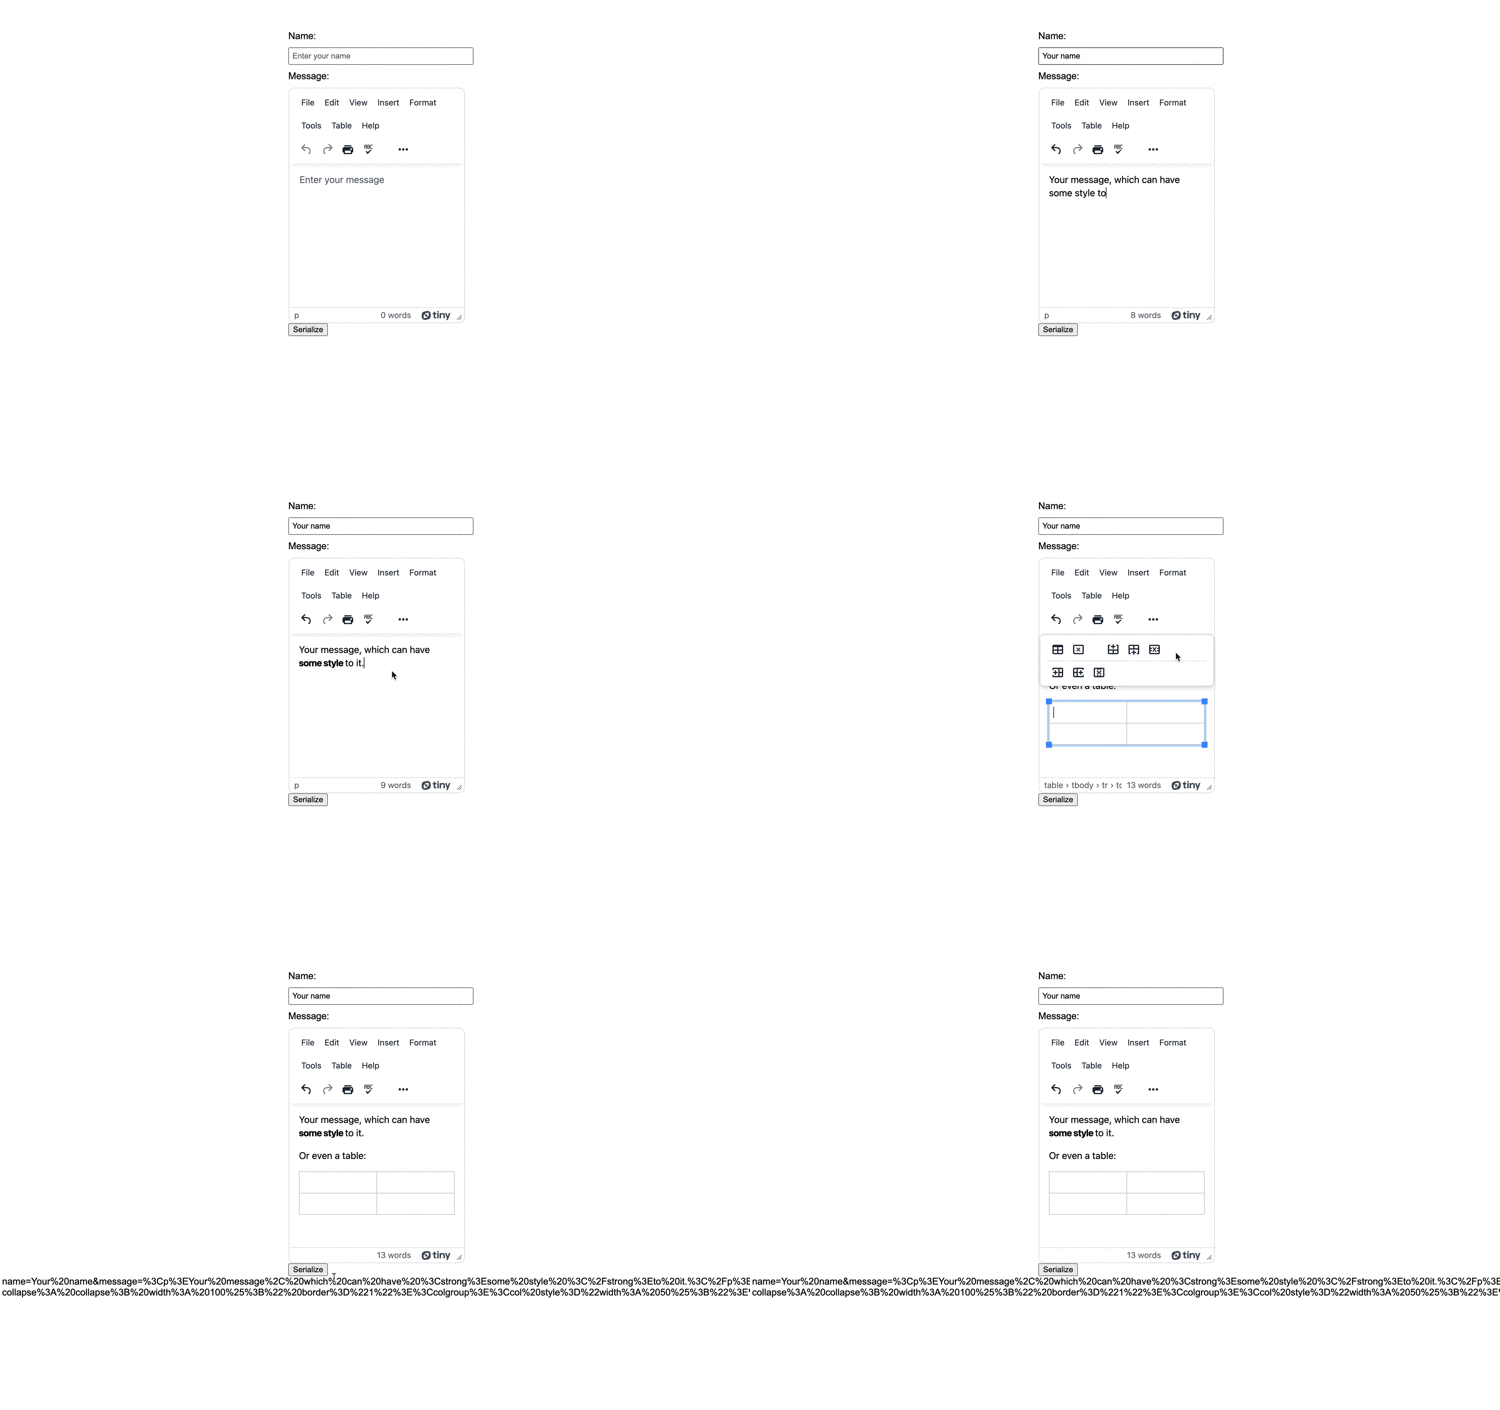
Filling out forms becomes tedious quickly, and the information must be handled with care. Online forms are no different. Handling the content of an online form needs a few things: Correctly formatted HTML, JavaScript or jQuery serialize methods, and AJAX request management. There’s one component in the HTML that often gets overlooked, but is surprisingly important: the textarea element.
In production, a textarea element often gets replaced with a rich text editor. That’s good for customers, but there’s a problem: not all rich text editor components handle form information with care. Or worse, they require you to put in significant customization and code to extract and serialize the form data.
With TinyMCE as the rich text editor component in your form, you don’t need to jump through hoops to serialize form data. In fact, TinyMCE’s effortless customizable configuration makes serializing form data quick to put together. This article explains how that process is done using jQuery serialize methods – one of the ways in which TinyMCE integrates with jQuery rich text editor to provide ease of implementation for your app.
What is serialization in jQuery?
The serialize() method in jQuery allows you to encode a set of form elements into a string. Running jQuery serialize creates a URL-encoded string out of the form element data, which can be useful for sending form data via AJAX requests. The method doesn't work on non-form elements. Also, know that jQuery serialize creates an array-like syntax of the form data when there are multiple form elements on a page.
jQuery form serialize and TinyMCE
Since TinyMCE replaces the textarea element with an iframe that contains the TinyMCE text area, toolbars, and menubar, the challenge is getting the content of the TinyMCE text area. For your forms, the TinyMCE Autosave plugin handily solves this problem. The following procedure explains the process with a demo.
How to use jQuery serialize with forms and TinyMCE
-
Create a new index.html file in your development environment, and place the following form HTML into it. This demo content contains the needed jQuery link in the head section:
<!DOCTYPE html>
<html>
<head>
  <meta charset="UTF-8">
  <meta http-equiv="X-UA-Compatible" content="IE=edge">
  <meta name="viewport" content="width=device-width, initial-scale=1.0">
  <title>Form Demo</title>
  <script src="https://code.jquery.com/jquery-3.7.0.js"></script>
</head>
<body>
  <form>
    <label for="name">Name:</label>
    <input type="text" id="name" name="name" placeholder="Enter your name" required>
    <label for="message">Message:</label>
    <textarea id="editor" name="message" rows="4" placeholder="Enter your message" required></textarea>
    <input type="button" value="Serialize" id="button">
  </form>
  <div id="serial01"></div>
</body>
</html>-
Add TinyMCE using the CDN link and the TinyMCE init script. This configuration makes use of several Premium plugins. When you sign up for a FREE rich text editor API key and add it to the CDN link (replace the “your-api-key” string), you get 14 days free access to Premium plugins. Plus, adding an API key removes any warnings about domain names from the text area:
<script src="https://cdn.tiny.cloud/1/your-api-key/tinymce/6-dev/tinymce.min.js" referrerpolicy="origin"></script>
  <script>
    tinymce.init({
      selector: '#editor',
      plugins: 'powerpaste casechange searchreplace autolink save autosave directionality advcode link code table charmap pagebreak nonbreaking insertdatetime advlist lists checklist wordcount tinymcespellchecker help formatpainter linkchecker emoticons advtable',
      toolbar: 'undo redo print spellcheckdialog | fontfamily fontsize | bold italic underline | link image | alignleft aligncenter alignright alignjustify | checklist bullist numlist indent outdent | code',
    });
</script>-
Include the following jQuery in a new set of script tags. When the button to submit the form notices the click event, it runs jQuery serialize followed by the text method to append the serialized string inside the div with the serial01 ID.
The key part of the jQuery serialize script for the form data is the TinyMCE triggerSave API method. This saves the contents of the TinyMCE text area, making it available for the jQuery to serialize.
  <script>
    $("document").ready(function(){
      $("#button").click(function(){
        tinymce.triggerSave();
        $("#serial01").text($("form").serialize());
      });
    });
</script>-
Create a CSS file, and add the following CSS to style the form into something that resembles the essentials of a form you might find online:
touch style.css

…

body {
      font-family: Arial, sans-serif;
    }

    form {
      width: 300px;
      margin: 0 auto;
    }

    label {
      display: block;
      margin-bottom: 10px;
    }

    input[type="text"],
    textarea {
      width: 100%;
      padding: 5px;
      margin-bottom: 10px;
    }

    input[type="submit"] {
      background-color: #4CAF50;
      color: white;
      padding: 10px 15px;
      border: none;
      cursor: pointer;
    }

    input[type="submit"]:hover {
      background-color: #45a049;
}-
Include a link to the new stylesheet in the HTML head section:
<!DOCTYPE html>
<html>
<head>
  <meta charset="UTF-8">
  <meta http-equiv="X-UA-Compatible" content="IE=edge">
  <meta name="viewport" content="width=device-width, initial-scale=1.0">
  <link rel="stylesheet" href="style.css">
<title>Form Demo</title>-
Save the changes, and then test out the jQuery serialize process. You can open the index.html file in a browser, or set up a local host server for testing with Python, or with the PHP option:

Can jQuery serialize handle file input in a form?
The jQuery serialize method cannot handle file uploads directly. It’s designed for transforming data into a URL-encoded string format, which is not suitable for handling file uploads. File uploads need both the client-side and server-side handling beyond the jQuery serialize parameters such as file validation, storage, and security.
Form serialize not working: errors and exceptions handling
The main error that might appear when handling form data from the TinyMCE rich text editor is an empty serialized response from jQuery. This happens when the API method used to get the TinyMCE content is not working. For instance, you might have the following configured:
$("document").ready(function () {
  $("button").click(function () {
    let content = tinymce.get("form-long-response").getContent();
    console.log(content);
    $("textarea[name=textarea]").val(content);
    let str = $("form").serialize();
    console.log(str);
  });
});
Here, the function manually retrieves the state of the text area when the button click event happens. It then adds that result to the textarea on the page (assuming there is only one text area). The problem is that this then returns an empty form.
Rather than manually setting the textarea element contents in the DOM, use the setup option in the TinyMCE init script. Configure this option to run the TinyMCE save API method whenever the change event happens in the rich text editor. It’s an example of how TinyMCE’s effortless customization saves time and energy:
  <script>
    tinymce.init({
      selector: '#editor',
      plugins: 'powerpaste casechange searchreplace autolink autosave save directionality advcode link code table charmap pagebreak nonbreaking insertdatetime advlist lists checklist wordcount tinymcespellchecker help formatpainter linkchecker emoticons advtable',
      toolbar: 'undo redo print spellcheckdialog | fontfamily fontsize | bold italic underline | link image | alignleft aligncenter alignright alignjustify | checklist bullist numlist indent outdent | code',
      setup: function (e) {
        e.on('change', function () {
          tinymce.triggerSave();
        })
      }
    });
</script>Serialize jQuery forms in TinyMCE
The best method to handle form data when TinyMCE is your rich text editor is making use of the available save methods (and the Save plugin). They are designed to take the frustration out of figuring a solution to the HTML requirements of the jQuery serialize method.
If you have any further questions about TinyMCE and jQuery, you can contact us, read about how to get setup with TinyMCE and jQuery, or check on the TinyMCE and jQuery integration.
