React is an excellent JavaScript library for building user interfaces. Using React, you can create beautiful applications with ease and can use TinyMCE as your React WYSIWYG editor. However, much like anything else, if you don't use React properly, you could end up creating more problems than you solve. You might get stuck on a bug that is impossible to trace, end up writing spaghetti code, or worse – you might have to rewrite most of your application if you don't keep some important "gotchas" in mind. So let's get straight into six common mistakes to avoid when using React.
1. Don't create God components
React's building blocks are components. A component is used to define a contained and reusable piece of the UI so you can focus on how it works in isolation, and then also how it works in conjunction with other components in a composable system. Some examples of components are elements like navbars, data tables, and clock widgets.
God components are components that do too much - they are monolithic, and not reusable. Building an entire page with all the UI elements packed into a single component, is generally considered an anti-pattern in React.
For example, a God component might look something like this:
import React, { Suspense } from 'react';

function MyComponent() {
  return (
    <div>
      <div>
        { // Map related HTML }
      </div>

      <div>
        { // Chart related HTML }
      </div>

      <div>
        { //Datatable HTML }
      </div>

    </div>
  );
}Solution
Invest the time to identify the different interdependent parts of your application, and lift those parts into their own components. By breaking them down in this way, each part is easier to maintain and recompose where required.
Using the example above, we can split this God component into multiple components:
//DataTableComponent.js
import React, { Component } from 'react';

class DataTableComponent extends Component {
  render() {
    return (
      <div>
        { //Datatable HTML }
      </div>
    );
  }
}

export default DataTableComponent;

//ChartComponent.js
import React, { Component } from 'react';
import Button from './Button'; // Import a component from another file

class ChartComponent extends Component {
  render() {
    return (
      <div>
        { //Chart related HTML }
        <Button color="red" action="home"/>
      </div>
    );
  }
}

export default ChartComponent;

//MapComponent.js
import React, { Component } from 'react';

class MapComponent extends Component {
  render() {
    return (
      <div>
        { //Map related HTML }
      </div>
    );
  }
}

export default MapComponent;Then these components can be combined to form the complete solution:
import React, { Suspense } from "react";

const DataTableComponent = React.lazy(() => import("./DataTableComponent"));
const ChartComponent = React.lazy(() => import("./ChartComponent"));
const MapComponent = React.lazy(() => import("./MapComponent"));

function MyComponent() {
  return (
    <div>
      <Suspense fallback={<div>Loading. Please Wait...</div>}>
        <section>
          <DataTableComponent />
          <ChartComponent />
          <MapComponent />
        </section>
      </Suspense>
    </div>
  );
}
Note: In this example, we’re using lazy loading as well as React’s inbuilt Suspense component to improve responsiveness of our application.
2. It's not a good idea to modify the state directly
State in React should be immutable - you shouldn’t modify state directly, because doing so can cause errors and performance issues that are difficult to debug. Consider the following example.
const modifyCarsList = (element, id) => {
  carsList[id].checked = element.target.checked;
  setCarsList(carsList);
};
Here, we are trying to update the checked key of an object in an array based on the state of a checkbox. The problem here is that React can’t observe and trigger re-rendering from that change because the object is being changed with the same reference. A major issue with this is due to the asynchronous nature of the state – any pending state change could easily override these direct modifications.
Solution
To update the state, use either the setState() method in class-based components or the useState() hook with functional components. These methods ensure that the changes are recognized by React, and the DOM is re-rendered accordingly.
We can rewrite the previous example to work as expected with the useState() method. We also use map() and spread syntax to avoid accidentally mutating other state values.
const modifyCarsList = (element, id) => {
  const { checked } = element.target;
  setcarsList((cars) => {
    return cars.map((car, index) => {
      if (id === index) {
        car = { ...car, checked };
      }
      return car;
    });
  });
};
3. Remember that setState is asynchronous
In the previous tip, we learned that we should use setState() to modify our application's state. However, setState() is not synchronous! That means any modifications do not take effect immediately and may take effect on the next render. This is true for useState() (React Hooks) as well. React can also batch multiple update calls together to optimize performance. It does this automatically. Therefore, accessing a state value right after setting it might not retrieve the most accurate results.
For example:
handleCarsUpdate = (carCount) => {
  this.setState({ carCount });
  this.props.callback(this.state.carCount); // Old value
};
Solution
You can fix this issue by providing an optional second parameter to setState(), which is a callback function. This callback function is called after the state is updated with your change.
For example:
handleCarsUpdate = (carCount) => {
  this.setState({ carCount }, () => {
    this.props.callback(this.state.carCount); // Updated value
  });
};
However, the process differs slightly for React Hooks because they don't expose a callback argument similar to setState(). In this case, we can use the useEffect() hook to achieve the same result.
For example:
const [carCount, setCarCount] = useState(0);

//useEffect is invoked whenever the value of carCount changes
useEffect(() => {
  callback(carCount);
}, [carCount, callback]);

const handleChange = (value) => {
  setCarCount(value);
};
4. Don't use navigate to go back to the previous page
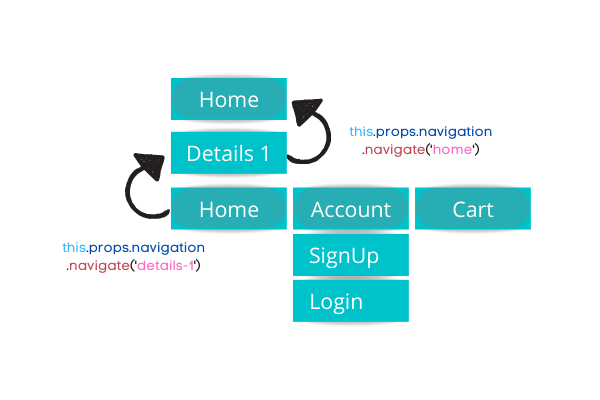
This gotcha is only relevant to you when you’re using React Native and the react-navigation library with it. One of the most common mistakes developers make while using react-navigation is how they go back and forth between pages. The navigate() method always creates a new instance of the page. Using navigate() is perfectly fine if you are navigating to an entirely new page. However, if you intend to go back to a previous page (the page from which you came), using navigate() would create a new instance that is unnecessary and adds overhead to your app. This overhead adds up in large-scale applications, hurting performance.
Here is an example of a component called Home. It has a button that navigates to a page called Details.
class Home extends React.Component {
  goToDetailPage = () => {
    this.props.navigation.navigate("details-1");
  };

  render() {
    return <button onClick={this.goToDetailPage}>Visit Detail Page</button>;
  }
}
Here’s the Details page. It’s got a button that allows you to return to the Home page using the same navigate method.
class Details1 extends React.Component {
  goBackToHomePage = () => {
    this.props.navigation.navigate("home");
  };

  render() {
    return (
      <button onClick={this.goBackToHomePage}>Go Back to Home Page</button>
    );
  }
}
The above code results in a duplicated stack like this:

Solution
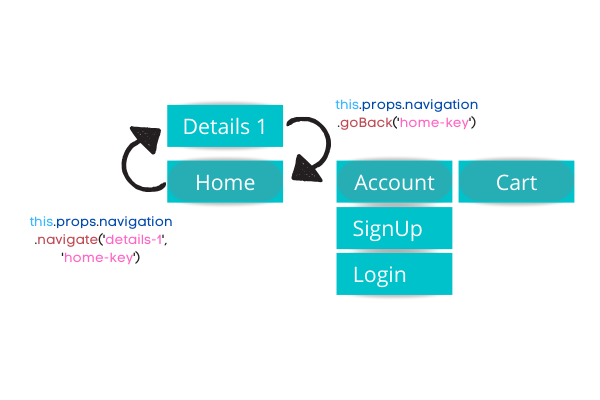
Whenever you intend to go back to a page, use the goBack() method instead, including the unique key of the page you want to navigate to. In this case, React won’t duplicate the instance - instead, it will re-render the instance that is already present in the stack.
Continuing the example from the Home component above, you can have a button to navigate to the Details page and provide the Home page's key at the same time.
class Home extends React.Component {
  goToDetailPage = () => {
    this.props.navigation.navigate("details-1", "home-key");
  };

  render() {
    return <button onClick={this.goToDetailPage}>Visit Detail Page</button>;
  }
}
Then, from the Details page, this time you can use the goBack() method.
class Details1 extends React.Component {
  goBackToHomePage = () => {
    this.props.navigation.goBack("home-key");
  };

  render() {
    return (
      <button onClick={this.goBackToHomePage}>Go Back to Home Page</button>
    );
  }
}
Now the stack will be utilized without duplicating the Home instance.

5. Never leave console.log statements in production!
This gotcha is controversial, but worth forming your own opinion on. Many of us debug our software using console.log() statements. But did you know that console statements are synchronous? Due to their synchronous nature, when left in your code, they can cause serious performance issues. The issue also exists with external debug libraries such as redux-logger.
Solution
One possible solution is to make sure no console.log statements end up in your production build. However, this is easier said than done. To help with this, you could install and set-up ESlint in your React project. ESlint is the ubiquitous linter for JavaScript frameworks. ESlint enables you to keep your code cleaner by enforcing several industry-standard rules for how you should write your code.
After that, you can add a no-console rule in your project's .eslintrc.js file and you’re done:
module.exports = {
  rules: {
    "no-console": "on",
  },
};
6. Don't pass a number as a string when passing props
The component in the example below expects position as a prop. It also asserts that position should be a number:
class Winner extends React.Component {
  render() {
    return (
      <h1>
        Hello, you came {this.props.position === 1 ? "First!" : "Last!"} .
      </h1>
    );
  }
}
Because we're making a strict comparison above, anything that is not a number, and not exactly equal to 1, would trigger the secondary expression of this ternary operator and print "Last!" even if we pass it in as a string – "1".
const element = <Winner position="1" />; //would still print "Last" instead of "First."
Solution
Instead, wrap the input around curly brackets.
const element = <Winner position={1} />; //would print "First."
Whenever you are using a component that takes a number as a prop, make sure you keep the types of your props consistent to avoid unnecessary code bloat, overhead and possible mistakes. You should also consider adding libraries that help type and lint your projects like React's own PropTypes, Typescript or Flow.
What’s next?
Apart from reading the official React documentation (and doing more of your own research), incorporating these suggestions are the first steps in writing a cleaner and better-performing application.
While you’re here, check out how to enhance your React apps with a rich text editor.

