The noneditable class is a useful UI customization feature of TinyMCE, and is available whether you’re self-hosting or using the cloud-based version. Its purpose is clear: to mark specific elements as not editable by your authors.
When you have parts of your content that you don’t want your authors to edit, incorporating the noneditable class with your TinyMCE configuration can be incredibly useful.
For example, when exploring the “template” plugin in another post, one example was using templates for letter responses. Maybe your letters need to include specific statements for legal reasons – that’s a great opportunity to use noneditable. The class gives your users the ability to edit the letter content, but prevents them from editing the must-never-change legal statements.
This post demonstrates how the noneditable class provides a solution for making noneditable elements, and shows how TinyMCE is effortlessly customizable.
Basic noneditable configuration
Theexamples in the following sections use a TinyMCE demo to show you the steps involved when configuring noneditable classes. You can follow along with the steps to get an idea of the customization involved.
To create the TinyMCE demo, first you’ll need an API key. This key gives you free access to TinyMCE Premium plugins for 14 days. Navigate to the Get-tiny sign up page to get your FREE API key.
-
Create an index.html file, and add the following HTML:
<!DOCTYPE html>
<html lang="en">
<head>
    <meta charset="UTF-8">
    <meta http-equiv="X-UA-Compatible" content="IE=edge">
    <meta name="viewport" content="width=device-width, initial-scale=1.0">
    <title>TinyMCE Demo</title>
</head>
    <body>
    </body>
</html>- With your file open, in the head section, add script tags, and reference TinyMCE Cloud through a CDN link within the script tags. This is what the link looks like:
<script
  src="https://cdn.tiny.cloud/1/your-api-key/tinymce/6/tinymce.min.js"
  referrerpolicy="origin"
></script>;
Note: For the Tiny Cloud connection, creating an account with TinyMCE gets you a FREE API key. When you use this key, you get access to Premium TinyMCE plugins for 14 days, as well as no warning messages concerning API keys in the text area.
-
Add another pair of script tags, add the following JavaScript. It’s the tinymce.init method, and it’s how you control TinyMCE:
<script>
   tinymce.init({
   selector: '#editor',
   plugins: 'powerpaste casechange searchreplace autolink directionality advcode visualblocks visualchars image link media mediaembed codesample table charmap pagebreak nonbreaking anchor tableofcontents insertdatetime advlist lists checklist wordcount tinymcespellchecker editimage help formatpainter permanentpen charmap linkchecker emoticons advtable export autosave',
   toolbar: 'undo redo print spellcheckdialog formatpainter | blocks fontfamily fontsize | bold italic underline forecolor backcolor | link image | alignleft aligncenter alignright alignjustify lineheight | checklist bullist numlist indent outdent | removeformat',
   height: '700px'
       });
</script>-
Add initial HTML content in the file body. This includes the CSS selector class that TinyMCE transforms. The id with the value “editor” is currently set in the TinyMCE init script. You can change the selector to fit your specific application.
Here’s the content to add between the body tags:
<form id="post">
     <textarea id="editor">Hello, World!</textarea>

</form>;
-
Test run the index.html file by opening it in your browser, or use a local server command with Python or with the PHP command:

Configuring the noneditable class
-
In the TinyMCE init script, add the noneditable_class option:
  tinymce.init({
        selector: '#editor',
        //skipped for brevity.
        height: '700px',
noneditable_class: 'nonedit',-
Specify an editable class as well with the editable class option, which appears later on in the following sections:
tinymce.init({
   selector: '#editor',

   //skipped for brevity.

   height: '700px',
   noneditable_class: 'nonedit',
editable_class: 'editcontent'-
Save the changes.
Making textarea elements noneditable
By default, everything within the editor instance is editable.
However, by using the noneditable class, you can make specific elements of content noneditable by the user. Generally, noneditable elements aren’t something the majority of users can create themselves, and they’d come from markup generated by a custom plugin (that you’d have written), or from markup in the templates plugin.
The editability state of an element is controlled by whether the element has the noneditable class applied to it. if your project has a different naming approach, you can change noneditable_class to the class that you need. This means that any element that has the class won’t be editable within the TinyMCE editor.
This is a great feature to have for sections of content that you may not want your authors to be able to change.
For example, in a scenario where customers write letters based on a set of predefined templates. These could include specific legal statements required by your industry. You could wrap those statements with the noneditable_class, and prevent authors from making changes to those, while still allowing them to work around the block and personalize the letter for the recipient.
Making textarea elements editable
Now that you understand how to make an element noneditable, did you also know that you can make specific child elements editable? That is, you can set up a noneditable block, and then include child elements inside the blog that writers can edit:
-
Add the following contents inside the demo textarea tags:
<div class=”nonedit”>
  <p>This can’t be edited</p>
  <p class=”editcontent”>This can be edited, even though it is nested under an noneditable parent</p>
</div>-
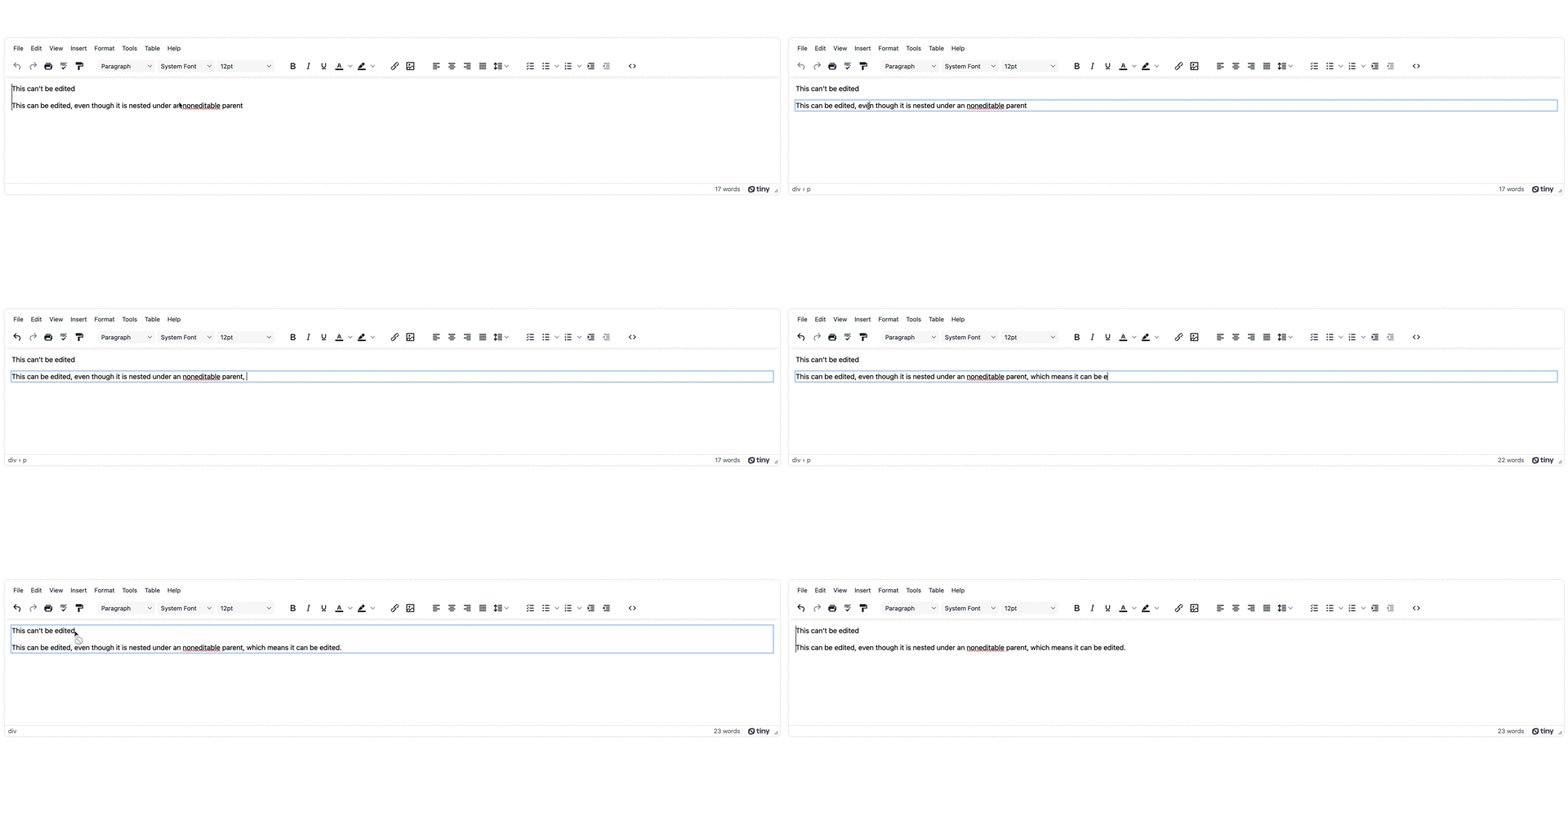
Reload the demo, and check on the second sentence. You can edit the content because of the editable class:
 The editable class set up in the demo earlier has set up the child element to be editable. If you want to make moreintricate documents (that combine editable and noneditable blocks), the editable class is your best bet.
Combining noneditable with editable
So when would you actually need to combine the two classes? Here’s an example: imagine your template is a table. That table includes set column dimensions and heading cells, but can be made up of many rows. You want the headings to be noneditable, and at the same time, you want customers to be able to modify table row contents.
Making the table noneditable means nothing can be changed – cells can’t be adjusted and rows can’t be added. However, you can make the <table> element noneditable, and make specific <tr> and <td> elements within the table editable.
An HTML table is made up of:
- An outer <table> element
- Within the outer element, a <thead>, <tbody> and <tfoot> to give it structure
- Within the head and body elements, <tr> and <td> elements define the rows and cells.
The following example is for a quote or an invoice:
-
Copy the following is example table into the demo’s textarea tags (it does not yet have any editable or noneditable classes set up):
<table>

  <thead>

    <tr>
             <th style="width:60%;">Item</th>
             <th style="width:10%;">Quantity</th>
             <th style="width:15%;">Cost</th>
             <th style="width:15%;">Subtotal</th>

    </tr>

  </thead>

  <tbody>

    <tr>
             <td>Item 1</td>
             <td>2</td>
             <td>$10.00</td>
             <td>$20.00</td>

    </tr>

  </tbody>

  <tfoot>

    <tr>
             <td colspan="3">Total</td>
             <td>$20.00</td>

    </tr>

  </tfoot>
</table>;
When writers use this table, to protect the headings but keep the rows and cells open for editing, you can adjust the classes like this:
-
Add the noneditable class to the <table> element:
<table class=”nonedit”>-
Add the editable class to the elements to be edited:
-
Given the goal is to ensure that authors can add rows, that means the <tbody> element must have the editable class:
-
<tbody class='editcontent'>-
Also, make the cell that contains the total editable as well:
<tr>
    <td colspan="3">Total</td>
<td class='editcontent'>$20.00</td>-
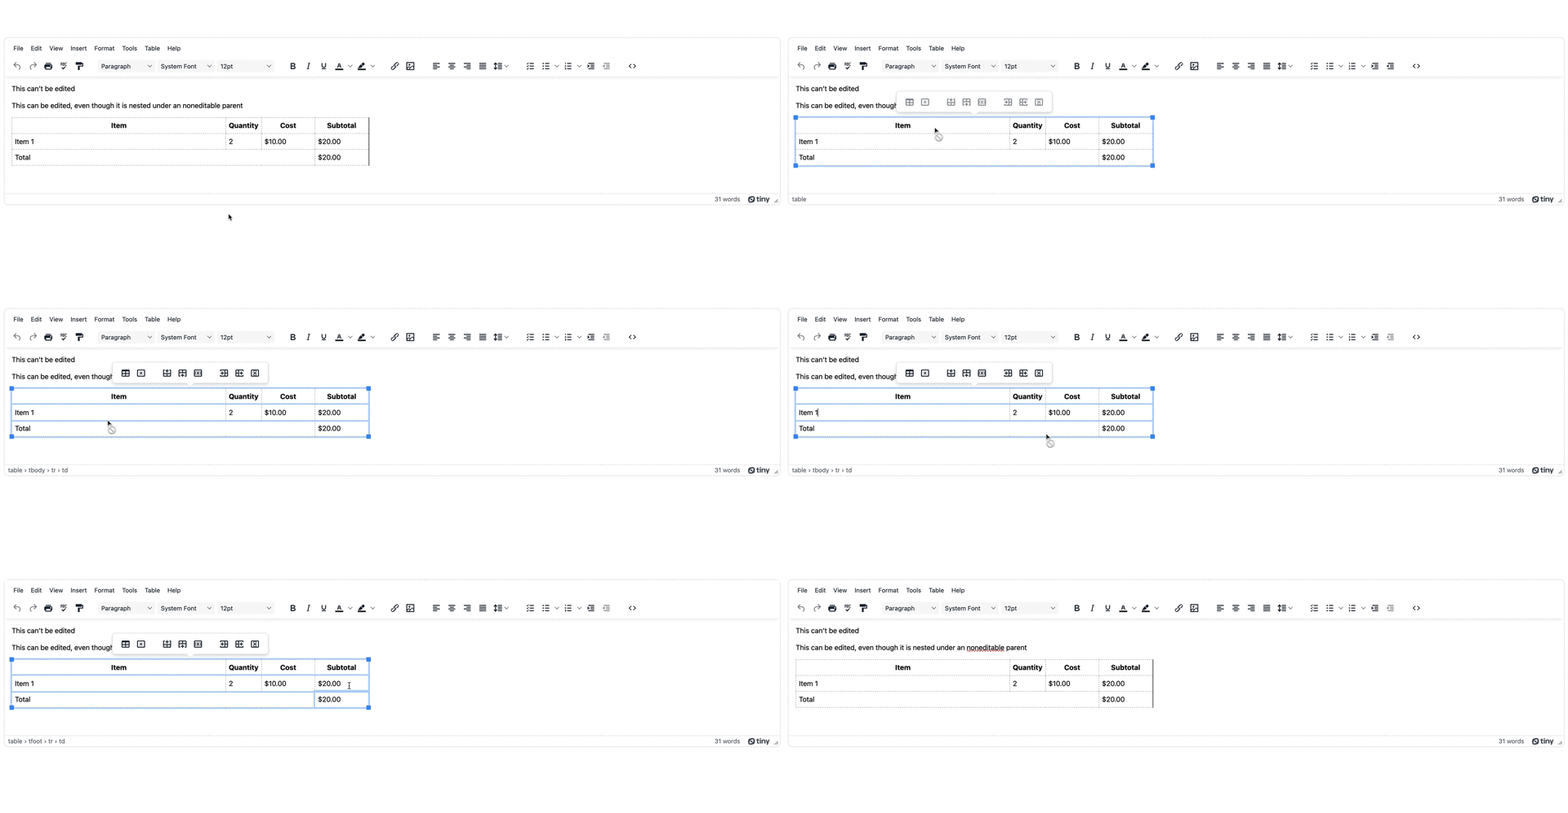
Save the changes, and test out the new table:

This gives authors the ability to change the areas you want them to be able to – but also preserve the overall layout and structure of our table. Here’s a complete example:
When would you use this?
Implementing noneditable (and editable) sections is a matter of adding classes, setting up templates, or making use of other methods like TinyMCE’s APIs to add content with specific classes. When to use it is a little more complicated, and varies based on the needs of your project.
If your organization has specific legal requirements or statements that must be included in communications, then by making these section noneditable, it ensures you’re meeting your legal obligations.
It could even be simpler than that. You may have specific style guidelines around how letters are authored. Your set structure could have a greeting and salutation (and noneditable, populated by your CRM or system or even replacing values using the templates plugin). Configure the mceNonEditable and mceEditable options, and only allow parts of the letter to be changed. Other parts are lock to strictly follow your style guide.
What about the Code plugin?
Using the Code plugin, an author can view the editor content’s source code. They can also edit the source code. This means that the classes that define noneditable content could be overwritten or deleted, making content editable again.
One way to try to overcome this is to carefully consider your TinyMCE configurations, and even tie some plugins to specific user permissions or roles. For example, the Code plugin toolbar button and menu option may only appear for advanced users or managers, and is absent for day to day content authors. For example, here’s a simple and advanced configuration.
Custom styling for TinyMCE noneditable elements
If you’re using the noneditable class, remember that it’s just that – a class, and you can style elements with classes using the content_css styles. For instance, here’s an example:
This is a handy way to provide visual cues as to what they can and cannot edit. Even with nested content, you can then apply styles if you need to highlight the editable areas of the content.
Final noneditable thoughts
The control freak in me likes things to be a certain way. And making parts of my user’s content noneditable keeps the parts I really care about fully intact.
This is such a powerful technique to use when paired with templates – giving your authors the ability to change the parts that you want them to, but also locking down specific areas for your organization’s legal, brand and style requirements.
If you’re already using templates, maybe take a look at your template code to see if noneditable is a good fit for your users. It might even just scratch that control freak itch inside you too.
